

MyBatis 简介
MyBatis 是一款优秀的持久层框架,它支持自定义 SQL、存储过程以及高级映射。MyBatis 免除了几乎所有的 JDBC 代码以及设置参数和获取结果集的工作。MyBatis 可以通过简单的 XML 或注解来配置和映射原始类型、接口和 Java POJO(Plain Ordinary Java Objects,简单 Java 对象)为数据库中的记录。
参考自 MyBatis 的官方简介。
MyBatis 作为一款优秀的持久层框架,具有如下优点:
- 小巧并且简单易学。
- 相比于 JDBC 减少了大量冗余的代码。
- 将 SQL 语句与程序代码进行分离,降低了耦合,便于管理。
- 提供 XML 标签,支持编写动态 SQL 语句。
- 提供映射标签,支持 Java 对象的属性与数据表字段的映射关系。
MyBatis 实践
下面我们创建一个 Spring Boot 项目,整合 MyBatis,实现简单的 CRUD 功能。
1. 引入依赖
POM 文件如下:
    4.0.0

        org.springframework.boot
        spring-boot-starter-parent
        2.5.6

    com.example
    springboot-mybatis
    0.0.1-SNAPSHOT
    springboot-mybatis
    Demo project for Spring Boot

        1.8

            org.springframework.boot
            spring-boot-starter-web

            mysql
            mysql-connector-java
            runtime

            org.mybatis.spring.boot
            mybatis-spring-boot-starter
            2.2.0

            org.springframework.boot
            spring-boot-starter-jdbc

            org.springframework.boot
            spring-boot-devtools
            runtime
            true

            org.projectlombok
            lombok
            true

            org.springframework.boot
            spring-boot-starter-test
            test

                org.springframework.boot
                spring-boot-maven-plugin

                            org.projectlombok
                            lombok
2. 配置 MySQL 和 MyBatis
配置文件 application.yml 的内容如下:
配置 MySQL
spring:
  datasource:
    url: jdbc:mysql://localhost:3306/test?serverTimezone=UTC
    username: root
    password: 123456
    driver-class-name: com.mysql.cj.jdbc.Driver

配置 MyBatis
mybatis:
  mapper-locations: classpath:mapper/*
  type-aliases-package: com.example.entity
  configuration:
    map-underscore-to-camel-case: true
MyBatis 的配置项中:
mapper-locations:用来指定 mapper.xml 文件的路径,该文件用于编写 SQL 语句。type-aliases-package:用来设置别名,它的作用是告诉 MyBatis 需要设置别名的实体类的所在的包。默认情况下,MyBatis 会使用实体类的非限定类名来作为它的别名,如将com.example.entity.User的别名设置为User或user(别名不区分大小写)。当然,MyBatis 也支持自定义别名,这个我们在后文中再聊。map-underscore-to-camel-case:用来开启驼峰命名自动映射,如将数据表中的字段 user_name 映射到实体对象的属性 userName。
3. 实体类
编写简单的 User 类:
package com.example.entity;

import lombok.Data;

import java.util.Date;

/**
 * @Author john
 * @Date 2021/11/14
 */
@Data
public class User {

    private long id;

    private String userName;

    private int age;

    private String address;

    private Date createTime;

    private Date updateTime;
}
User 类中封装了用户的 id、姓名、年龄、地址、创建时间以及修改时间等信息。
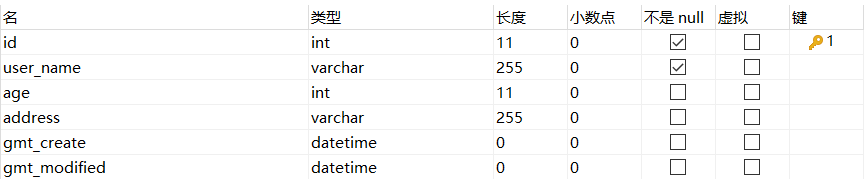
4. 创建 user 表
user 表的字段设计如下:

5. 编写 Mapper 接口和 mapper 文件
首先编写 UserMapper 接口:
package com.example.mapper;

import com.example.entity.User;

/**
 * @Author john
 * @Date 2021/11/16
 */
public interface UserMapper {

    void insertUser(User user);

    User findUserById(long id);
}
接口中定义了两个方法,insertUser 用来向数据表中插入一条记录,findUserById 用来通过 id 查询 User。
上述操作完成后,我们在 resources 文件夹中创建 mapper/user-mapper.xml 文件(文件路径在配置文件 application.yml 中设置)。user-mapper.xml 文件的内容如下:
        user_name, age, address, gmt_create, gmt_modified

        id, user_name, age, address, gmt_create, gmt_modified

        select

        from user
        where id = #{id}

        insert into user ()
        values(#{userName}, #{age}, #{address}, UTC_TIMESTAMP(), UTC_TIMESTAMP())
可以看到,Mapper 接口中定义的是 CRUD 相关的方法,mapper.xml 文件中定义的是具体的 SQL 语句。MyBatis 允许我们将 Mapper 接口与 mapper.xml 文件关联在一起,这样当调用 Mapper 接口中的方法时,实际的处理逻辑为执行 mapper.xml 文件中对应的 SQL 语句。关联 Mapper 接口和 mapper.xml 文件时需要保证:
- Mapper 接口的全限定名对应 mapper.xml 文件的 namespace 值。
- Mapper 接口的方法名对应 statement(每一个 SQL 就是一个 statement)的 id 值。
- Mapper 接口中方法接收的参数对应 statement 的入参。
- Mapper 接口中方法的返回值对应 statement 的出参。
下面介绍一下 mapper.xml 文件中几个重要标签的含义:
<sql></sql>标签:用于定义复用的 SQL 片段,如果多个 SQL 需要操作相同的字段集,那么就可以使用<sql></sql>标签将这些字段提取出来,然后在 SQL 语句中直接引用即可。引用的语法为<include refid=" "></include>,其中 refid 的值就是<sql></sql>的 id 值。<resultmap></resultmap>标签:用于创建数据表字段与实体属性的映射关系,在查询操作中,MyBatis 会根据查询到的字段名找到 POJO 对应的属性名,然后调用该属性的 setter 方法进行赋值。如果数据表的字段名与实体类的属性名完全相同,或者符合驼峰式命名映射的规则,那么 MyBatis 可以直接完成赋值操作。否则的话,就需要我们使用<resultmap></resultmap>标签创建自定义的映射规则,告诉 MyBatis 字段和属性之间应该如何映射。本实验中,user 表的 id 会自动映射为 User 对象的 id,user 表的 user_name 也会自动映射为 User 对象的 userName。但是 gmt_create 和 gmt_modified 不会映射为 createTime 和 updateTime,因为字段名和属性名既不完全一致,也不符合驼峰式命名映射的规则,所以这里我们需要使用<resultmap></resultmap>来创建新的映射关系,其中属性 id 用于指明该 resultMap 的标志,属性 type 用于指明映射的实体类。<select></select>标签:用于执行查询操作。<insert></insert>标签:用于执行插入操作。
实际上,MyBatis 赋值时不一定会调用实体类属性的 setter 方法,因为我们在编码时可能并没有添加该方法。以 User 类的属性 id 为例,如果我们添加了 setId 方法,那么 MyBatis 会通过反射获取到 setId 对应的 MethodInvoker,然后调用 setId 方法为 id 赋值;如果未设置 setId 方法,那么 MyBatis 会获取属性 id 对应的 SetFieldInvoker,然后为属性赋值。详见 MetaObject 类的 setValue 方法。
接下来介绍 SQL 语句中几个重要属性的含义:
- parameterType:用于指定 SQL 语句的入参类型(可以是基本数据类型或者 JavaBean),该类型需要与对应的接口方法的入参类型一致。如果我们设置了别名,那么也可以使用别名作为参数,例如使用
User或user代替com.example.entity.User。 - resultMap:用于指定 SQL 语句的出参类型,以 insertUser 方法为例,在 Mapper 接口中,该方法的返回值为 User 类型,所以对应的 SQL 语句的返回值也应为 User 类型,由于 User 对象需要使用
<resultmap></resultmap>进行属性映射,所以我们将自定义的UserMap来作为 SQL 语句的返回值类型。 - keyProperty:用于指定主键在 POJO 中对应的属性名,需要配合数据库的自增主键来使用。以 user 表为例,我们在建表的时候将表的主键 id 设置为了数据库自增 id,因此在将 User 对象持久化到数据库之前不需要为属性 id 设置初始值,MySQL 会自动帮我们赋值,keyProperty 的作用就是告诉 MyBatis 哪个属性是主键。
除了 resultMap 外,resultType 属性也可用于指定出参类型。如果我们将 user 表中的字段 gmt_create 和 gmt_modified 分别改为 create_time 和 update_time,那么就不需要使用 <resultmap></resultmap> 标签来配置映射规则,因为 user 表的所有字段都可以和 User 对象的属性一一对应,这样在 SQL 语句中,就可以将 resultMap="UserMap" 替换为 resulType="User" 或 resulType="user"。另外,在本实验中,resultMap 标签也可以定义为:
因为其他字段会自动映射,不需要额外书写。
6. 编写 Service
创建 UserService:
package com.example.service;

import com.example.entity.User;
import com.example.mapper.UserMapper;
import org.springframework.beans.factory.annotation.Autowired;
import org.springframework.stereotype.Service;

/**
 * @Author john
 * @Date 2021/11/16
 */
@Service
public class UserService {

    @Autowired
    private UserMapper userMapper;

    public void insertUser(User user) {
        userMapper.insertUser(user);
    }

    public User findUserById(long id) {
        return userMapper.findUserById(id);
    }
}
在 UserService 中注入 UserMapper 对象,并调用相关方法来添加/查询 User。
为了能够正常注入 UserMapper 对象,我们还需要再启动类上添加 @MapperScan 注解,并指定 Mapper 接口所在的包:
package com.example;

import org.mybatis.spring.annotation.MapperScan;
import org.springframework.boot.SpringApplication;
import org.springframework.boot.autoconfigure.SpringBootApplication;

@SpringBootApplication
@MapperScan("com.example.mapper")
public class SpringbootMybatisApplication {

    public static void main(String[] args) {
        SpringApplication.run(SpringbootMybatisApplication.class, args);
    }

}
com.example.mapper 包下的所有 Mapper 接口都会被 Spring 扫描。
除了在启动类上添加 @MapperScan 注解外,还可以在 Mapper 接口上直接添加 @Mapper 注解,这种方法相对比较麻烦,因为实际中我们可能会有多个 Mapper 接口,这样就需要添加多个注解。
7. 测试
编写测试接口:
package com.example;

import com.example.entity.User;
import com.example.service.UserService;
import org.junit.jupiter.api.Test;
import org.springframework.beans.factory.annotation.Autowired;
import org.springframework.boot.test.context.SpringBootTest;

@SpringBootTest
class SpringbootMybatisApplicationTests {

    @Autowired
    private UserService service;

    @Test
    public void addUser(){
        User user = new User();
        user.setUserName("John");
        user.setAge(24);
        user.setAddress("BUPT");
        service.insertUser(user);
    }

    @Test
    public void findUser(){
        System.out.println(service.findUserById(1));
    }
}
首先执行 addUser() 方法,执行成功后查询数据表,得到如下信息:

然后执行 findUser() 方法,执行结果如下:

至此,SpringBoot 整合 MyBatis 测试成功!
MyBatis 设置别名的方式
方式一:在配置文件 application.yml 中添加配置。
yml 文件的配置内容如下:
mybatis:
  type-aliases-package: com.example.entity
本实验采用此种方式设置别名,默认情况下实体类的别名为其类名,严格来说是首字母小写的非限定类名,由于别名不区分大小写,所以 User、 user、 uSer 的效果都是相同的。
MyBatis 也支持自定义别名,我们只需要在实体类上添加 @Alias 注解,就可以为其设置别名:
package com.example.entity;

import lombok.Data;
import org.apache.ibatis.type.Alias;

import java.util.Date;

/**
 * @Author john
 * @Date 2021/11/14
 */
@Data
@Alias("hello")
public class User {

    private long id;

    private String userName;

    private int age;

    private String address;

    private Date createTime;

    private Date updateTime;
}
上述代码中,我们将 User 类的别名设置为了 hello。注意,若要使 @Alias 注解生效,必须配置 type-aliases-package 来指定实体类的包路径。另外,@Alias 会使默认的别名变得无效,例如在本实验中,User 类的别名只能是 hello,而不能是 User 或 user 等。
方式二:使用 MyBatis 的配置文件 filename.xml。
首先在 yml 文件中设置 MyBatis 配置文件 filename.xml(filename 是配置文件的名称)的路径:
配置MyBatis
mybatis:
  mapper-locations: classpath:mapper/*
  config-location: classpath:mybatis/mybatis-config.xml #MyBatis配置文件
然后在 resource 文件夹下创建 MyBatis 的配置文件 mapper/mybatis-config.xml(路径和文件名在 config-location 中设置),配置文件内容如下:
几个重要标签的含义为:
<setting></setting>标签:用于开启驼峰命名映射,其效果与在 yml 文件中配置map-underscore-to-camel-case: true是相同的。<typealiases></typealiases>标签:用于配置别名,子标签<package></package>可以让 MyBatis 扫描指定包下的实体类,其效果与在 yml 文件中配置type-aliases-package: com.example.entity是相同的。
在方式一中,我们可以使用 @Alias 注解自定义别名,而在方式二中,我们可以通过 <typealiases></typealiases> 的子标签 <typealias></typealias> 来设置别名:
<typealias></typealias> 标签不需要配置 type-aliases-package 就可以生效,且该标签与 <package></package> 标签并不冲突,也就是说如果我们添加了 <package name="com.example.entity"></package>,那么 User 类的别名既可以是 hello,也可以是 User 或 user 等。当然,方式二中也可以添加 @Alias 注解,但添加了该注解后,User 类的别名只能为 hello 或 @Alias 注解指定的别名。
Original: https://www.cnblogs.com/johnlearning/p/16264689.html
Author: John同学
Title: Spring Boot 整合 MyBatis
原创文章受到原创版权保护。转载请注明出处:https://www.johngo689.com/592866/
转载文章受原作者版权保护。转载请注明原作者出处!