

Lvs
Lvs简介
LVS(Linux Virtual Server)即Linux虚拟服务器,是由章文嵩博士主导的开源负载均衡项目,目前LVS已经被集成到Linux内核模块中。在Linux内核中实现了基于IP的数据请求负载均衡调度方案,终端互联网用户从外部访问公司的负载均衡服务器,终端用户的Web请求会发送给LVS调度器,调度器根据自己预设的算法决定将该请求发送给后端的某台Web服务器,比如,轮询算法可以将外部的请求平均分发给后端的所有服务器,终端用户访问LVS调度器虽然会被转发到后端真实的服务器,但如果真实服务器连接的是相同的存储,提供的服务也是相同的服务,最终用户不管是访问哪台真实服务器,得到的服务内容都是一样的,整个集群对用户而言都是透明的。最后根据LVS工作模式的不同,真实服务器会选择不同的方式将用户需要的数据发送到终端用户,LVS工作模式分为NAT模式、TUN模式、以及DR模式。
VIP RIP
官方站点
体系结构


使用LVS架设的服务器集群系统有三个部分组成:最前端的负载均衡层(Loader Balancer),中间的服务器群组层,用Server Array表示,最底层的数据共享存储层,用Shared Storage表示。在用户看来所有的应用都是透明的,用户只是在使用一个虚拟服务器提供的高性能服务。
Load Balancer层:位于整个集群系统的最前端,有一台或者多台负载调度器(Director Server)组成,LVS模块就安装在Director Server上,而Director的主要作用类似于一个路由器,它含有完成LVS功能所设定的路由表,通过这些路由表把用户的请求分发给Server Array层的应用服务器(Real Server)上。同时,在Director Server上还要安装对Real Server服务的监控模块Ldirectord,此模块用于监测各个Real Server服务的健康状况。在Real Server不可用时把它从LVS路由表中剔除,恢复时重新加入。
Server Array层:由一组实际运行应用服务的机器组成,Real Server可以是WEB服务器、MAIL服务器、FTP服务器、DNS服务器、视频服务器中的一个或者多个,每个Real Server之间通过高速的LAN或分布在各地的WAN相连接。在实际的应用中,Director Server也可以同时兼任Real Server的角色。
Shared Storage层:是为所有Real Server提供共享存储空间和内容一致性的存储区域,在物理上,一般有磁盘阵列设备组成,为了提供内容的一致性,一般可以通过NFS网络文件系统共享数据,但是NFS在繁忙的业务系统中,性能并不是很好,此时可以采用集群文件系统,例如Red hat的GFS文件系统,oracle提供的OCFS2文件系统等。
从整个LVS结构可以看出,Director Server是整个LVS的核心,目前,用于Director Server的操作系统只能是Linux和FreeBSD,linux2.6内核不用任何设置就可以支持LVS功能,而FreeBSD作为 Director Server的应用还不是很多,性能也不是很好。对于Real Server,几乎可以是所有的系统平台,Linux、windows、Solaris、AIX、BSD系列都能很好的支持。
LVS管理工具
ipvs:内核中的协议栈上实现
ipvs是LVS软件核心,是允许在LB(负载均衡层)上,这是个基于ip层的负载均衡
ipvs的总体结构主要有ip包处理,负载均衡算法,系统配置和管理三个模块以及虚拟服务器与真实服务器链表组成。
ipvs管理集群服务管理服务上的RS(real server)。
一个ipvs主机可以同时定义多个cluster server,但可能会影响调度性格。
一个ipvs服务至少应该有一个RS。
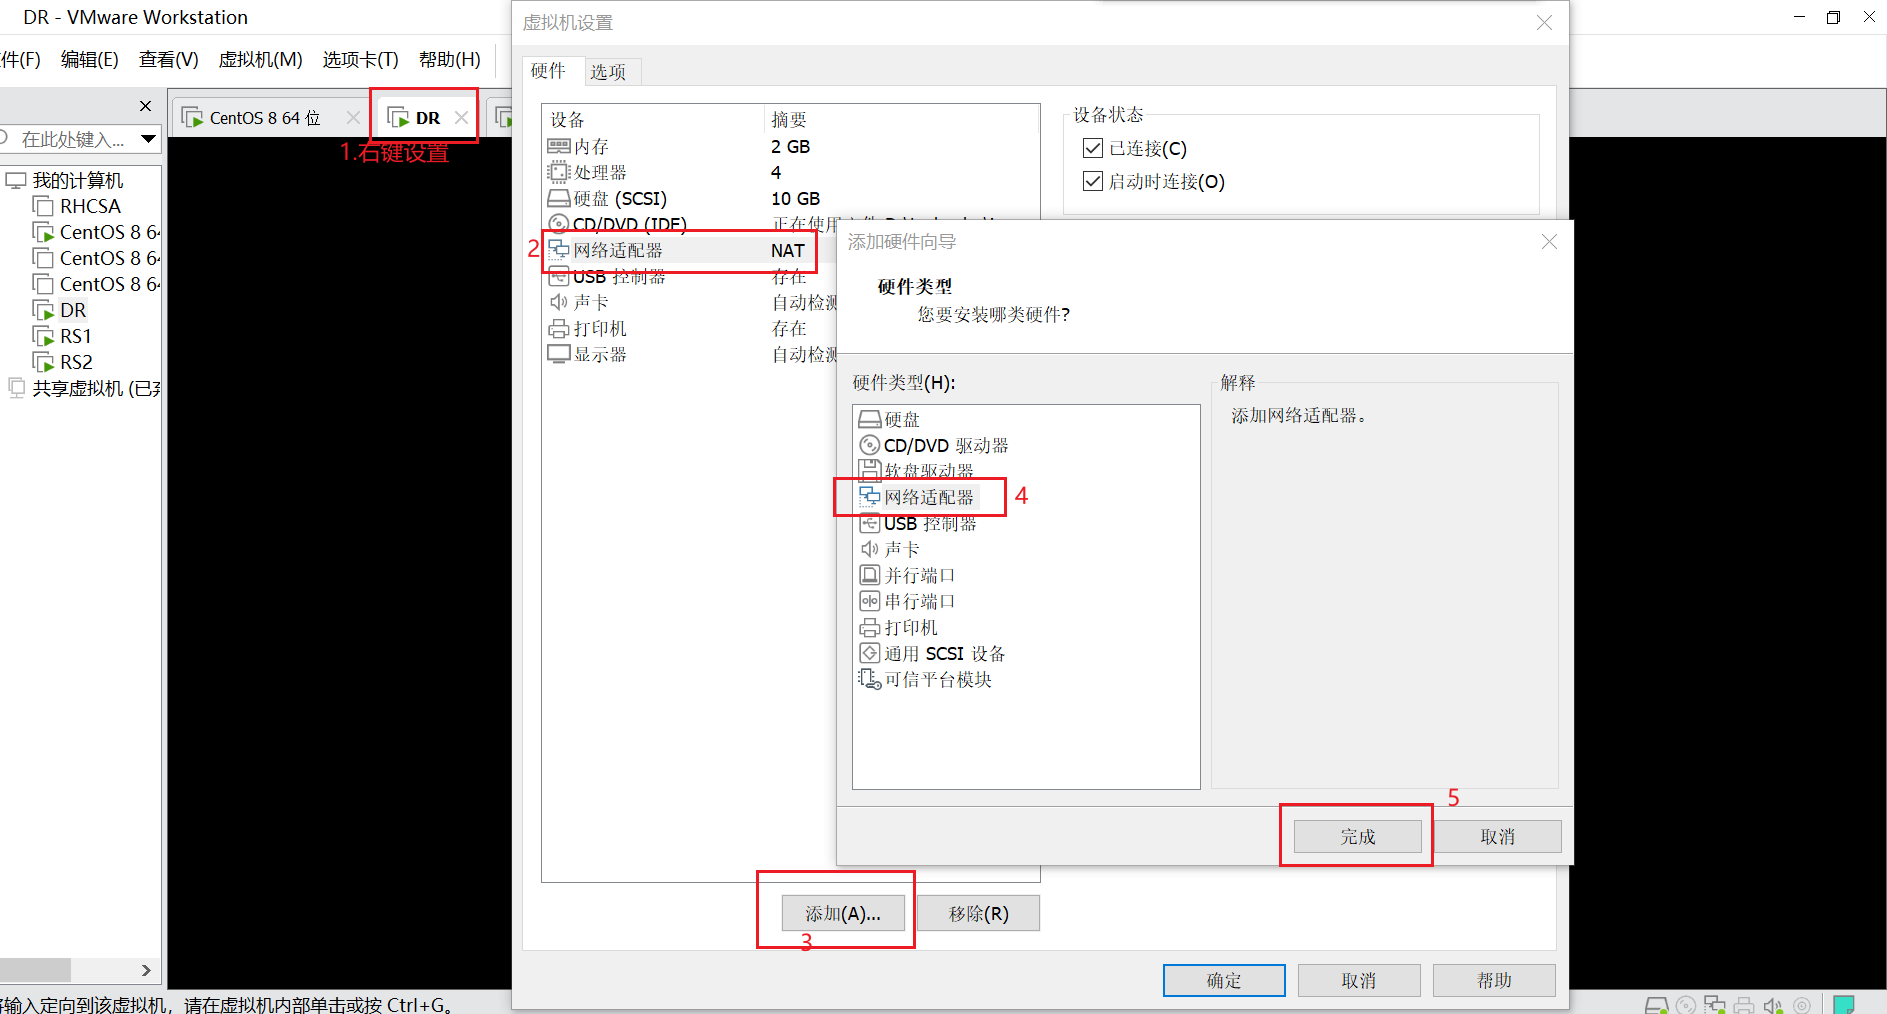
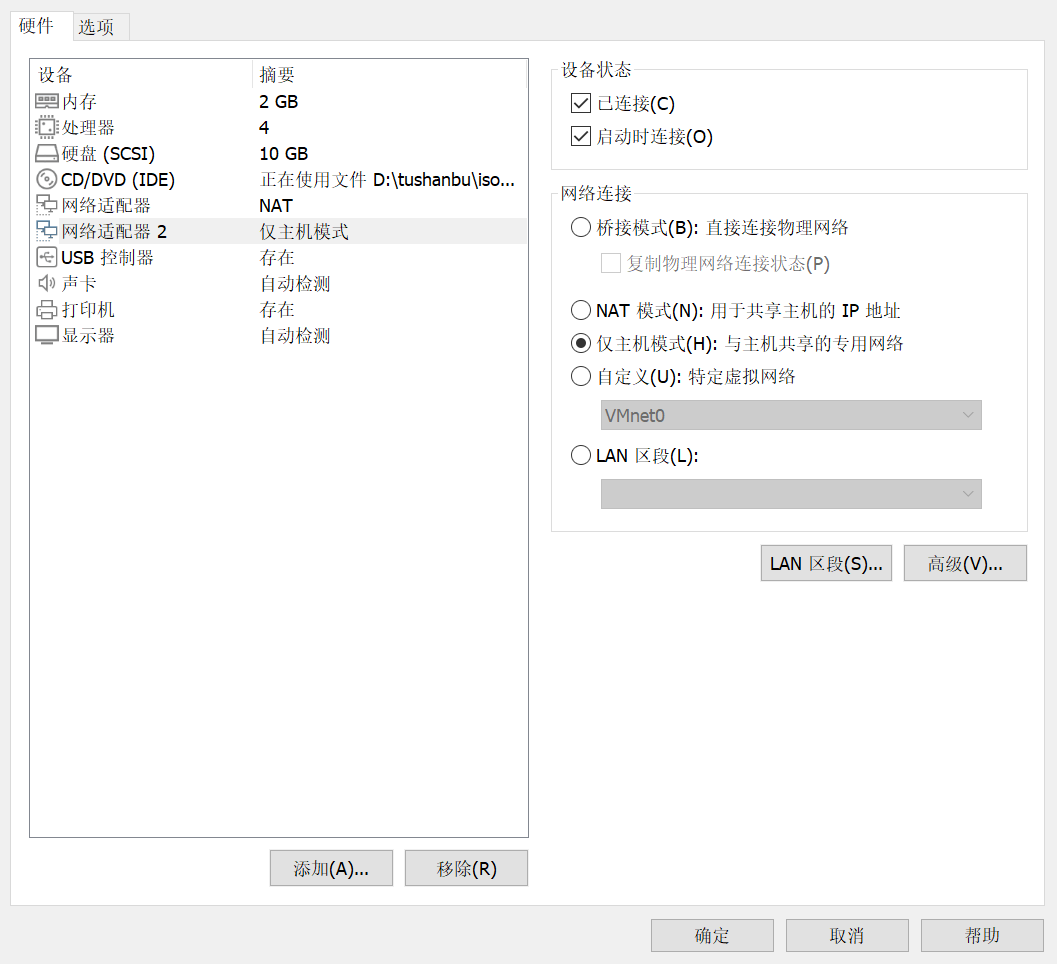
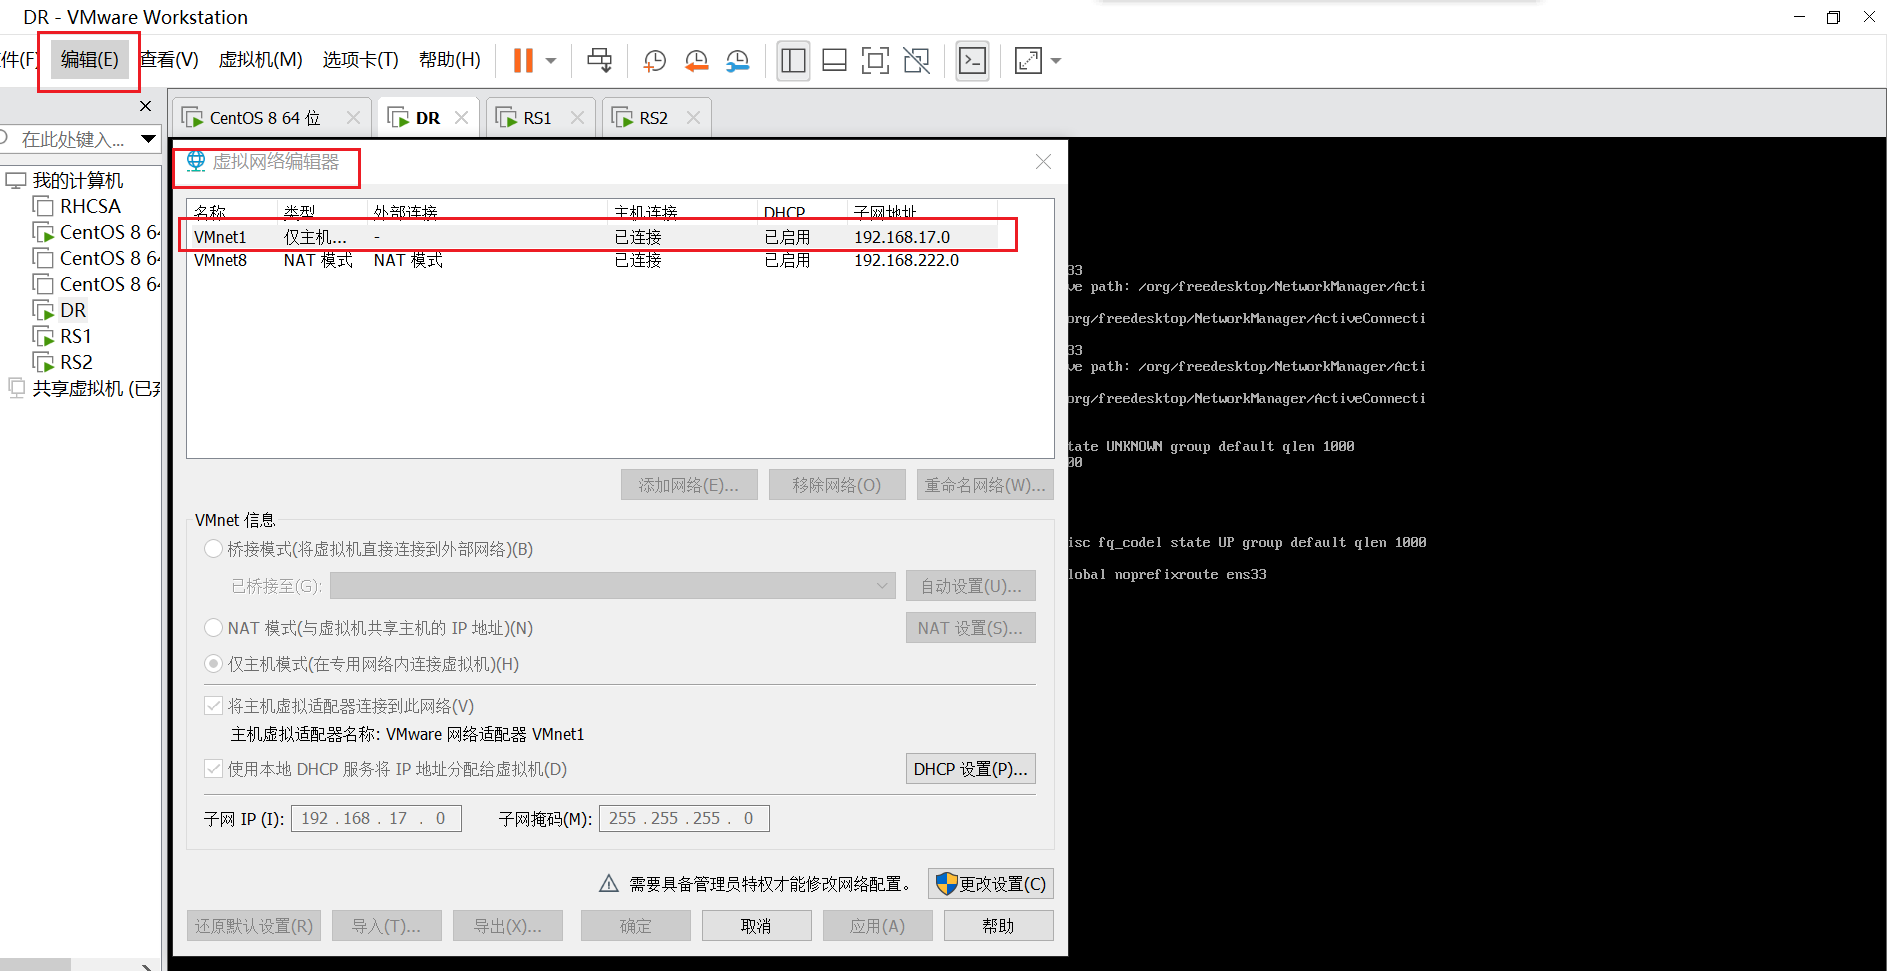
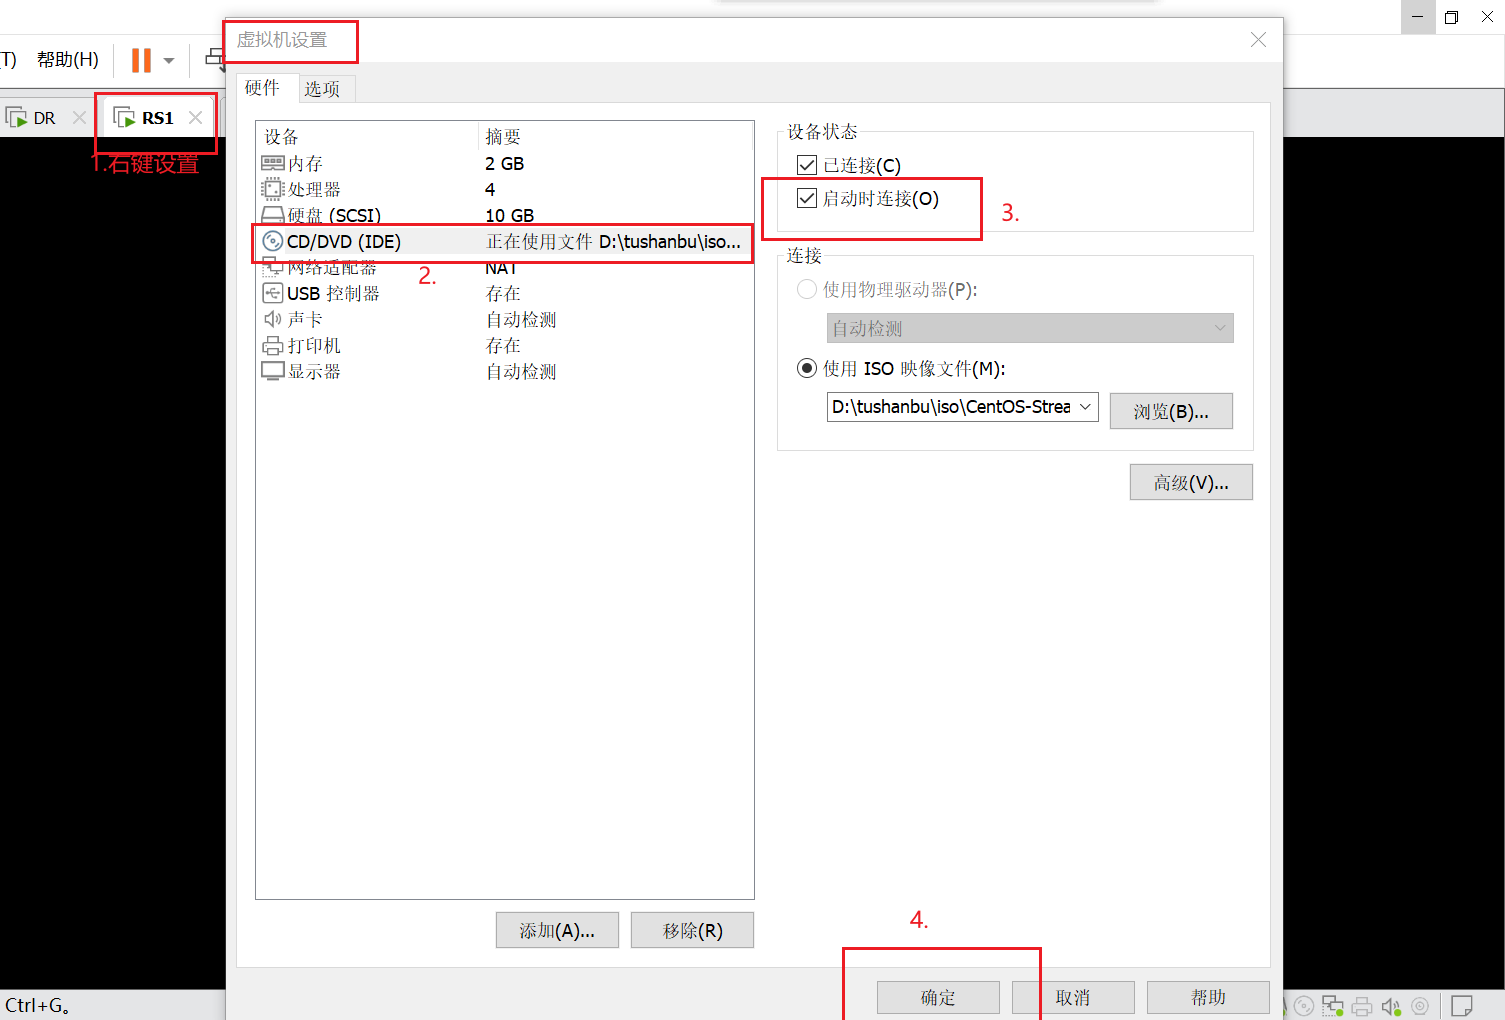
配置 lvs-nat 模式的 httpd 负载集群—http
环境说明:
主机名称 网卡信息 (ens160 为 nat、ens192 为仅主机) 安装应用 系统 Client 客户端 192.168.222.250(ens33) 无 RHEL8 DR DIP:192.168.222.137(ens33)—VIP:192.168.17.10(ens37) ipvsadm RHEL8 RS1 RIP:192.168.222.138(ens33)—gw:192.168.222.137 httpd RHEL8 RS2 RIP:192.168.222.139(ens33)—gw:192.168.222.137 httpd RHEL8
DR、RS1、RS2 三台主机都关闭防火墙和 selinux
[root@DR ~]# systemctl stop firewalld.service
[root@DR ~]# vim /etc/selinux/config
SELINUX=disabled
[root@DR ~]# setenforce 0
[root@DR ~]# systemctl disable --now firewalld.service
Removed /etc/systemd/system/multi-user.target.wants/firewalld.service.

Removed /etc/systemd/system/dbus-org.fedoraproject.FirewallD1.service.

[root@RS1 ~]# systemctl stop firewalld.service
[root@RS1 ~]# vim /etc/selinux/config
SELINUX=disabled
[root@RS1 ~]# setenforce 0
[root@RS1 ~]# systemctl disable --now firewalld.service
Removed /etc/systemd/system/multi-user.target.wants/firewalld.service.

Removed /etc/systemd/system/dbus-org.fedoraproject.FirewallD1.service.

[root@RS2 ~]# systemctl stop firewalld.service
[root@RS2 ~]# vim /etc/selinux/config
SELINUX=disabled
[root@RS2 ~]# setenforce 0
[root@RS2 ~]# systemctl disable --now firewalld.service
Removed /etc/systemd/system/multi-user.target.wants/firewalld.service.

Removed /etc/systemd/system/dbus-org.fedoraproject.FirewallD1.service.
配置 ip 信息
DR:
添加ens192网卡信息仅主机

[root@DR ~]# ifconfig    //查看刚刚添加的网卡
ens33: flags=4163<up,broadcast,running,multicast>  mtu 1500
        inet 192.168.222.137  netmask 255.255.255.0  broadcast 192.168.222.255
        inet6 fe80::20c:29ff:fec7:eb2  prefixlen 64  scopeid 0x20<link>
        ether 00:0c:29:c7:0e:b2  txqueuelen 1000  (Ethernet)
        RX packets 122996  bytes 47438695 (45.2 MiB)
        RX errors 0  dropped 0  overruns 0  frame 0
        TX packets 159300  bytes 28724758 (27.3 MiB)
        TX errors 0  dropped 0 overruns 0  carrier 0  collisions 0

ens37: flags=4163<up,broadcast,running,multicast>  mtu 1500
        inet 192.168.17.134  netmask 255.255.255.0  broadcast 192.168.17.255
        inet6 fe80::318:a5d1:6043:25f  prefixlen 64  scopeid 0x20<link>
        ether 00:0c:29:c7:0e:bc  txqueuelen 1000  (Ethernet)
        RX packets 6  bytes 1022 (1022.0 B)
        RX errors 0  dropped 0  overruns 0  frame 0
        TX packets 12  bytes 1468 (1.4 KiB)
        TX errors 0  dropped 0 overruns 0  carrier 0  collisions 0

lo: flags=73<up,loopback,running>  mtu 65536
        inet 127.0.0.1  netmask 255.0.0.0
        inet6 ::1  prefixlen 128  scopeid 0x10<host>
        loop  txqueuelen 1000  (Local Loopback)
        RX packets 0  bytes 0 (0.0 B)
        RX errors 0  dropped 0  overruns 0  frame 0
        TX packets 0  bytes 0 (0.0 B)
        TX errors 0  dropped 0 overruns 0  carrier 0  collisions 0
</host></up,loopback,running></up,broadcast,running,multicast></up,broadcast,running,multicast>
查看刚刚添加网卡的网段
[root@DR ~]# cd /etc/sysconfig/network-scripts/
[root@DR network-scripts]# ls
ifcfg-ens33
[root@DR network-scripts]# vim ifcfg-ens33
[root@DR network-scripts]# cat ifcfg-ens33
TYPE=Ethernet
BOOTPROTO=static
NAME=ens33
DEVICE=ens33
ONBOOT=yes
IPADDR=192.168.222.137
NETMASK=255.255.255.0
GATEWAY=192.168.222.2
DNS1=192.168.222.2
[root@DR network-scripts]# systemctl restart NetworkManager
[root@DR network-scripts]# nmcli connection up ens36
Connection successfully activated (D-Bus active path: /org/freedesktop/NetworkManager/ActiveConnection/3)
[root@DR network-scripts]# cp ifcfg-ens33 ifcfg-ens37
[root@DR network-scripts]# ls
ifcfg-ens33  ifcfg-ens37
[root@DR network-scripts]# vim ifcfg-ens37
[root@DR network-scripts]# cat ifcfg-ens37
TYPE=Ethernet
BOOTPROTO=static
NAME=ens37
DEVICE=ens37
ONBOOT=yes
IPADDR=192.168.17.10
NETMASK=255.255.255.0
GATEWAY=192.168.222.2
DNS1=192.168.222.2
[root@DR network-scripts]# systemctl restart NetworkManager
[root@DR network-scripts]# nmcli connection up ens37
Connection successfully activated (D-Bus active path: /org/freedesktop/NetworkManager/ActiveConnection/3)
[root@DR network-scripts]# nmcli connection show
NAME                UUID                                  TYPE      DEVICE
ens33               c96bc909-188e-ec64-3a96-6a90982b08ad  ethernet  ens33
ens37               4a5516a4-dfa4-24af-b1c4-e843e312e2fd  ethernet  ens37
Wired connection 1  2fcbb410-1e4b-3138-a0de-629a7e701de6  ethernet  --
RS1:
[root@RS1 ~]# vim /etc/sysconfig/network-scripts/ifcfg-ens33
[root@RS1 ~]# cat /etc/sysconfig/network-scripts/ifcfg-ens33
TYPE=Ethernet
BOOTPROTO=static
NAME=ens33
DEVICE=ens33
ONBOOT=yes
IPADDR=192.168.222.138
NETMASK=255.255.255.0
GATEWAY=192.168.222.137
DNS1=192.168.222.2
[root@RS1 ~]# systemctl restart NetworkManager
[root@RS1 ~]# nmcli connection up ens33
Connection successfully activated (D-Bus active path: /org/freedesktop/NetworkManager/ActiveConnection/3)
RS2:
[root@RS2 ~]# vim /etc/sysconfig/network-scripts/ifcfg-ens33
[root@RS2 ~]# cat /etc/sysconfig/network-scripts/ifcfg-ens33
TYPE=Ethernet
BOOTPROTO=static
NAME=ens33
DEVICE=ens33
ONBOOT=yes
IPADDR=192.168.222.139
NETMASK=255.255.255.0
GATEWAY=192.168.222.137
DNS1=192.168.222.2
[root@RS2 ~]# systemctl restart NetworkManager
[root@RS2 ~]# nmcli connection up ens33
Connection successfully activated (D-Bus active path: /org/freedesktop/NetworkManager/ActiveConnection/2)
后端RS1和RS2部署WEB服务器
RS1:
[root@RS1 ~]# cd /etc/yum.repos.d/
[root@RS1 yum.repos.d]# ls
CentOS-Base.repo   epel-next-testing.repo  epel-playground.repo       epel-testing.repo
epel-modular.repo  epel-next.repo          epel-testing-modular.repo  epel.repo
[root@RS1 yum.repos.d]# rm -rf *
[root@RS1 yum.repos.d]# ls
[root@RS1 yum.repos.d]# vim lnh.repo   //配置本地的yum仓库
[root@RS1 yum.repos.d]# cat lnh.repo
[BaseOS]
name=111
baseurl=file:///mnt/BaseOS
gpgcheck=0
enabled=1
[AppStream]
name=222
baseurl=file:///mnt/AppStream
gpgcheck=0
enabled=1
[root@RS1 yum.repos.d]# cd
[root@RS1 ~]# mount /dev/cdrom /mnt/   //挂载镜像
mount: /mnt: WARNING: device write-protected, mounted read-only.

[root@RS1 ~]# dnf -y install httpd
[root@RS1 ~]# echo RS1 > /var/www/html/index.html //创建一个网站
[root@RS1 ~]# systemctl enable --now httpd   //设置开机自启
Created symlink /etc/systemd/system/multi-user.target.wants/httpd.service → /usr/lib/systemd/system/httpd.service.

[root@RS1 ~]# curl http://192.168.222.138  //可以访问自己
RS1
RS2:

[root@RS2 ~]# cd /etc/yum.repos.d/
[root@RS2 yum.repos.d]# ls
CentOS-Base.repo   epel-next-testing.repo  epel-playground.repo       epel-testing.repo
epel-modular.repo  epel-next.repo          epel-testing-modular.repo  epel.repo
[root@RS2 yum.repos.d]# rm -rf *
[root@RS2 yum.repos.d]# vim lnh.repo   //配置本地yum仓库
[root@RS2 yum.repos.d]# cat lnh.repo
[BaseOS]
name=111
baseurl=file:///mnt/BaseOS
gpgcheck=0
enabled=1
[AppStream]
name=222
baseurl=file:///mnt/AppStream
gpgcheck=0
enabled=1
[root@RS2 ~]# mount /dev/cdrom /mnt/   //挂载镜像
mount: /mnt: WARNING: device write-protected, mounted read-only.

[root@RS2 ~]# dnf -y install httpd
[root@RS2 ~]# echo RS2 > /var/www/html/index.html   //创建一个网站
[root@RS2 ~]# systemctl enable --now httpd    //设置开机自启
Created symlink /etc/systemd/system/multi-user.target.wants/httpd.service → /usr/lib/systemd/system/httpd.service.

[root@RS2 ~]# curl http://192.168.222.139   //可以访问自己
RS2
配置DR
开启IP转发功能
[root@DR ~]# vim /etc/sysctl.conf
net.ipv4.ip_forward = 1   //添加(等于号前后都要空格)
[root@DR ~]# sysctl -p
net.ipv4.ip_forward = 1
安装ipvsadm并添加规则
[root@DR ~]# cd /etc/yum.repos.d/
[root@DR yum.repos.d]# ls
CentOS-Base.repo   epel-next-testing.repo  epel-playground.repo       epel-testing.repo
epel-modular.repo  epel-next.repo          epel-testing-modular.repo  epel.repo
[root@DR yum.repos.d]# rm -rf *
[root@DR yum.repos.d]# ls
[root@DR yum.repos.d]# vim lnh.repo    //配置本地yum仓库
[root@DR yum.repos.d]# cat lnh.repo
[BaseOS]
name=111
baseurl=file:///mnt/BaseOS
gpgcheck=0
enabled=1
[AppStream]
name=222
baseurl=file:///mnt/AppStream
gpgcheck=0
enabled=1
[root@DR yum.repos.d]# cd
[root@DR ~]# mount /dev/cdrom /mnt/    //挂载镜像
mount: /mnt: WARNING: device write-protected, mounted read-only.

[root@DR ~]# dnf -y install ipvsadm
[root@DR ~]# ipvsadm -A -t 192.168.17.10:80 -s rr  //这里是vip的地址
[root@DR ~]# ipvsadm -a -t 192.168.17.10:80 -r 192.168.222.138:80 -m   //vip加RS1的地址
[root@DR ~]# ipvsadm -a -t 192.168.17.10:80 -r 192.168.222.139:80 -m   //vip加RS2的地址
[root@DR ~]# ipvsadm -Ln  //列出添加的ip
IP Virtual Server version 1.2.1 (size=4096)
Prot LocalAddress:Port Scheduler Flags
  -> RemoteAddress:Port           Forward Weight ActiveConn InActConn
TCP  192.168.17.10:80 rr
  -> 192.168.222.138:80           Masq    1      0          0
  -> 192.168.222.139:80           Masq    1      0          0
[root@DR ~]# ipvsadm -Sn > /etc/sysconfig/ipvsadm
//因为开机自启后这些就会消失,所以将这些导入文件里面存放
[root@DR ~]# cat /etc/sysconfig/ipvsadm   //查看
-A -t 192.168.17.10:80 -s rr
-a -t 192.168.17.10:80 -r 192.168.222.138:80 -m -w 1
-a -t 192.168.17.10:80 -r 192.168.222.139:80 -m -w 1
[root@DR ~]# systemctl enable --now ipvsadm.service  //设置开机自启
Created symlink /etc/systemd/system/multi- user.target.wants/ipvsadm.service → /usr/lib/systemd/system/ipvsadm.service.
客户端测试
配置好ip信息
测试:
[root@Client ~]# curl http://192.168.17.10
RS2
[root@Client ~]# curl http://192.168.17.10
RS1
[root@Client ~]# curl http://192.168.17.10
RS2
[root@Client ~]# curl http://192.168.17.10
RS1
配置lvs-nat模式的httpd负载集群—https
在DR中生成一对密钥
[root@DR ~]# mkdir  -p  /etc/pki/CA/private
[root@DR ~]# cd /etc/pki/CA/
[root@DR CA]# ls
private
[root@DR CA]# (umask 077;openssl genrsa -out private/cakey.pem 2048)
Generating RSA private key, 2048 bit long modulus (2 primes)
............................................................................................+++++
......................................................+++++
e is 65537 (0x010001)
[root@DR CA]# openssl rsa -in private/cakey.pem -pubout
writing RSA key
[root@DR CA]# openssl req -new -x509 -key private/cakey.pem -out cacert.pem -days 1024
You are about to be asked to enter information that will be incorporated
into your certificate request.

What you are about to enter is what is called a Distinguished Name or a DN.

There are quite a few fields but you can leave some blank
For some fields there will be a default value,
If you enter '.', the field will be left blank.

Country Name (2 letter code) [XX]:CN    //国家
State or Province Name (full name) []:HB  //省份
Locality Name (eg, city) [Default City]:WH   //城市
Organization Name (eg, company) [Default Company Ltd]:tushanbu //组织
Organizational Unit Name (eg, section) []:linux //部门
Common Name (eg, your name or your server's hostname) []:lnh //名字
Email Address []:lnh@example.com    //邮箱地址
[root@DR CA]# touch index.txt && echo 01 > serial  //提前创建好数据存放的文件
在RS1中生成证书签署请求,并发送给CA
`
[root@RS1 ~]# dnf -y install mod_ssl
[root@RS1 ~]# mkdir /etc/httpd/ssl
[root@RS1 ~]# cd /etc/httpd/ssl/
[root@RS1 ssl]# (umask 077;openssl genrsa -out httpd.key 2048)
Generating RSA private key, 2048 bit long modulus (2 primes)
…………….+++++
………………………………………+++++
e is 65537 (0x010001)
[root@RS1 ssl]# openssl req -new -key httpd.key -days 1024 -out httpd.csr
Ignoring -days; not generating a certificate
You are about to be asked to enter information that will be incorporated
into your certificate request.
What you are about to enter is what is called a Distinguished Name or a DN.
There are quite a few fields but you can leave some blank
For some fields there will be a default value,
If you enter ‘.’, the field will be left blank.
Original: https://www.cnblogs.com/tushanbu/p/16739108.html
Author: 涂山布
Title: Lvs
原创文章受到原创版权保护。转载请注明出处:https://www.johngo689.com/573938/
转载文章受原作者版权保护。转载请注明原作者出处!