

realsense D455深度相机+YOLO V5结合实现目标检测(二)
- 1.代码来源
- 2.环境配置
- 3.代码分析:
* - 3.1 主要展示在将detect.py转换为realsensedetect.py的文件部分,大家也可以直接将自己的detect.py 文件改成下面的文件,直接执行即可。
- 3.2 文件或者文件夹里面文件的对比差异分析软件介绍:
- 4. 思考与结束语
realsense D455深度相机+YOLO V5结合实现目标检测(一)第一篇链接
为什么会出现关于realsense D455 +YOLO V5结合的第二篇文章呢,因为上一篇文章是从github上面找到并且跑通之后写的,后来发现怎么也用不到我自己git下来的YOLO V5代码之中,发现还是缺一点东西,所以从各种途径中学习后将原汁原味的从github上找到的YOLO v5代码应用到了里面,最后可以很好的检测啦!
可以实现将D435,D455深度相机和yolo v5结合到一起,在识别物体的同时,还能测到物体相对与相机的距离。
说明一下为什么需要做这个事情?1.首先为什么需要用到realsense D455深度相机? 因为他是普通的相机还加了一个红外测距的东西,所以其他二维图像一样,能够得到三维世界在二维像素平面的投影,也就是图片,但是我们损失了一个深度的维度以后得到的都是投影的东西,比如说苹果可以和足球一样大,因为我们不知道深度也就是物体距离相机的距离信息,所以我们需要一个深度相机来实现测距离。2.为什么需要用到yolo算法?因为他在实时性和准确率方面都可以,可以应用于工农业生产当中,所以肯定很需要。所以才会有这二者的结合的必要性!
1.代码来源
这是我第一次将代码更改后放在了github上, 希望大家多多star,主要重写了detect.py文件为realsensedetect.py.首先大家如果想用这个代码的话可以去这里git clone 这是代码链接(为了防止链接不过去还是再写在这里 https://github.com/wenyishengkingkong/realsense-D455-YOLOV5.git)。
2.环境配置
大家按照YOLO V5环境配置方法配置环境就可以,或者是向前面的一篇一样前面的一篇,有一个简单的配置。
然后cd到进入工程文件夹下执行:
python realsensedetect.py
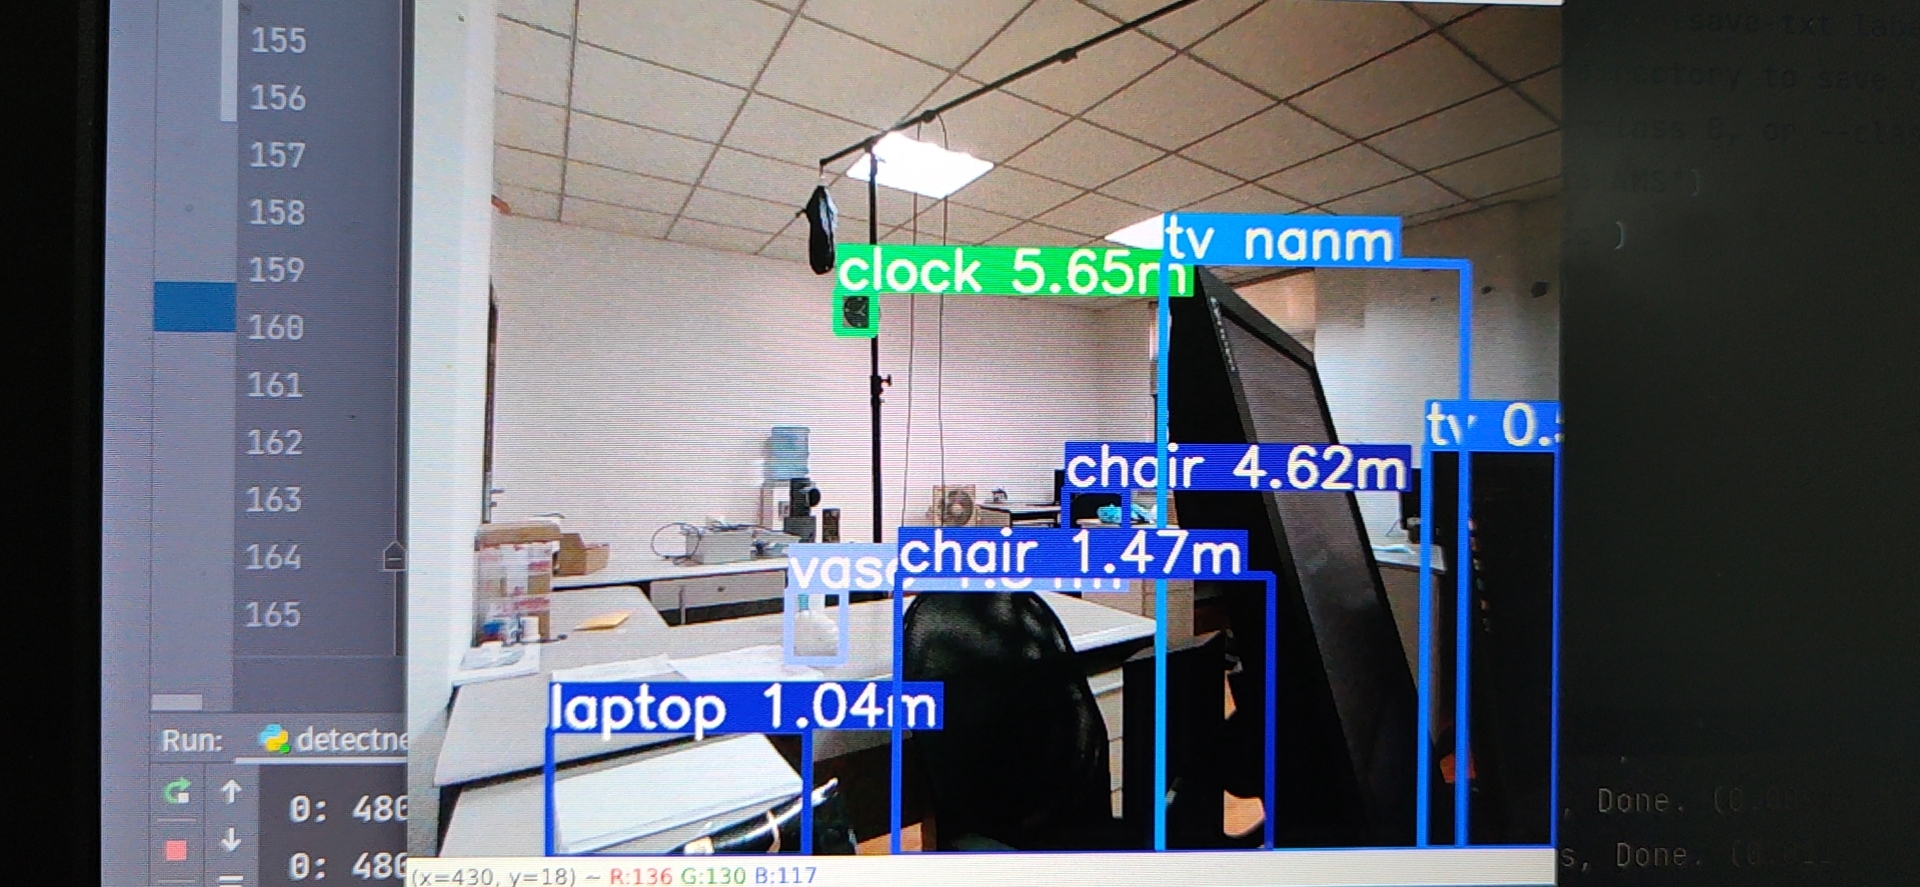
主要重写了detect.py部分为realsensedetect.py文件。运行结果如下:

3.代码分析:
3.1 主要展示在将detect.py转换为realsensedetect.py的文件部分,大家也可以直接将自己的detect.py 文件改成下面的文件,直接执行即可。
import argparse
import os
import shutil
import time
from pathlib import Path

import cv2
import torch
import torch.backends.cudnn as cudnn
from numpy import random
import numpy as np
import pyrealsense2 as rs

from models.experimental import attempt_load
from utils.general import (
    check_img_size, non_max_suppression, apply_classifier, scale_coords,
    xyxy2xywh, plot_one_box, strip_optimizer, set_logging)
from utils.torch_utils import select_device, load_classifier, time_synchronized
from utils.datasets import letterbox

def detect(save_img=False):
    out, source, weights, view_img, save_txt, imgsz = \
        opt.save_dir, opt.source, opt.weights, opt.view_img, opt.save_txt, opt.img_size
    webcam = source == '0' or source.startswith(('rtsp://', 'rtmp://', 'http://')) or source.endswith('.txt')

    # Initialize
    set_logging()
    device = select_device(opt.device)
    if os.path.exists(out):  # output dir
        shutil.rmtree(out)  # delete dir
    os.makedirs(out)  # make new dir
    half = device.type != 'cpu'  # half precision only supported on CUDA

    # Load model
    model = attempt_load(weights, map_location=device)  # load FP32 model
    imgsz = check_img_size(imgsz, s=model.stride.max())  # check img_size
    if half:
        model.half()  # to FP16
    # Set Dataloader
    vid_path, vid_writer = None, None
    view_img = True
    cudnn.benchmark = True  # set True to speed up constant image size inference
    #dataset = LoadStreams(source, img_size=imgsz)

    # Get names and colors
    names = model.module.names if hasattr(model, 'module') else model.names
    colors = [[random.randint(0, 255) for _ in range(3)] for _ in range(len(names))]

    # Run inference
    t0 = time.time()
    img = torch.zeros((1, 3, imgsz, imgsz), device=device)  # init img
    _ = model(img.half() if half else img) if device.type != 'cpu' else None  # run once
    pipeline = rs.pipeline()
    # 创建 config 对象:
    config = rs.config()
    # config.enable_stream(rs.stream.depth, 640, 480, rs.format.z16, 30)
    config.enable_stream(rs.stream.depth, 640, 480, rs.format.z16, 60)
    config.enable_stream(rs.stream.color, 640, 480, rs.format.bgr8, 60)

    # Start streaming
    pipeline.start(config)
    align_to_color = rs.align(rs.stream.color)
    while True:
        start = time.time()
        # Wait for a coherent pair of frames(一对连贯的帧): depth and color
        frames = pipeline.wait_for_frames()
        frames = align_to_color.process(frames)
        # depth_frame = frames.get_depth_frame()
        depth_frame = frames.get_depth_frame()
        color_frame = frames.get_color_frame()
        color_image = np.asanyarray(color_frame.get_data())
        depth_image = np.asanyarray(depth_frame.get_data())
        mask = np.zeros([color_image.shape[0], color_image.shape[1]], dtype=np.uint8)
        mask[0:480, 320:640] = 255

        sources = [source]
        imgs = [None]
        path = sources
        imgs[0] = color_image
        im0s = imgs.copy()
        img = [letterbox(x, new_shape=imgsz)[0] for x in im0s]
        img = np.stack(img, 0)
        img = img[:, :, :, ::-1].transpose(0, 3, 1, 2)  # BGR to RGB, to 3x416x416, uint8 to float32
        img = np.ascontiguousarray(img, dtype=np.float16 if half else np.float32)
        img /= 255.0  # 0 - 255 to 0.0 - 1.0

        # Get detections
        img = torch.from_numpy(img).to(device)
        if img.ndimension() == 3:
            img = img.unsqueeze(0)
        t1 = time_synchronized()
        pred = model(img, augment=opt.augment)[0]

        # Apply NMS
        pred = non_max_suppression(pred, opt.conf_thres, opt.iou_thres, classes=opt.classes, agnostic=opt.agnostic_nms)
        t2 = time_synchronized()

        for i, det in enumerate(pred):  # detections per image
            p, s, im0 = path[i], '%g: ' % i, im0s[i].copy()
            s += '%gx%g ' % img.shape[2:]  # print string
            gn = torch.tensor(im0.shape)[[1, 0, 1, 0]]  # normalization gain whwh
            if det is not None and len(det):
                # Rescale boxes from img_size to im0 size
                det[:, :4] = scale_coords(img.shape[2:], det[:, :4], im0.shape).round()

                # Print results
                for c in det[:, -1].unique():
                    n = (det[:, -1] == c).sum()  # detections per class
                    s += '%g %ss, ' % (n, names[int(c)])  # add to string

                # Write results
                for *xyxy, conf, cls in reversed(det):
                    xywh = (xyxy2xywh(torch.tensor(xyxy).view(1, 4)) / gn).view(-1).tolist()  # normalized xywh
                    line = (cls, conf, *xywh) if opt.save_conf else (cls, *xywh)  # label format
                    distance_list = []
                    mid_pos = [int((int(xyxy[0]) + int(xyxy[2])) / 2), int((int(xyxy[1]) + int(xyxy[3])) / 2)]  # 确定索引深度的中心像素位置左上角和右下角相加在/2
                    min_val = min(abs(int(xyxy[2]) - int(xyxy[0])), abs(int(xyxy[3]) - int(xyxy[1])))  # 确定深度搜索范围
                    # print(box,)
                    randnum = 40
                    for i in range(randnum):
                        bias = random.randint(-min_val // 4, min_val // 4)
                        dist = depth_frame.get_distance(int(mid_pos[0] + bias), int(mid_pos[1] + bias))
                        # print(int(mid_pos[1] + bias), int(mid_pos[0] + bias))
                        if dist:
                            distance_list.append(dist)
                    distance_list = np.array(distance_list)
                    distance_list = np.sort(distance_list)[
                                    randnum // 2 - randnum // 4:randnum // 2 + randnum // 4]  # 冒泡排序+中值滤波

                    label = '%s %.2f%s' % (names[int(cls)], np.mean(distance_list), 'm')
                    plot_one_box(xyxy, im0, label=label, color=colors[int(cls)], line_thickness=3)

            # Print time (inference + NMS)
            print('%sDone. (%.3fs)' % (s, t2 - t1))

            # Stream results
            if view_img:
                cv2.imshow(p, im0)
                if cv2.waitKey(1) == ord('q'):  # q to quit
                    raise StopIteration
    print('Done. (%.3fs)' % (time.time() - t0))

if __name__ == '__main__':
    parser = argparse.ArgumentParser()
    parser.add_argument('--weights', nargs='+', type=str, default='yolov5m.pt', help='model.pt path(s)')
    parser.add_argument('--source', type=str, default='inference/images', help='source')  # file/folder, 0 for webcam
    parser.add_argument('--img-size', type=int, default=640, help='inference size (pixels)')
    parser.add_argument('--conf-thres', type=float, default=0.25, help='object confidence threshold')
    parser.add_argument('--iou-thres', type=float, default=0.45, help='IOU threshold for NMS')
    parser.add_argument('--device', default='', help='cuda device, i.e. 0 or 0,1,2,3 or cpu')
    parser.add_argument('--view-img', action='store_true', help='display results')
    parser.add_argument('--save-txt', action='store_true', help='save results to *.txt')
    parser.add_argument('--save-conf', action='store_true', help='save confidences in --save-txt labels')
    parser.add_argument('--save-dir', type=str, default='inference/output', help='directory to save results')
    parser.add_argument('--classes', nargs='+', type=int, help='filter by class: --class 0, or --class 0 2 3')
    parser.add_argument('--agnostic-nms', action='store_true', help='class-agnostic NMS')
    parser.add_argument('--augment', action='store_true', help='augmented inference')
    parser.add_argument('--update', action='store_true', help='update all models')
    opt = parser.parse_args()
    print(opt)

    with torch.no_grad(): # 一个上下文管理器,被该语句wrap起来的部分将不会track梯度
        detect()
相信大家看到这么多代码已经觉得头疼了,其实更改的就不多的几行,只不过是将顺序的和位置更改了一下。大家如果觉得麻烦,有两个软件可以辅助大家对文件进行对比(说明上面用的到是YOLO V5代码中的v3.1版本,相信换成其他版本应该不会有任何问题,对于其他的目标检测算法没有进行试验,相信应该都是换汤不换药)。
3.2 文件或者文件夹里面文件的对比差异分析软件介绍:
无论是在windows上或者是在ubuntu上面,好用的pycharm软件都是可以应用的,可以在 选择文件或者文件夹然后右键有一个compare with的选项就可以进行差异分析了,大家可以对比上面realsensedetect.py文件和detect.py文件两者的差异部分就可以知道到底更改了多少。第二是在 Windows上面可以应用diffnity的软件,按道理来说挺好用的!
- 思考与结束语
为什么需要用到这个realsense深度相机呢,正如上一篇讲述的一样,他会增加一个维度,就是距离,那多的这个维度到底有什么应用呢?首先第一个就是在 社交距离检测中,比如你发现检测到一个人没有戴口罩,那么你可以直接检测到他距离摄像头的距离,你就可以提前通知他带好口罩,以避免在入口处人员多的时候交叉感染。这是一个实际的例子。其次,主要应用在 三维重建中,我们得到了物体的二维像素点和距离值,就可以通过三维重建或者数学建模来实现三维物体的重新建模,这是很重要的!最后,我们都可以利用已经得到的信息进行 三维建模和用pcl库进行更加准确的距离计算,实现在现实世界中的应用!
这是第一在github上git自己的代码,希望能够帮助到您, 对我感兴趣的童鞋可以 关注我,说不定那一天就可以 帮到您!
Original: https://blog.csdn.net/qq_45077256/article/details/120040059
Author: 文一生
Title: realsense D455深度相机+YOLO V5结合实现目标检测(二)
原创文章受到原创版权保护。转载请注明出处:https://www.johngo689.com/558979/
转载文章受原作者版权保护。转载请注明原作者出处!