

文章目录:
- 1 dlib库介绍
- 2 dlib人脸检测:绘制出人脸检测框
* - 2.1 dlib人脸检测源码
- 2.2 opencv + dlib 人脸检测
- 2.3 dlib人脸检测总结
- 3 dlib人脸关键点检测:并绘制检测框、关键点、不同区域关键点连线
* - 3.1 dlib人脸关键点检测源码
- 3.2 opencv + dlib 进行人脸关键点检测
- 4 dlib人脸识别
* - 4.1 dlib进行人脸识别逻辑
- 4.2 opencv+dlib 进行人脸识别
- 4.3 人脸识别总结
- 5 dlib人脸聚类
- 6 dlib视频目标跟踪
1 dlib库介绍
dlib官网:http://dlib.net/
dlib模型文件和源码下载:http://dlib.net/files/
2 dlib人脸检测:绘制出人脸检测框
2.1 dlib人脸检测源码
1、人脸检测,dlib官方例子 face_detector.py
这个人脸检测器是使用现在经典的直方图定向梯度(HOG)特征,结合线性分类器,图像金字塔和滑动窗口检测方案。这种类型的物体检测器是相当普遍的,除了人脸之外,还能够检测许多类型的半刚性物体。因此,如果您对制作自己的对象检测器感兴趣,那么请阅读 train_object _detector.py示例程序。
"""
Copyright (c) 2018-2022. All Rights Reserved.

@author: shliang
@email: shliang0603@gmail.com
"""

import dlib

def dlib_detector_face(img_path):
    print("Processing file: {}".format(img_path))
    img = dlib.load_rgb_image(img_path)

    detector = dlib.get_frontal_face_detector()
    win = dlib.image_window()

    dets = detector(img, 1)
    print("Number of faces detected: {}".format(len(dets)))
    for i, d in enumerate(dets):

        print("Detection {}: Left: {} Top: {} Right: {} Bottom: {}".format(i, d.left(), d.top(), d.right(), d.bottom()))

    win.clear_overlay()
    win.set_image(img)
    win.add_overlay(dets)
    dlib.hit_enter_to_continue()

    dets, scores, idx = detector.run(img, 1, -1)
    for i, d in enumerate(dets):
        print("Detection {}, score: {}, face_type:{}".format(d, scores[i], idx[i]))

if __name__ == '__main__':
    dlib_detector_face('./images/single_face.jpg')
    dlib_detector_face('./images/multi_face.jpg')
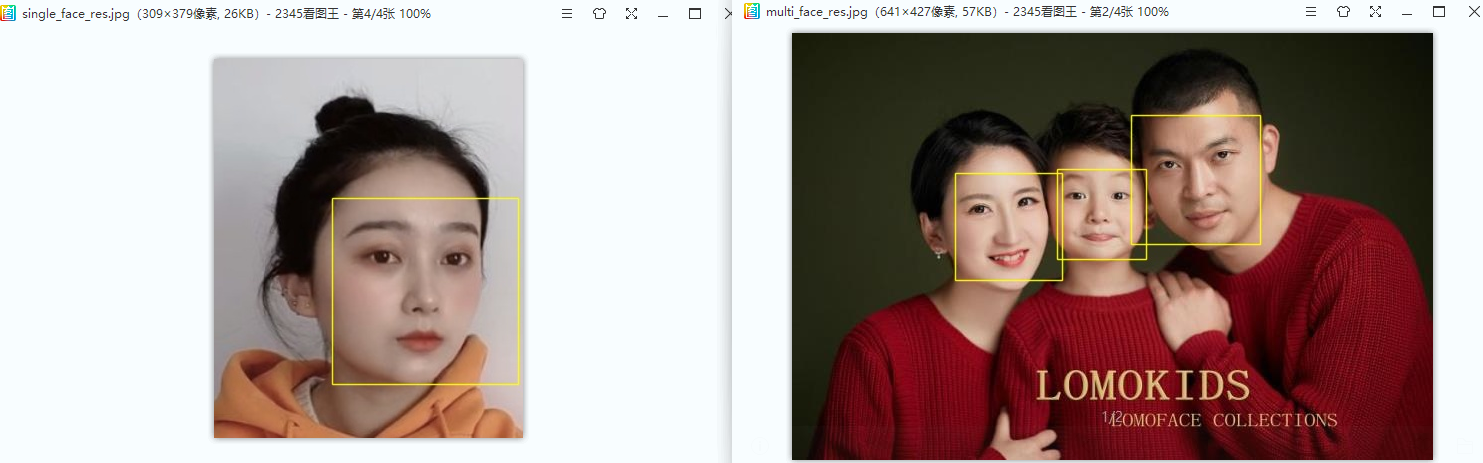
输出结果:
Processing file: ./images/single_face.jpg
Number of faces detected: 1
Detection 0: Left: 118 Top: 139 Right: 304 Bottom: 325
Hit enter to continue
Detection [(118, 139) (304, 325)], score: 1.6567257084382887, face_type:0
Detection [(55, 218) (98, 262)], score: -0.6576982940533731, face_type:2

Processing file: ./images/multi_face.jpg
Number of faces detected: 3
Detection 0: Left: 339 Top: 82 Right: 468 Bottom: 211
Detection 1: Left: 163 Top: 140 Right: 270 Bottom: 247
Detection 2: Left: 265 Top: 136 Right: 354 Bottom: 226
Hit enter to continue
Detection [(339, 82) (468, 211)], score: 1.9180631791420404, face_type:1
Detection [(163, 140) (270, 247)], score: 1.5263808407319899, face_type:0
Detection [(265, 136) (354, 226)], score: 1.153857532931697, face_type:0
如下是检测结果:


2.2 opencv + dlib 人脸检测
1、把上面的代码改用opencv读取与显示
"""
Copyright (c) 2018-2022. All Rights Reserved.

@author: shliang
@email: shliang0603@gmail.com
"""

import dlib
import cv2

def dlib_detector_face(img_path):
    print("Processing file: {}".format(img_path))
    img = cv2.imread(img_path)

    detector = dlib.get_frontal_face_detector()

    dets = detector(img, 1)
    print('dets:', dets)
    print("Number of faces detected: {}".format(len(dets)))
    for i, d in enumerate(dets):

        left = d.left()
        top = d.top()
        right = d.right()
        bottom = d.bottom()
        print("Detection {}: Left: {} Top: {} Right: {} Bottom: {}".format(i, left, top, right, bottom))
        cv2.rectangle(img, (left, top), (right, bottom), color=(0, 255, 255), thickness=1, lineType=cv2.LINE_AA)
    cv2.imshow('detect result', img)
    cv2.waitKey(0)

if __name__ == '__main__':
    dlib_detector_face('./images/single_face.jpg')
    dlib_detector_face('./images/multi_face.jpg')
2.3 dlib人脸检测总结
1、dlib人脸检测效果
dlib人脸检测并不是很准确,如果人脸比较小,有大角度偏转,很有可能就检测不到人脸,我以为dlib版本更新了,人脸检测的模型也会更新,其实不是,dlib是一个机器学习库,里面有很多算法的!
2、使用dlib的场景
- 最好是正脸
- 图像分辨率不能太小
- 图像清晰
3 dlib人脸关键点检测:并绘制检测框、关键点、不同区域关键点连线
3.1 dlib人脸关键点检测源码
1、人脸关键点检测,dlib官方例子 face_detector.py
"""
Copyright (c) 2018-2022. All Rights Reserved.
@author: shliang
@email: shliang0603@gmail.com
"""
import dlib
predictor_path = './model/shape_predictor_68_face_landmarks.dat'
detector = dlib.get_frontal_face_detector()
predictor = dlib.shape_predictor(predictor_path)
win = dlib.image_window()
face_image_path = './images/multi_face.jpg'
print("Processing file: {}".format(face_image_path))
img = dlib.load_rgb_image(face_image_path)
win.clear_overlay()
win.set_image(img)
dets = detector(img, 1)
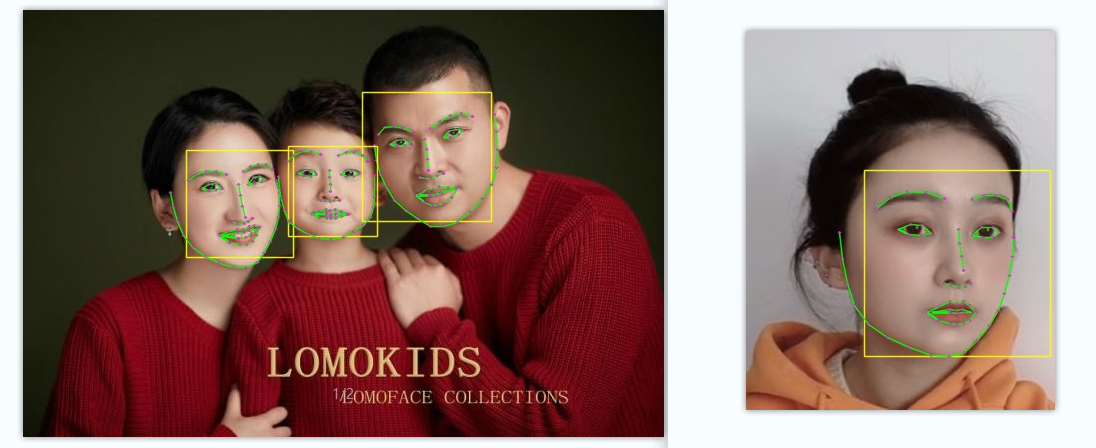
print("Number of faces detected: {}".format(len(dets)))
for k, d in enumerate(dets):
print("Detection {}: Left: {} Top: {} Right: {} Bottom: {}".format(
k, d.left(), d.top(), d.right(), d.bottom()))
shape = predictor(img, d)
print("Part 0: {}, Part 1: {} ...".format(shape.part(0),
shape.part(1)))
win.add_overlay(shape)
win.add_overlay(dets)
dlib.hit_enter_to_continue()

3.2 opencv + dlib 进行人脸关键点检测
"""
Copyright (c) 2018-2022. All Rights Reserved.

@author: shliang
@email: shliang0603@gmail.com
"""
import os
import cv2
import dlib
import numpy as np

pred_types = {'face': ((0, 17), (0.682, 0.780, 0.909, 0.5)),
              'eyebrow1': ((17, 22), (1.0, 0.498, 0.055, 0.4)),
              'eyebrow2': ((22, 27), (1.0, 0.498, 0.055, 0.4)),
              'nose': ((27, 31), (0.345, 0.239, 0.443, 0.4)),
              'nostril': ((31, 36), (0.345, 0.239, 0.443, 0.4)),
              'eye1': ((36, 42), (0.596, 0.875, 0.541, 0.3)),
              'eye2': ((42, 48), (0.596, 0.875, 0.541, 0.3)),
              'lips': ((48, 60), (0.596, 0.875, 0.541, 0.3)),
              'teeth': ((60, 68), (0.596, 0.875, 0.541, 0.4))
              }

def draw_line(img, shape, i):
    cv2.line(img, pt1=(shape.part(i).x, shape.part(i).y), pt2=(shape.part(i+1).x, shape.part(i+1).y),
             color=(0, 255, 0), thickness=1, lineType=cv2.LINE_AA)

def draw_line_circle(img, shape, i, start, end):
    cv2.line(img, pt1=(shape.part(i).x, shape.part(i).y), pt2=(shape.part(i + 1).x, shape.part(i + 1).y),
             color=(0, 255, 0), thickness=1, lineType=cv2.LINE_AA)

    cv2.line(img, pt1=(shape.part(start).x, shape.part(start).y), pt2=(shape.part(end).x, shape.part(end).y),
             color=(0, 255, 0), thickness=1, lineType=cv2.LINE_AA)

def dlib_face_keypoint_detector(img_path, save_result=True):

    detector = dlib.get_frontal_face_detector()

    predictor_path = './model/shape_predictor_68_face_landmarks.dat'

    predictor = dlib.shape_predictor(predictor_path)

    img = cv2.imread(img_path)
    print("Processing file: {}".format(img_path))

    dets = detector(img, 1)
    print("Number of faces detected: {}".format(len(dets)))
    for k, d in enumerate(dets):
        x1 = d.left()
        y1 = d.top()
        x2 = d.right()
        y2 = d.bottom()
        print("Detection {}: Left: {} Top: {} Right: {} Bottom: {}".format(k, x1, y1, x2, y2))
        cv2.rectangle(img, (x1, y1), (x2, y2), color=(0, 255, 255), thickness=1, lineType=cv2.LINE_AA)

        shape = predictor(img, d)

        print(shape.num_parts)
        print(shape.rect)
        print(shape.parts())

        print("Part 0: {}, Part 1: {} ...".format(shape.part(0), shape.part(1)))

        landmarks = np.matrix([[p.x, p.y] for p in shape.parts()])

        for i, point in enumerate(shape.parts()):
            x = point.x
            y = point.y
            cv2.circle(img, (x, y), 1, color=(255, 0, 255), thickness=1, lineType=cv2.LINE_AA)
            cv2.putText(img, str(i+1), (x, y), fontFace=cv2.FONT_HERSHEY_SCRIPT_SIMPLEX,
                        fontScale=0.3, color=(255, 255, 0))

            if i + 1 < 17:
                draw_line(img, shape, i)
            elif 17 < i + 1 < 22:
                draw_line(img, shape, i)
            elif 22 < i + 1 < 27:
                draw_line(img, shape, i)
            elif 27 < i + 1 < 31:
                draw_line(img, shape, i)
            elif 31 < i + 1 < 36:
                draw_line(img, shape, i)
            elif 36 < i + 1 < 42:
                draw_line_circle(img, shape, i, 36, 42 - 1)
            elif 42 < i + 1 < 48:
                draw_line_circle(img, shape, i, 42, 48 - 1)
            elif 48 < i + 1 < 60:
                draw_line_circle(img, shape, i, 48, 60 - 1)
            elif 60 < i + 1 < 68:
                draw_line_circle(img, shape, i, 60, 68 - 1)

    cv2.imshow('detect keypoints', img)
    if save_result:
        dir, filename = os.path.split(img_path)
        save_filename = os.path.join(dir, filename.split('.')[0] + '_keypoint' + '.' + filename.split('.')[1])
        cv2.imwrite(save_filename, img)
    cv2.waitKey(0)

if __name__ == '__main__':
    dlib_face_keypoint_detector('./images/single_face.jpg')

    dlib_face_keypoint_detector('./images/multi_face.jpg')
注意:
    detector = dlib.get_frontal_face_detector()

    predictor_path = './model/shape_predictor_68_face_landmarks.dat'

    predictor = dlib.shape_predictor(predictor_path)
如果循环检测多张图片,detector和predictor只需要在最开始调用,相当于是加载模型,不用每次都加载,如果每次都加载你检测一张图片的时间大概是2s,如果只在最开始加载,检测每张图片关键点的时间为50ms左右
看下68个关键点的位置,然后进行连线:


4 dlib人脸识别
4.1 dlib进行人脸识别逻辑
1、首先需要需要构建一个人脸识别的 底库(专业点就叫gallery),也就是每一个人在数据库中注册一张人脸图片,这里假设 ./images/recog_face/register是我们注册的人脸数据,每张人脸数据是包含人脸ID(这里我就先简单用文件名表示,如reba,表示的是迪丽热巴,实际场景中一般注册的都是提前提取好的人脸特征)
2、提取注册图片中的人脸
- 注册的图片每张图片中只能有一张图片
- 注册图片最好是正脸照片、无遮挡、光照良好
- 总之注册图片的质量必须比较好
3、提取待识别图片中的人脸特征: ./images/recog_face/test_face:目录下 待识别的人脸,我们并不知道每张图片中人脸的真实身份(我的图片命名成已知身份,只是为了方便后续和识别结果做对比)
4、 特征比对:将待识别图片中提取的人脸特征 和 注册数据中的每张人脸特征都做比对,然后取特征距离最近的一张注册数据,如果距离小于设定的阈值,则该注册数据的ID身份则为识别未知人脸的身份,否则在数据库中没有正确匹配识别都人脸
- 待识别的人脸图片在数据库中可能是有的,但由于人脸角度大、遮挡等,导致计算出的特征距离比较大,因此也就不能正确识别!
注意:
在提取图片中人脸特征之前,是先经过了 检测人脸 和 人脸对齐操作的,可以看下面具体代码!
如下是我人脸识别图片相关路径:
images/recog_face/register:注册的人脸images/recog_face/test_face:待识别人脸图片images/recog_face/recog_result:保存识别人脸的结果

; 4.2 opencv+dlib 进行人脸识别
1、dlib通过检测出每个人脸框,然后对人脸框中的每张人脸进行特征提取,每张人脸特征映射为一个128维的向量,当两个向量之间的Euclidean距离小于0.6时,可以认为属于同一个人
2、这里需要用到两个模型:
- 人脸68关键点检测模型:
shape_predictor_68_face_landmarks.dat - 人脸识别模型:
dlib_face_recognition_resnet_model_v1.dat
以上判定标准在LFW(Labeled Faces in the Wild)数据集上可以获得99.38%的识别准确率
3、你也可以这样调用这个函数: face_descriptor = facerec.compute_face_descriptor(img, shape, 100, 0.25) 在LFW(Labeled Faces in the Wild)上:
- 不使用100的参数值在LFW获得99.13%的准确率,
- 使用100的参数值获得99.38%的准确率,但是使用100的参数值后调用的执行速度慢了100倍,
所以选择你可以根据需要选择使不使用该参数。
解释一下:
- 第三个参数100:告诉代码
抖动/重新采样图像的次数。当将其设置为100时,它将对稍微修改过的面部版本执行100次面部描述符提取,并返回平均结果。您还可以选择一个更中间的值,比如10,它的速度只有10倍,但仍然可以获得99.3%的LFW精度。 - 第四个参数0.25:是脸周围的填充。如果填充== 0,那么对齐时将会在面部周围被紧密裁剪。设置更大的填充值将导致更松散的裁剪。特别是0.5的填充值将使裁剪区域的宽度加倍,即值为1会是三倍,以此类推。还有另一个compute_face_descriptor重载,它可以将一个对齐的图像作为输入。注意,将对齐的图像生成为dlib是很重要的。Get_face_chip会这样做,即大小必须是150×150,居中并缩放。
"""
Copyright (c) 2018-2022. All Rights Reserved.

@author: shliang
@email: shliang0603@gmail.com
"""
import cv2
import os
import dlib
import glob
import numpy as np

def Eucl_distance(a, b):
    '''
    d = 0
    for i in range(len(a)):
        d += (a[i] - b[i]) * (a[i] - b[i])
    return np.sqrt(d)
    :param a:
    :param b:
    :return:
    '''
    return np.linalg.norm(a - b, ord=2)

def extract_face_feature(img_array):
    predictor_path = './model/shape_predictor_68_face_landmarks.dat'
    face_rec_model_path = './model/dlib_face_recognition_resnet_model_v1.dat'

    detector = dlib.get_frontal_face_detector()
    predictor = dlib.shape_predictor(predictor_path)
    facerec = dlib.face_recognition_model_v1(face_rec_model_path)

    dets = detector(img_array, 1)
    print("Number of faces detected: {}".format(len(dets)))

    all_face_feature = []
    all_face_rect = []

    for k, d in enumerate(dets):
        x1 = d.left()
        y1 = d.top()
        x2 = d.right()
        y2 = d.bottom()
        print("Detection {}: Left: {} Top: {} Right: {} Bottom: {}".format(k, x1, y1, x2, y2))
        all_face_rect.append([x1, y1, x2, y2])
        shape = predictor(img_array, d)

        face_descriptor = facerec.compute_face_descriptor(img_array, shape)

        print("Computing descriptor on aligned image ..")

        face_chip = dlib.get_face_chip(img_array, shape)

        face_descriptor_from_prealigned_image = facerec.compute_face_descriptor(face_chip)

        face_descriptor_from_prealigned_image_np = np.array(face_descriptor_from_prealigned_image)
        all_face_feature.append(face_descriptor_from_prealigned_image_np)
    feature_rect = list(zip(all_face_feature, all_face_rect))
    return feature_rect

def extract_register_face_feature():
    register_face_feature = {}
    img_paths = glob.glob('./images/recog_face/register/*.jpg')
    for img_path in img_paths:
        name = os.path.split(img_path)[-1].split('.')[0]
        img = cv2.imread(img_path)
        feature_rect = extract_face_feature(img)
        register_face_feature[name] = feature_rect[0][0]
    return register_face_feature

def main(save_result=True):

    all_regiter_feature_dict = extract_register_face_feature()

    face_img_paths = glob.glob('./images/recog_face/test_face/*.jpg')
    for img_path in face_img_paths:
        img_name = os.path.split(img_path)[-1]
        img = cv2.imread(img_path)
        h, w, c = img.shape
        all_feature_rect = extract_face_feature(img)
        for feature_rect in all_feature_rect:
            face_feat = feature_rect[0]
            x1, y1, x2, y2 = feature_rect[1]
            cv2.rectangle(img, (x1, y1), (x2, y2), color=(0, 255, 255), thickness=1, lineType=cv2.LINE_AA)

            cv2.putText(img, img_name, (20, h-20), fontFace=cv2.FONT_HERSHEY_SIMPLEX,
                        fontScale=0.8, color=(0, 0, 255), thickness=2, lineType=cv2.LINE_AA)
            cv2.putText(img, 'Detect Face: {}'.format(len(all_feature_rect)), (20, h - 50), fontFace=cv2.FONT_HERSHEY_SIMPLEX,
                        fontScale=0.8, color=(0, 0, 255), thickness=2, lineType=cv2.LINE_AA)

            all_dist_dict = dict()
            for reg_name, reg_feat in all_regiter_feature_dict.items():

                print(f'src image name: {img_name}, reg image name: {reg_name}')
                dist = Eucl_distance(reg_feat, face_feat)
                print('dist:', dist)
                all_dist_dict[dist] = reg_name
            print('all dist with reg: ', all_dist_dict)
            print(all_dist_dict.keys())

            print(list(all_dist_dict.keys()))
            print(any(list(all_dist_dict.keys())) < 0.4)
            '''
            >>> any([0.38222860571657313, 0.5497940177651175])
            min_dist = min(list(all_dist_dict.keys()))
            if min_dist < 0.5:
                reg_name = all_dist_dict[min_dist]
                if reg_name == "ym":

                    reg_name = "Yang Mi"
                if reg_name == "reba":

                    reg_name = "Reba"

                cv2.putText(img, reg_name, (x1, y1-2), fontFace=cv2.FONT_HERSHEY_SIMPLEX,
                            fontScale=0.8, color=(255, 255, 0), thickness=2, lineType=cv2.LINE_AA)

            else:

                cv2.putText(img, 'unknown', (x1, y1-2), fontFace=cv2.FONT_HERSHEY_SIMPLEX,
                            fontScale=0.8, color=(255, 255, 0), thickness=2, lineType=cv2.LINE_AA)

        if save_result:
            save_name = img_name.split('.')[0] + '_result.' + img_name.split('.')[1]
            save_filename = os.path.join('./images/recog_face/recog_result', save_name)
            cv2.imwrite(save_filename, img)
        cv2.imshow('detect face', img)
        cv2.waitKey(0)

if __name__ == '__main__':
    main()
如下时人脸识别的结果:

再调几张:


4.3 人脸识别总结
1、首先注册(入库)的图片的质量要好
2、需要选择一个合适的阈值,虽然dlib介绍如再LFW上准确率有有91.3%,但是再实际场景中这个准确率肯定会大打折扣的
3、dlib人脸识别的速度也不是很快,还有很多地方需要优化的,通过了解dlib人脸识别可以大概了解做人脸识别的一个基本流程:
- 人脸检测
- 人脸裁剪对齐
- 人脸特征提取
- 人脸特征比对,即人脸识别
具体做成一个人脸识别系统,还有很多细节,以及对自己的人脸识别系统的评测等!
参考:https://blog.csdn.net/weixin_33696106/article/details/87951676
5 dlib人脸聚类
"""
Copyright (c) 2018-2022. All Rights Reserved.

@author: shliang
@email: shliang0603@gmail.com
"""

import os
import dlib
import glob
import cv2
import numpy as np
from collections import Counter

def dlib_face_cluster():
    predictor_path = './model/shape_predictor_68_face_landmarks.dat'
    face_rec_model_path = './model/dlib_face_recognition_resnet_model_v1.dat'

    faces_path = glob.glob('./images/cluster/johns/*/*.jpg')
    output_folder_path = './images/cluster/johns_output'

    detector = dlib.get_frontal_face_detector()
    predictor = dlib.shape_predictor(predictor_path)
    facerec = dlib.face_recognition_model_v1(face_rec_model_path)

    descriptors = []
    images = []

    for img_path in faces_path:
        print("Processing file: {}".format(img_path))
        img = cv2.imread(img_path)

        dets = detector(img, 1)
        print("Number of faces detected: {}".format(len(dets)))

        for k, d in enumerate(dets):

            shape = predictor(img, d)

            print(shape.num_parts)
            print(shape.rect)
            print(
                shape.parts())

            print("Part 0: {}, Part 1: {} ...".format(shape.part(0), shape.part(1)))

            landmarks = np.matrix([[p.x, p.y] for p in shape.parts()])

            face_descriptor = facerec.compute_face_descriptor(img, shape)

            descriptors.append(face_descriptor)
            images.append((img, shape))

    labels = dlib.chinese_whispers_clustering(descriptors, 0.5)
    num_classes = len(set(labels))
    print("Number of clusters: {}".format(num_classes))
    biggest_class = Counter(labels).most_common(1)
    print(biggest_class)

    biggest_class = None
    biggest_class_length = 0
    for i in range(0, num_classes):
        class_length = len([label for label in labels if label == i])
        if class_length > biggest_class_length:
            biggest_class_length = class_length
            biggest_class = i

    print("Biggest cluster id number: {}".format(biggest_class))
    print("Number of faces in biggest cluster: {}".format(biggest_class_length))

    indices = []
    for i, label in enumerate(labels):
        if label == biggest_class:
            indices.append(i)

    print("Indices of images in the biggest cluster: {}".format(str(indices)))

if __name__ == '__main__':
    dlib_face_cluster()
6 dlib视频目标跟踪
1、源码
- 需要先手动指定要跟踪物体在
视频第一帧的位置,就是矩形框的坐标 - 然后在命令行中回车就可以不断更新之后每一帧更新的结果
"""
Copyright (c) 2018-2022. All Rights Reserved.

@author: shliang
@email: shliang0603@gmail.com
"""

import dlib
import cv2

def dlib_video_object_tracking():
    tracker = dlib.correlation_tracker()
    win = dlib.image_window()

    cap = cv2.VideoCapture('./images/cars_cut.mp4')
    i = 0
    while True:
        ret, frame = cap.read()
        frame = cv2.cvtColor(frame, cv2.COLOR_BGR2RGB)

        if i == 0:
            tracker.start_track(frame, dlib.rectangle(400, 380, 500, 475))

        else:
            tracker.update(frame)
        i += 1
        win.clear_overlay()
        win.set_image(frame)
        win.add_overlay(tracker.get_position())
        dlib.hit_enter_to_continue()

if __name__ == '__main__':
    dlib_video_object_tracking()
第一帧:

第N帧的跟踪结果:
2、改进:
通过python+opencv,用鼠标的方式获取视频中待跟踪目标框:
- 还没有完全搞定,待更新!
Original: https://blog.csdn.net/weixin_41010198/article/details/121996795
Author: 点亮~黑夜
Title: dlib库包的介绍与使用,opencv+dlib检测人脸框、opencv+dlib进行人脸68关键点检测,opencv+dlib实现人脸识别,dlib进行人脸特征聚类、dlib视频目标跟踪
原创文章受到原创版权保护。转载请注明出处:https://www.johngo689.com/549566/
转载文章受原作者版权保护。转载请注明原作者出处!