

springboot本身提供了许多自动配置,帮助开发者提供开发效率,当然如果我们有一些个性化的需求,springboot
也提供了良好的扩展,只需要配置starter依赖或者简单的properties配置即可实现功能,下面我们分析几种和其他组件
整合的案例。
一:与Druid数据源的整合
druid是alibaba提供的一种数据源框架,内置了许多监控的功能,如果想使用可以很方便和springboot整合。
1:添加依赖和配置
java;gutter:true;
com.alibaba
            druid-spring-boot-starter
            1.1.21</p>
<pre><code>        com.alibaba
        druid
        1.0.26
</code></pre>
<pre><code>
;gutter:true;
#连接池的配置信息
## 初始化大小,最小,最大
spring.datasource.druid.url=jdbc:mysql://localhost:3306/study
spring.datasource.druid.username=root
spring.datasource.druid.password=root
spring.datasource.druid.driver-class-name=com.mysql.jdbc.Driver
spring.datasource.druid.type=com.alibaba.druid.pool.DruidDataSource
spring.datasource.druid.initialSize=2
spring.datasource.druid.minIdle=2
spring.datasource.druid.maxActive=2
## 配置获取连接等待超时的时间
spring.datasource.druid.maxWait=60000
配置间隔多久才进行一次检测,检测需要关闭的空闲连接,单位是毫秒
spring.datasource.druid.timeBetweenEvictionRunsMillis=60000
配置一个连接在池中最小生存的时间,单位是毫秒
spring.datasource.druid.minEvictableIdleTimeMillis=300000
spring.datasource.druid.validationQuery=SELECT 1 FROM DUAL
spring.datasource.druid.testWhileIdle=true
spring.datasource.druid.testOnBorrow=false
spring.datasource.druid.testOnReturn=false
spring.datasource.druid.poolPreparedStatements=true
spring.datasource.druid.maxPoolPreparedStatementPerConnectionSize=20
配置监控统计拦截的filters,去掉后监控界面sql无法统计,’wall’用于防火墙
spring.datasource.druid.filters=stat,wallWWW
通过connectProperties属性来打开mergeSql功能;慢SQL记录
spring.datasource.druid.connectionProperties=druid.stat.mergeSql=true;druid.stat.slowSqlMillis=5000
#mybatis sql配置文件
mybatis.mapperLocations=classpath:com/mapper/*.xml
2:配置druid监控
java;gutter:true;
@Data
@Configuration
//@ConfigurationProperties(prefix = "spring.druid",ignoreInvalidFields = true)
public class DruidConfig {</p>
<pre><code>//因为Springboot内置了servlet容器,所以没有web.xml,替代方法就是将ServletRegistrationBean注册进去
//加入后台监控
//这里其实就相当于servlet的web.xml
@Bean
public ServletRegistrationBean statViewServlet() {
    ServletRegistrationBean bean =
            new ServletRegistrationBean(new StatViewServlet(), "/druid/*");

    //后台需要有人登录,进行配置
    //bean.addUrlMappings(); 这个可以添加映射,我们在构造里已经写了
    //设置一些初始化参数
    Map initParas = new HashMap();
    initParas.put("loginUsername", "admin");//它这个账户密码是固定的
    initParas.put("loginPassword", "123456");
    //允许谁能防伪
    initParas.put("allow", "");//这个值为空或没有就允许所有人访问,ip白名单
    //initParas.put("allow","localhost");//只允许本机访问,多个ip用逗号,隔开
    //initParas.put("deny","");//ip黑名单,拒绝谁访问 deny和allow同时存在优先deny
    initParas.put("resetEnable", "false");//禁用HTML页面的Reset按钮
    bean.setInitParameters(initParas);
    return bean;
}

//再配置一个过滤器,Servlet按上面的方式注册Filter也只能这样
@Bean public FilterRegistrationBean webStatFilter() {
    FilterRegistrationBean bean = new FilterRegistrationBean();
    //可以设置也可以获取,设置一个阿里巴巴的过滤器
    bean.setFilter(new WebStatFilter());
    bean.addUrlPatterns("/*");
    //可以过滤和排除哪些东西
    Map initParams = new HashMap();
    //把不需要监控的过滤掉,这些不进行统计
    initParams.put("exclusions", "*.js,*.css,/druid/*");
    bean.setInitParameters(initParams);
    return bean;
}
</code></pre>
<p>}</p>
<pre><code>
测试代码:
;gutter:true;
@Controller
public class DemoController {
@Value("${study.enable}")
private String env;
@Autowired
private DataSource dataSource;
@RequestMapping("/hello")
@ResponseBody
public String hello(){
try{
Connection connection = dataSource.getConnection();
String sql = "select * from user";
PreparedStatement ps = connection.prepareStatement(sql);
ResultSet resultSet = ps.executeQuery();
List list = new ArrayList<>();
while(resultSet.next()){
String name = resultSet.getString("name");
String age = resultSet.getString("age");
User user = new User();
user.setAge(age);
user.setName(name);
list.add(user);
}
return JSON.toJSONString(list);
}catch (Exception e){
e.printStackTrace();
return null;
}
}
}
运行结果:


看一下监控平台:

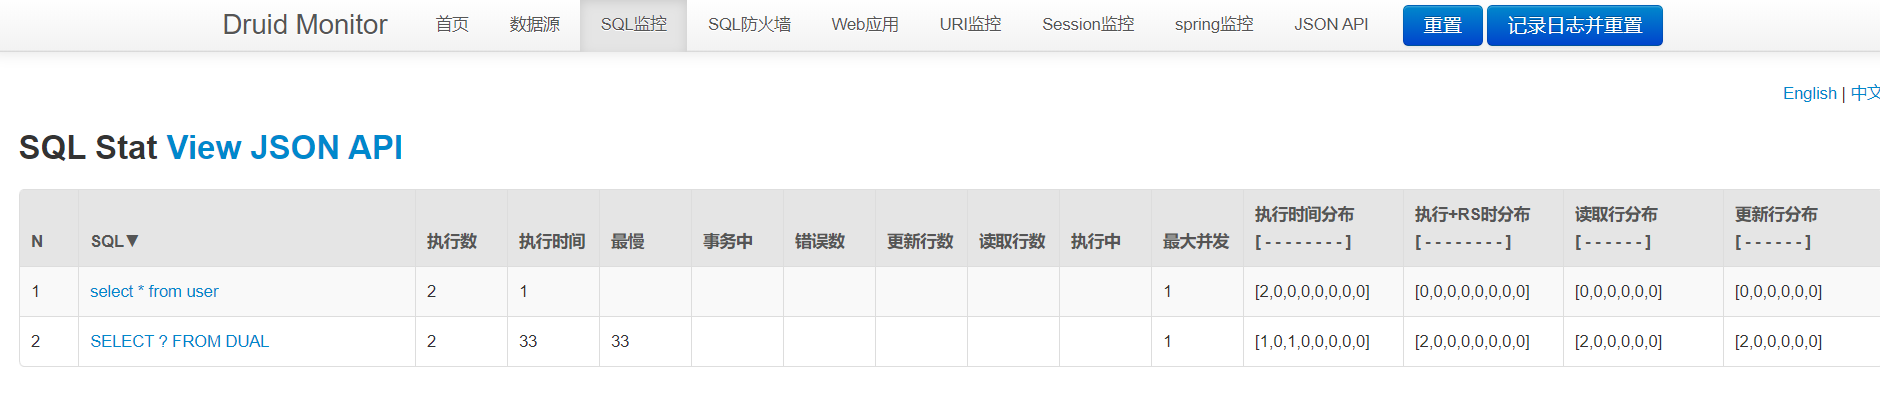
指标监控正常,说明springboot整合druid数据源成功!,简单看一下源码,从配置启动依赖starter开始看
springboot的自动配置 是基于SPI机制,在spring容器启动的时候,会加载META-INF 下的spring.factories 目录的文件,解析里面的配置项


看一下DruidDataSourceAutoConfigure类:


最后把DruidDataSource这个对象缓存到spring容器中。
二:与mybatis的整合
操作数据库用的最多的还是mybatis框架,作为比较优秀的orm框架,深得程序员的喜欢,下面我们来看一下怎么整合?
1:添加依赖和配置
java;gutter:true;
org.mybatis.spring.boot
            mybatis-spring-boot-starter
            RELEASE</p>
<pre><code>
;gutter:true;
#mybatis sql配置文件
mybatis.mapperLocations=classpath:com/mapper/*.xml
在@Configuration配置项上加入@MapperScan注解,配置扫描包路径

在dao目录新建一个UserMapper类
java;gutter:true;
public interface UserMapper {
    List listUsers();
}</p>
<pre><code>
在mapper目录新建一个UserMapper.xml文件
;gutter:true;
select * from user
测试类改为:
java;gutter:true;
@Controller
public class DemoController {</p>
<pre><code>@Value("${study.enable}")
private String env;
</code></pre>
<p>//  @Autowired
//  private DataSource dataSource;</p>
<pre><code>@Autowired
private UserMapper mapper;

@RequestMapping("/hello")
@ResponseBody
public String hello(){
    try{
        /*
        Connection connection = dataSource.getConnection();
        String sql = "select * from user";
        PreparedStatement ps = connection.prepareStatement(sql);
        ResultSet resultSet = ps.executeQuery();
        List list = new ArrayList<>();
        while(resultSet.next()){
            String name = resultSet.getString("name");
            String age = resultSet.getString("age");
            User user = new User();
            user.setAge(age);
            user.setName(name);
            list.add(user);
        }*/
        List list = mapper.listUsers();
        return JSON.toJSONString(list);
    }catch (Exception e){
        e.printStackTrace();
        return null;
    }
}
</code></pre>
<p>}
运行结果:

springboot整合mybatis成功!
下面看一下源码如何实现的?从mybatis的starter启动类开始看
mybatis-spring-boot-starter是一个父类工程,pom文件,依赖引入了上面的jar包

mybatis-spring-boot-autoconfigure中有spring.factories文件:


看一下这个类里面的方法,在这个方法中会解析mybatis-config.xml ,以及mapper.xml文件,完成MapperStatement的解析缓存以及命名空间的解析,
全限定名id与MapperProxyFactory的映射缓存。

@MapperScan注解扫描会在ConfigurationClassPostProcessor中进行,由于这个注解扫描比较复杂,后面再进行分析,主要工作是:
扫描包路径,创建MapperFactoryBean,然后代理通过beanName调用会getObject,调到sqlSession.getMapper,返回动态代理。
Original: https://www.cnblogs.com/warrior4236/p/13275255.html
Author: warrior1234
Title: springboot分析——与其他组件的整合(druid/mybatis)
原创文章受到原创版权保护。转载请注明出处:https://www.johngo689.com/541108/
转载文章受原作者版权保护。转载请注明原作者出处!