

(九)、SpringBoot整合Swagger2、Swagger3
一、整合 Swagger2
1、maven 依赖:
io.springfox
    springfox-swagger2
    2.6.1

    io.springfox
    springfox-swagger-ui
    2.6.1
2、创建Swagger2配置类
import org.springframework.context.annotation.Bean;
import org.springframework.context.annotation.Configuration;
import springfox.documentation.builders.ApiInfoBuilder;
import springfox.documentation.builders.PathSelectors;
import springfox.documentation.builders.RequestHandlerSelectors;
import springfox.documentation.service.ApiInfo;
import springfox.documentation.spi.DocumentationType;
import springfox.documentation.spring.web.plugins.Docket;
import springfox.documentation.swagger2.annotations.EnableSwagger2;

@Configuration
@EnableSwagger2
public class Swagger2 {
    @Bean
    public Docket createRestApi() {
        return new Docket(DocumentationType.SWAGGER_2)
                .apiInfo(apiInfo())
                .select()
                .apis(RequestHandlerSelectors.basePackage("com.xxx.springcloudproducer"))
                .paths(PathSelectors.any())
                .build();
    }
    private ApiInfo apiInfo() {
        return new ApiInfoBuilder()
                .title("springcloudproducer_RESTful APIs")
                .description("服务名:springcloudproducer")
                .version("1.0")
                .build();
    }
}
3、注解说明
1、 @Api 注解在Controller 上
@Api(tags = "用户相关接口", description = "提供用户相关的 Rest API")
public class UserController
属性解析
注解属性类型描述tags String[]控制器标签。description String 控制器描述 (该字段被申明为过期)
2、写在方法上的注解
2.1 接口方法的描述@ApiOperation 主要属性
@PostMapping(value = "/login")
    @ApiOperation(value = "登录接口",notes = "登录接口",httpMethod = "POST",responseContainer="登录成功,登录失败")
    @ApiResponses({
            @ApiResponse(code = 200, message = "请求成功"),
            @ApiResponse(code = 10000, message = "用户名验证码为空"),
            @ApiResponse(code = 10001, message = "验证码不正确"),
            @ApiResponse(code = 10002, message = "验证码已失效"),
            @ApiResponse(code = 10004, message = "登录错误次数超过五次"),
            @ApiResponse(code = 10005, message = "用户名或密码错误"),
            @ApiResponse(code = 10006, message = "账号被冻结,请联系管理员")
    })
    public  ResponseEntity> login(@RequestBody SystemAccountBeanVO systemAccountBean, HttpServletRequest request) {

        return ResponseEntity.ok(new Message(loginService.login(systemAccountBean, request)));

    }
属性解析
注解属性类型描述value String 接口说明。notes String 接口发布说明。tags Stirng[]标签。response Class 接口返回类型。httpMethod String 接口请求方式。
@ApiIgnore
Swagger 文档不会显示拥有该注解的接口
@ApiImplicitParams
用于描述接口的非对象参数集
@ApiImplicitParam
用于描述接口的非对象参数,一般与 @ApiImplicitParams 组合使用。
@ApiImplicitParams({
            @ApiImplicitParam(name = "accountId", value = "账户ID", dataType = "string", paramType = "query", example = "xingguo"),
    })
    public ResultMsgBean> queryForMenuListByAccountId() {
        return systemMenuBean;
    }
主要属性
注解属性描述paramType 查询参数类型,实际上就是参数放在那里。取值:
path:以地址的形式提交数据,根据 id查询用户的接口就是这种形式传参。
query:Query string 的方式传参。
header:以流的形式提交。
form:以 Form 表单的形式提交。dataType 参数的数据类型。取值:Long String name 参数名字。value 参数意义的描述。required 是否必填。取值:true:必填参数。false:非必填参数。
@ApiParam
属性
属性名称 数据类型 默认值 说明 name String “” 参数名称,参数名称将从 filed/method/parameter 名称中派生,但你可以覆盖它,路径参数必须始终命名为它们所代表的路径部分 value String “” 参数简单描述 defaultValue String “” 描述参数默认值 allowableValues String “” 可接收参数值限制,有三种方式,取值列表,取值范围 required boolean false 是否为必传参数, false:非必传; true:必传 access String “” 参数过滤,请参阅:io.swagger.core.filter.SwaggerSpecFilter allowMultiple boolean false 指定参数是否可以通过多次出现来接收多个值 hidden boolean false 隐藏参数列表中的参数 example String “” 非请求体(body)类型的单个参数示例 examples Example @Example(value = @ExampleProperty(mediaType = “”, value = “”)) 参数示例,仅适用于请求体类型的请求 type String “” 添加覆盖检测到类型的功能 format String “” 添加提供自定义format格式的功能 allowEmptyValue boolean false 添加将格式设置为空的功能 readOnly boolean false 添加被指定为只读的能力 collectionFormat String “” 添加使用 array 类型覆盖 collectionFormat 的功能
3.写在实体类上的注解
3.1 描述
@ApiModel
可设置接口相关实体的描述。
@ApiModelProperty:
可设置实体属性的相关描述
3.2 代码示例
@ApiModel(description= "账户信息类")
public class SystemAccountBean extends CustomerPersonBean {
    /** 帐号序号 */
    @ApiModelProperty(value="帐号序号")
    private String accountId;
}
3.3 @ApiModelProperty属性说明
注解属性类型描述value String 字段说明。name String 重写字段名称。dataType Stirng 重写字段类型。required boolean 是否必填。example Stirng 举例说明。hidden boolean 是否在文档中隐藏该字段。allowEmptyValue boolean 是否允许为空。allowableValues String 该字段允许的值,当我们 API 的某个参数为枚举类型时,
使用这个属性就可以清楚地告诉 API 使用者该参数所能允许传入的值。
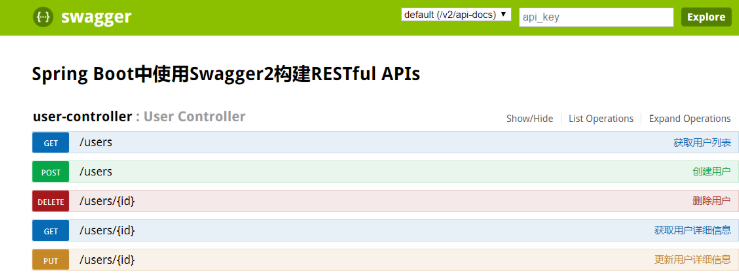
看下最终效果吧:
访问路径: http://localhost:8080/swagger-ui.html

使用案例:
@RestController
@RequestMapping("demoModel")
@Api(tags = "测试demo") // 请求类说明
public class DemoModelController {
    /**
     * 服务对象
     */
    @Resource
    private IUserService demoModelService;

    @PostMapping
    @ApiOperation(value = "新增操作", notes = "新增数据") // 请求方法说明  value="说明方法的作用" notes="方法的备注说明"
    @ApiResponses({
            @ApiResponse(code = 401,message = "没有用户权限"),
            @ApiResponse(code = 403,message = "禁止访问"),
            @ApiResponse(code = 404,message = "没有找到服务器资源"),
            @ApiResponse(code = 409,message = "业务逻辑异常"),
            @ApiResponse(code = 500,message = "服务器内部错误")
    })
    public boolean insert(@RequestBody @ApiParam(name = "demoModel对象",value = "json值", required = true) User demoModel){
        return demoModelService.save(demoModel);
    }

    /**
     * 通过主键查询单条数据
     *
     * @param productId 主键
     * @return 单条数据
     */
    @GetMapping
    @ApiOperation(value = "查询接口")
    @ApiImplicitParams({
            @ApiImplicitParam(name = "productId",value = "产品Id",required = true,dataType = "long,ex",example = "20250558"),
            @ApiImplicitParam(name = "productId",value = "用户Id",required = true,dataType = "long",example = "255955822")
    }) // @ApiImplicitParam表示单独的请求参数 用于方法,ApiImplicitParams包含多个 @ApiImplicitParam
    @ApiResponses({
            @ApiResponse(code = 401,message = "没有用户权限"),
            @ApiResponse(code = 403,message = "禁止访问"),
            @ApiResponse(code = 404,message = "没有找到服务器资源"),
            @ApiResponse(code = 409,message = "业务逻辑异常"),
            @ApiResponse(code = 500,message = "服务器内部错误")
    })
    public User selectOne(@RequestParam Integer productId, @RequestParam Long userId) {
        return demoModelService.getById(productId);
    }

}
二、整合Swagger3
1、首先在 pom.xml 中添加springfox官方Swagger依赖:
io.springfox
    springfox-boot-starter
    3.0.0
2、添加Swagger的Java配置,配置好Api信息和需要生成接口文档的类扫描路径即可:
@Configuration
@EnableSwagger2
public class SwaggerConfig {
    @Bean
    public Docket api() {
        return new Docket(DocumentationType.OAS_30)
                .select()
                .apis(RequestHandlerSelectors.withClassAnnotation(Api.class))
                .apis(RequestHandlerSelectors.basePackage("com.dw.easy.controller"))
                .apis(RequestHandlerSelectors.withMethodAnnotation(ApiOperation.class))
                .build()
                .apiInfo(apiInfo());
    }

    private ApiInfo apiInfo() {
        return new ApiInfoBuilder()
                .title("swagger 文档标题")
                .description("swagger 文档描述")
                .version("1.0 swagger 文档版本")
                .build();
    }
}
访问API文档信息,访问地址:http://localhost:8088/swagger-ui/
两步即可搞定SpringBoot集成Swagger,是不是很简单!
与之前版本相比:
旧版本需要依赖 springfox-swagger2和 springfox-swagger-ui两个配置,新版本一个Starter就搞定了,而且之前的版本如果不使用新版本的 swagger-models和 swagger-annotations依赖,访问接口会出现 NumberFormatException问题;
- 新版本去除了一些第三方依赖,包括
guava,之前使用旧版本时就由于guava版本问题导致过依赖冲突,具体可以看下《给Swagger升级了新版本,没想到居然有这么多坑!》; - 新版本和旧版本文档访问路径发生了变化,新版本为: http://localhost:8088/swagger-ui/ ,旧版本为: http://localhost:8088/swagger-ui.html
- 新版本中新增了一些SpringBoot配置,
springfox.documentation.enabled 配置可以控制是否启用Swagger文档生成功能;
比如说我们只想在 dev环境下启用Swagger文档,而在 prod环境下不想启用,旧版本我们可以通过 @Profile注解实现;
@Configuration
@EnableSwagger2
@Profile(value = {"dev"})
public class Swagger2Config {

}
新版本我们在SpringBoot配置文件中进行配置即可, <span><strong>springfox.documentation.enabled</strong></span> 在 application-dev.yml配置为 true,在 application-prod.yml中配置为false。
三、整合Spring Security使用
我们经常会在项目中使用Spring Security实现登录认证,接下来我们来讲下如何使用Swagger整合Spring Security,实现访问需要登录认证的接口。
如何访问需要登录认证的接口?只需在访问接口时添加一个合法的 Authorization请求头即可,下面是Swagger相关配置
/**
 * Swagger2API文档的配置
 */
@Configuration
public class Swagger2Config {
    @Bean
    public Docket createRestApi() {
        return new Docket(DocumentationType.SWAGGER_2)
                .apiInfo(apiInfo())
                .select()
                .apis(RequestHandlerSelectors.basePackage("com.macro.mall.tiny.controller"))
                .paths(PathSelectors.any())
                .build()
                //添加登录认证
                .securitySchemes(securitySchemes())
                .securityContexts(securityContexts());
    }

    private ApiInfo apiInfo() {
        return new ApiInfoBuilder()
                .title("SwaggerUI演示")
                .description("mall-tiny")
                .contact(new Contact("macro", null, null))
                .version("1.0")
                .build();
    }

    private List securitySchemes() {
        //设置请求头信息
        List result = new ArrayList<>();
        ApiKey apiKey = new ApiKey("Authorization", "Authorization", "header");
        result.add(apiKey);
        return result;
    }

    private List securityContexts() {
        //设置需要登录认证的路径
        List result = new ArrayList<>();
        result.add(getContextByPath("/brand/.*"));
        return result;
    }

    private SecurityContext getContextByPath(String pathRegex) {
        return SecurityContext.builder()
                .securityReferences(defaultAuth())
                .forPaths(PathSelectors.regex(pathRegex))
                .build();
    }

    private List defaultAuth() {
        List result = new ArrayList<>();
        AuthorizationScope authorizationScope = new AuthorizationScope("global", "accessEverything");
        AuthorizationScope[] authorizationScopes = new AuthorizationScope[1];
        authorizationScopes[0] = authorizationScope;
        result.add(new SecurityReference("Authorization", authorizationScopes));
        return result;
    }
}
我们需要在Spring Security中配置好Swagger静态资源的无授权访问,比如首页访问路径 /swagger-ui/;
/**
 * SpringSecurity的配置
 * Created by macro on 2018/4/26.

 */
@Configuration
@EnableWebSecurity
@EnableGlobalMethodSecurity(prePostEnabled = true)
public class SecurityConfig extends WebSecurityConfigurerAdapter {
    @Autowired
    private UmsAdminService adminService;
    @Autowired
    private RestfulAccessDeniedHandler restfulAccessDeniedHandler;
    @Autowired
    private RestAuthenticationEntryPoint restAuthenticationEntryPoint;

    @Override
    protected void configure(HttpSecurity httpSecurity) throws Exception {
        httpSecurity.csrf()// 由于使用的是JWT,我们这里不需要csrf
                .disable()
                .sessionManagement()// 基于token,所以不需要session
                .sessionCreationPolicy(SessionCreationPolicy.STATELESS)
                .and()
                .authorizeRequests()
                .antMatchers(HttpMethod.GET, // 允许对于网站静态资源的无授权访问
                        "/",
                        "/swagger-ui/",
                        "/*.html",
                        "/favicon.ico",
                        "/**/*.html",
                        "/**/*.css",
                        "/**/*.js",
                        "/swagger-resources/**",
                        "/v2/api-docs/**"
                )
                .permitAll()
                .antMatchers("/admin/login")// 对登录注册要允许匿名访问
                .permitAll()
                .antMatchers(HttpMethod.OPTIONS)//跨域请求会先进行一次options请求
                .permitAll()
                .anyRequest()// 除上面外的所有请求全部需要鉴权认证
                .authenticated();
        // 省略若干配置......

    }
}
如果有拦截器需要排除如下路径:excludePathPatterns("/swagger-resources/**", "/webjars/**", "/v2/**", "/swagger-ui.html/**", "/swagger-ui/**")
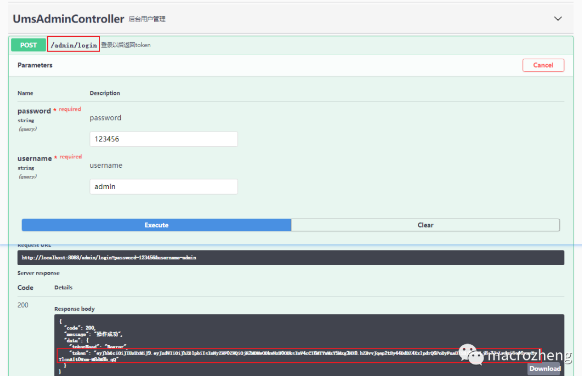
调用登录接口获取token,账号密码为 admin:123456;
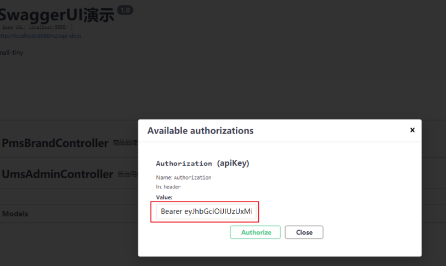
点击 Authorize按钮后输入 Authorization请求头,之后就可以访问需要登录认证的接口了。
Swagger官方Starter解决了之前整合Swagger的一系列问题,简化了SpringBoot整合Swagger的过程,使用起来更加方便了。同时对于一些复杂的配置使用基本没有变化,一些之前的使用方式依然可以使用!
四、swagger 解决请求地址不一致的问题:
在yml文件中。会重新设置base url,也就是把base url固定了,本地测试的话,base url也是下面的值,而不是127.0.0.1:3007
springfox:
  documentation:
    swagger:
      v2:
        host: d-ser-cloud.xinchao.com:3007/rm/mobile-gateway
Original: https://www.cnblogs.com/dw3306/p/13558602.html
Author: 邓维-java
Title: (九)、SpringBoot整合Swagger2、Swagger3
原创文章受到原创版权保护。转载请注明出处:https://www.johngo689.com/536629/
转载文章受原作者版权保护。转载请注明原作者出处!