

一、docker安装nginx
1、拉取镜像
docker pull nginx
2、创建容器
docker run -di --name=mynginx -p 8088:80 nginx
3、查看容器日志的命令
docker logs -f mynginx
二、认识nginx容器
进入容器
docker exec -it mynginx bash
查找nginx文件或文件夹
whereis nginx
结果:
root@xxx:/# whereis nginx
nginx: /usr/sbin/nginx /usr/lib/nginx /etc/nginx /usr/share/nginx
由上可知,nginx命令为/usr/sbin/nginx,nginx配置文件在/etc/nginx目录下
root@xxx:/# cd /etc/nginx
root@xxx:/etc/nginx# ls
conf.d    fastcgi_params    mime.types  modules  nginx.conf  scgi_params  uwsgi_params
查看nginx.conf文件的内容
user  nginx;
worker_processes  auto;

error_log  /var/log/nginx/error.log notice;
pid        /var/run/nginx.pid;

events {
    worker_connections  1024;
}

http {
    include       /etc/nginx/mime.types;
    default_type  application/octet-stream;

    log_format  main  '$remote_addr - $remote_user [$time_local] "$request" '
                      '$status $body_bytes_sent "$http_referer" '
                      '"$http_user_agent" "$http_x_forwarded_for"';

    access_log  /var/log/nginx/access.log  main;

    sendfile        on;
    #tcp_nopush     on;

    keepalive_timeout  65;

    #gzip  on;

    include /etc/nginx/conf.d/*.conf;
}
最后一行的意思是,该nginx.conf文件包含/etc/nginx/conf.d/*.conf文件。
进入/etc/nginx/conf.d目录
root@xxx:/etc/nginx# cd /etc/nginx/conf.d
root@xxx:/etc/nginx/conf.d# ls
default.conf
查看default.conf文件
root@xxx:/etc/nginx/conf.d# cat default.conf
server {
    listen       80;
    listen  [::]:80;
    server_name  localhost;

    #access_log  /var/log/nginx/host.access.log  main;

    location / {
        root   /usr/share/nginx/html;
        index  index.html index.htm;
    }

    #error_page  404              /404.html;

    # redirect server error pages to the static page /50x.html
    #
    error_page   500 502 503 504  /50x.html;
    location = /50x.html {
        root   /usr/share/nginx/html;
    }

    # proxy the PHP scripts to Apache listening on 127.0.0.1:80
    #
    #location ~ \.php$ {
    #    proxy_pass   http://127.0.0.1;
    #}

    # pass the PHP scripts to FastCGI server listening on 127.0.0.1:9000
    #
    #location ~ \.php$ {
    #    root           html;
    #    fastcgi_pass   127.0.0.1:9000;
    #    fastcgi_index  index.php;
    #    fastcgi_param  SCRIPT_FILENAME  /scripts$fastcgi_script_name;
    #    include        fastcgi_params;
    #}

    # deny access to .htaccess files, if Apache's document root
    # concurs with nginx's one
    #
    #location ~ /\.ht {
    #    deny  all;
    #}
}
由上可这,nginx部署项目的位置为/usr/share/nginx/html,
三、编辑nginx容器中的nginx.conf文件
通过vim和vi命令无法在容器内编辑nginx.conf文件
[root@xxx ~]# docker exec -it mynginx bash
root@xxx:/# whereis nginx
nginx: /usr/sbin/nginx /usr/lib/nginx /etc/nginx /usr/share/nginx
root@xxx:/# cd /etc/nginx
root@xxx:/etc/nginx# ls
conf.d    fastcgi_params    mime.types  modules  nginx.conf  scgi_params  uwsgi_params
root@xxx:/etc/nginx# vim nginx.conf
bash: vim: command not found
root@xxx:/etc/nginx# vi nginx.conf
bash: vi: command not found
可以将nginx.conf 文件先拷贝到容器外面,即拷贝到主机中。命令如下:
先退出容器
exit
再将容器内的nginx.conf文件拷贝到主机中
docker cp mynginx:/etc/nginx/nginx.conf .
再通过vim或vi命令对nginx.conf文件进行编辑。
修改完后,再将主机中的文件拷贝到容器内,从而完成对nginx.conf文件的编辑。
docker cp nginx.conf mynginx:/etc/nginx/nginx.conf
四、浏览器访问http://ip:8088/
界面如下:

五、实现nginx负载均衡
1、准备挂载文件
在/home目录下新建nginx文件夹
mkdir nginx
在/home/nginx目录下新建三个文件夹,分别叫conf、log、html
mkdir -p /home/nginx/{log,conf,html}
容器中的nginx.conf文件和conf.d文件夹复制到宿主机
将容器nginx.conf文件复制到宿主机
docker cp mynginx:/etc/nginx/nginx.conf /home/nginx/conf/nginx.conf
将容器conf.d文件夹下内容复制到宿主机
docker cp mynginx:/etc/nginx/conf.d /home/nginx/conf/conf.d
将容器中的html文件夹复制到宿主机
docker cp mynginx:/usr/share/nginx/html /home/nginx/
2、创建nginx容器
先删除mynginx容器
docker stop mynginx
docker rm mynginx
命令如下:
docker run \
-p 8088:80 \
--name mynginx \
-v /home/nginx/conf/nginx.conf:/etc/nginx/nginx.conf \
-v /home/nginx/conf/conf.d:/etc/nginx/conf.d \
-v /home/nginx/log:/var/log/nginx \
-v /home/nginx/html:/usr/share/nginx/html \
-d nginx:latest
执行命令时去掉\并改成一行
docker run -p 8088:80 --name mynginx -v /home/nginx/conf/nginx.conf:/etc/nginx/nginx.conf -v /home/nginx/conf/conf.d:/etc/nginx/conf.d -v /home/nginx/log:/var/log/nginx -v /home/nginx/html:/usr/share/nginx/html -d nginx:latest
浏览器访问http://ip:8088/,进入如下界面
编辑default.conf文件
vim /home/nginx/conf/conf.d/default.conf
添加如下内容
upstream nacosList {
    server 192.172.0.21:8848 weight=1;
    server 192.172.0.22:8848 weight=2;
    server 192.172.0.20:8848 weight=3;
}

server {
    listen       80;
    listen  [::]:80;
    server_name  ip;

    #access_log  /var/log/nginx/host.access.log  main;

    location / {
        root   /usr/share/nginx/html;
        index  index.html index.htm;
    }

    #error_page  404              /404.html;

    # redirect server error pages to the static page /50x.html
    #
    error_page   500 502 503 504  /50x.html;
    location = /50x.html {
        root   /usr/share/nginx/html;
    }
    location /nacos {
        proxy_pass  http://nacosList;
    }
    # proxy the PHP scripts to Apache listening on 127.0.0.1:80
    #
    #location ~ \.php$ {
    #    proxy_pass   http://127.0.0.1;
    #}

    # pass the PHP scripts to FastCGI server listening on 127.0.0.1:9000
    #
    #location ~ \.php$ {
    #    root           html;
    #    fastcgi_pass   127.0.0.1:9000;
    #    fastcgi_index  index.php;
    #    fastcgi_param  SCRIPT_FILENAME  /scripts$fastcgi_script_name;
    #    include        fastcgi_params;
    #}

    # deny access to .htaccess files, if Apache's document root
    # concurs with nginx's one
    #
    #location ~ /\.ht {
    #    deny  all;
    #}
}
重启mynginx容器
docker restart mynginx
将mynginx添加到newnet网络
docker network connect newnet mynginx
3、启动nacos2,nacos4,nacos6容器
搭建nacos集群参考:https://www.cnblogs.com/zwh0910/p/16483429.html#autoid-5-0-0
启动nacos2
docker run -it -e PREFER_HOST_MODE=ip -e MODE=cluster -e NACOS_SERVERS="192.172.0.21:8848 192.172.0.22:8848" -e SPRING_DATASOURCE_PLATFORM=mysql -e MYSQL_SERVICE_HOST=192.172.0.30 -e MYSQL_SERVICE_PORT=3306 -e MYSQL_SERVICE_USER=root -e MYSQL_SERVICE_PASSWORD=123456 -e MYSQL_SERVICE_DB_NAME=nacos_config -e MYSQL_SERVICE_DB_PARAM='characterEncoding=utf8&connectTimeout=1000&socketTimeout=3000&autoReconnect=true&useSSL=false&useUnicode=true&serverTimezone=UTC' -p 9902:8848 --name nacos2 --net newnet --ip 192.172.0.20 --restart=always nacos/nacos-server:2.0.3
注意:MYSQL_SERVICE_PORT为容器的端口3306,而不是宿主机的端口3301。
启动nacos4
docker run -it -e PREFER_HOST_MODE=ip -e MODE=cluster -e NACOS_SERVERS="192.172.0.20:8848 192.172.0.22:8848" -e SPRING_DATASOURCE_PLATFORM=mysql -e MYSQL_SERVICE_HOST=192.172.0.30 -e MYSQL_SERVICE_PORT=3306 -e MYSQL_SERVICE_USER=root -e MYSQL_SERVICE_PASSWORD=123456 -e MYSQL_SERVICE_DB_NAME=nacos_config -e MYSQL_SERVICE_DB_PARAM='characterEncoding=utf8&connectTimeout=1000&socketTimeout=3000&autoReconnect=true&useSSL=false&useUnicode=true&serverTimezone=UTC' -p 9904:8848 --name nacos4 --net newnet --ip 192.172.0.21 --restart=always nacos/nacos-server:2.0.3
启动nacos6
docker run -it -e PREFER_HOST_MODE=ip -e MODE=cluster -e NACOS_SERVERS="192.172.0.20:8848 192.172.0.21:8848" -e SPRING_DATASOURCE_PLATFORM=mysql -e MYSQL_SERVICE_HOST=192.172.0.30 -e MYSQL_SERVICE_PORT=3306 -e MYSQL_SERVICE_USER=root -e MYSQL_SERVICE_PASSWORD=123456 -e MYSQL_SERVICE_DB_NAME=nacos_config -e MYSQL_SERVICE_DB_PARAM='characterEncoding=utf8&connectTimeout=1000&socketTimeout=3000&autoReconnect=true&useSSL=false&useUnicode=true&serverTimezone=UTC' -p 9906:8848 --name nacos6 --net newnet --ip 192.172.0.22 --restart=always nacos/nacos-server:2.0.3
查看newnet网络
"Containers": {
            "660a5934625cc7b997dc92868630fd94160e85dc5236959aa88e6bdd02526ed1": {
                "Name": "mynginx",
                "EndpointID": "bf0fec125954c421e0ca413e923a8d1071345af0676808f90c34b727b03f891d",
                "MacAddress": "02:42:c0:ac:00:02",
                "IPv4Address": "192.172.0.2/16",
                "IPv6Address": ""
            },
            "7712fcdeb20cc6acc06c7c4ec62b23b38725ff9322f0350cdbe04504ce831886": {
                "Name": "nacos2",
                "EndpointID": "41adfa6ca375051df567c0be4bbb9c14eae3f147d454630f87482740b8ab1fba",
                "MacAddress": "02:42:c0:ac:00:14",
                "IPv4Address": "192.172.0.20/16",
                "IPv6Address": ""
            },
            "7f7b489358dcf9d00934f44b0af93c32ffd4a2d5f3f3e92804b87d2dddc66b7b": {
                "Name": "mysql-slave",
                "EndpointID": "e7dfd29c5b0a9a5cb84d501d96407c5e2545643a45594f08622afd6bcbc81fde",
                "MacAddress": "02:42:c0:ac:00:1f",
                "IPv4Address": "192.172.0.31/16",
                "IPv6Address": ""
            },
            "e2852aa4cd9751b4bd6bd3d4d0db319266de5f5ec30eb1f18b5daf6956518e3e": {
                "Name": "nacos4",
                "EndpointID": "513019fd124fa4122b4860c4bbfd090f56ed354f8af058009942433c2ee8329c",
                "MacAddress": "02:42:c0:ac:00:15",
                "IPv4Address": "192.172.0.21/16",
                "IPv6Address": ""
            },
            "e497e6d88c505bb4c34e9acc081781c33efcbb850f954cd36a36b8cbe14034ea": {
                "Name": "nacos6",
                "EndpointID": "e040c18f5dd779538f185771f380aad7c8311d0de9e32b08bfdc00503ccfe412",
                "MacAddress": "02:42:c0:ac:00:16",
                "IPv4Address": "192.172.0.22/16",
                "IPv6Address": ""
            },
            "f0d909d9adcbec956cf595594a2452383a68f115a3982cec2fb516c0c741c3e3": {
                "Name": "mysql-master",
                "EndpointID": "7e46b14ed59ffc9464054214f459a559fa2722df2e11c40b09b3c46c3a56c7a2",
                "MacAddress": "02:42:c0:ac:00:1e",
                "IPv4Address": "192.172.0.30/16",
                "IPv6Address": ""
            }
        },
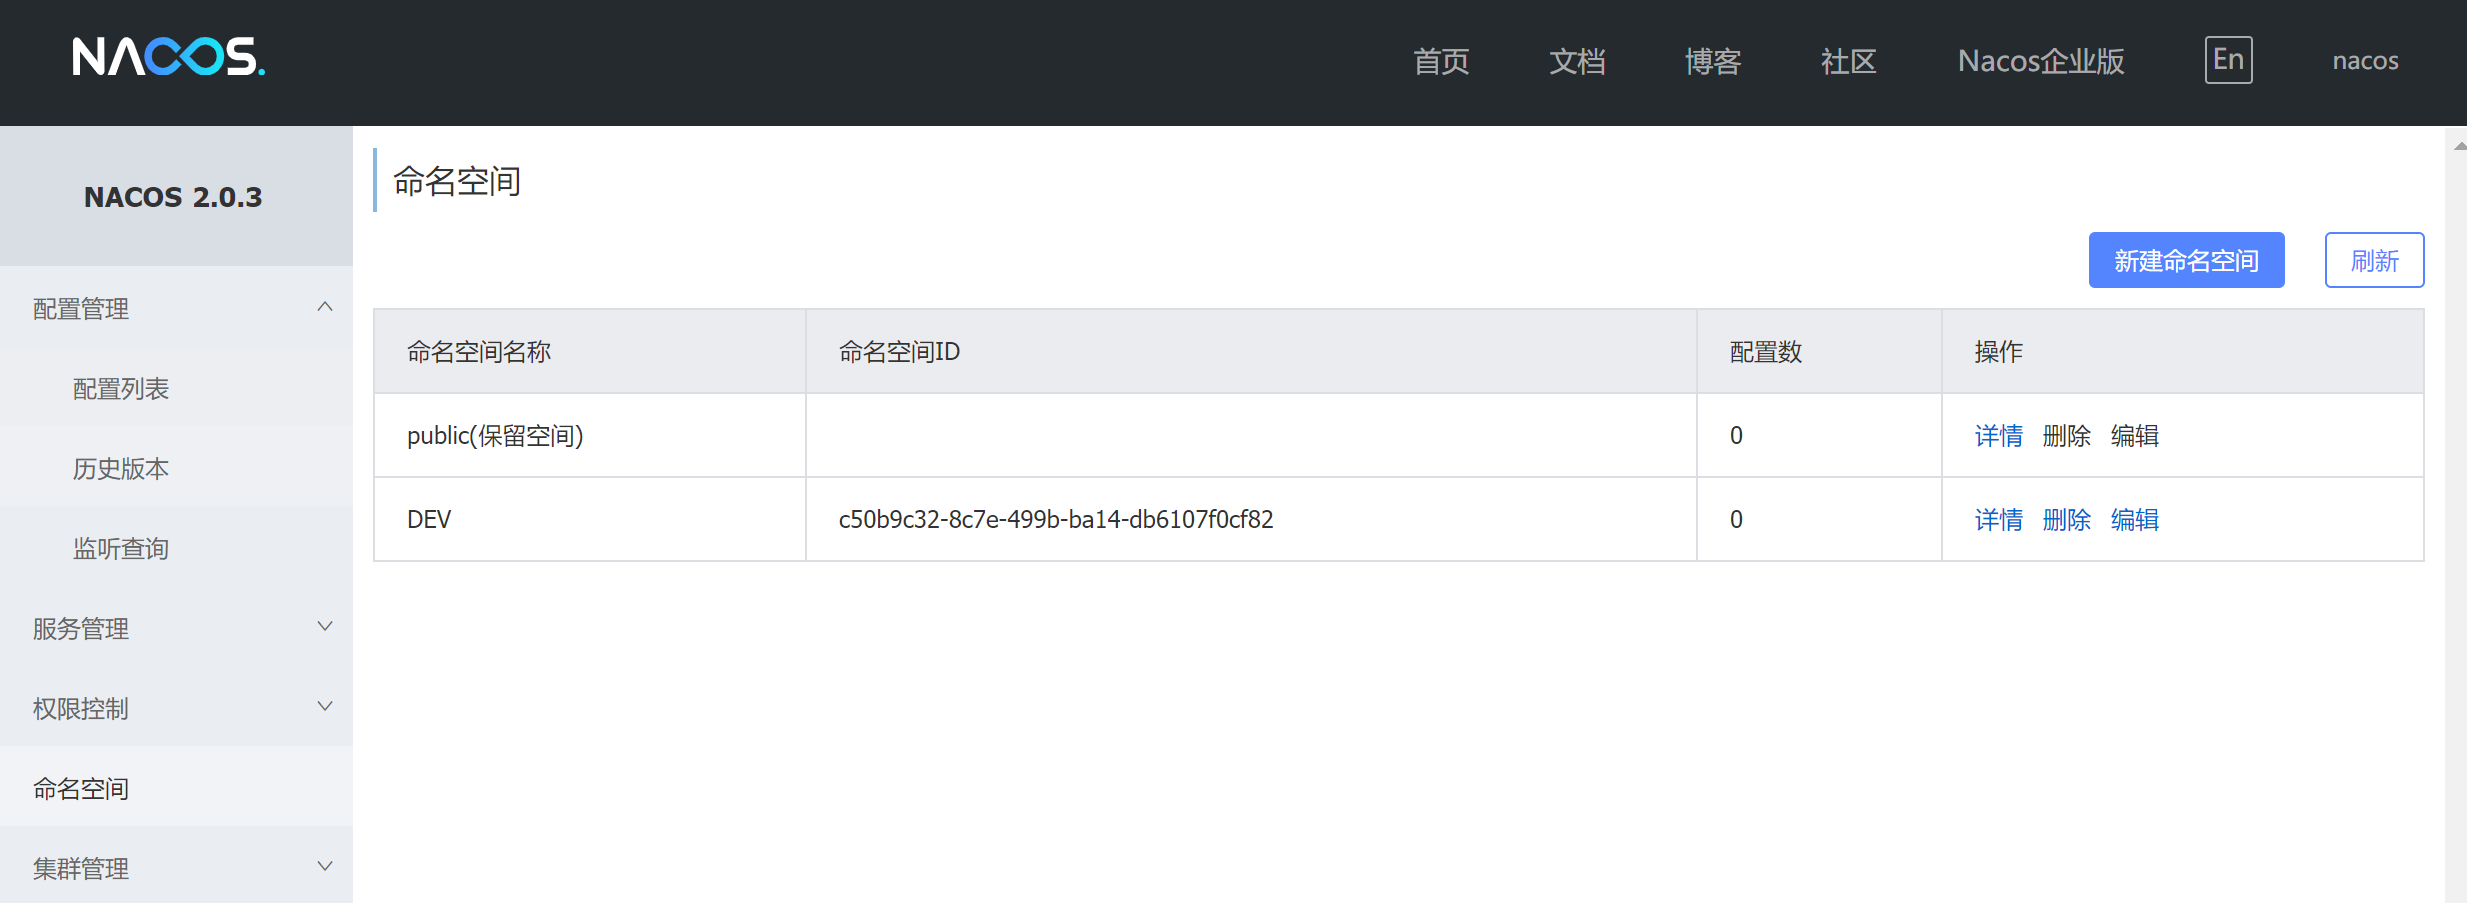
浏览器访问http://ip:8088/nacos,进入如下界面:

说明已经实现了ngxin的负载均衡。
用户名和密码登录:nacos/nacos
新建命名空间DEV
此时nacos_config数据库中的tenant_info表多出了一条数据:

由于我搭建了mysql主从复制,现在我们来看从数据库的tenant_info表中是否有记录:

发现有数据,也说明了我搭建的mysql主从复制成功。
mysql主从复制的搭建参考:https://www.cnblogs.com/zwh0910/p/16511041.html
六、搭建nginx集群
整体架构
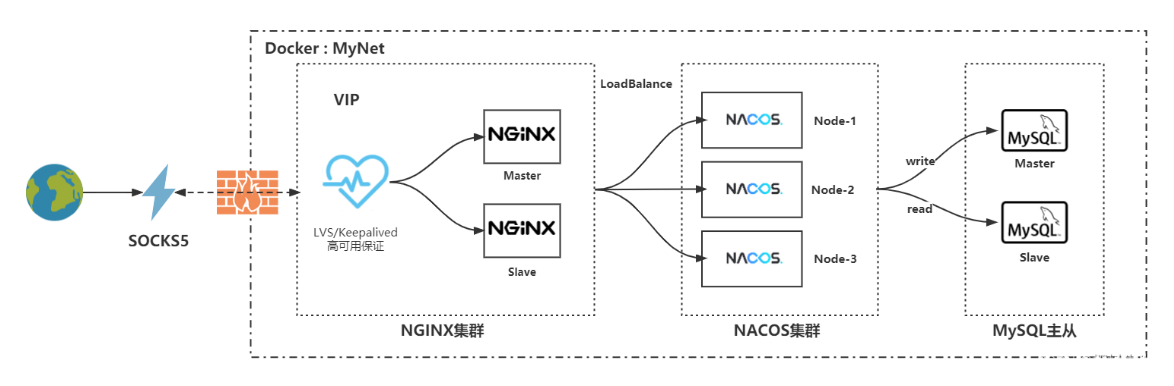
具体参考文档:https://www.cnblogs.com/zwh0910/p/16518416.html
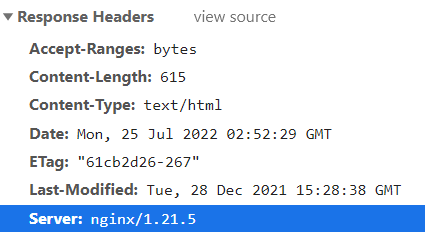
七、隐藏nginx版本号
浏览器访问:http://ip:8088/,按住F12,发现Response Headers中有nginx的版本号。
安装nmap命令
yum -y install nmap
扫描(注:V 是版本信息)
nmap -n -p 8088 -sV localhost
结果如下:
[root@xxx conf.d]# nmap -n -p 8088 -sV localhost

Starting Nmap 6.40 ( http://nmap.org ) at 2022-07-25 10:58 CST
Nmap scan report for localhost (127.0.0.1)
Host is up (0.000054s latency).

Other addresses for localhost (not scanned): 127.0.0.1
PORT     STATE SERVICE VERSION
8088/tcp open  http    nginx 1.21.5

Service detection performed. Please report any incorrect results at http://nmap.org/submit/ .
Nmap done: 1 IP address (1 host up) scanned in 6.34 seconds
修改配置文件nginx.conf
vim /home/nginx/conf/nginx.conf
添加如下内容
server_tokens off;
如下所示:
user  nginx;
worker_processes  auto;

error_log  /var/log/nginx/error.log notice;
pid        /var/run/nginx.pid;

events {
    worker_connections  1024;
}

http {
    include       /etc/nginx/mime.types;
    default_type  application/octet-stream;

    log_format  main  '$remote_addr - $remote_user [$time_local] "$request" '
                      '$status $body_bytes_sent "$http_referer" '
                      '"$http_user_agent" "$http_x_forwarded_for"';

    access_log  /var/log/nginx/access.log  main;
    server_tokens   off;
    sendfile        on;
    #tcp_nopush     on;

    keepalive_timeout  65;

    #gzip  on;

    include /etc/nginx/conf.d/*.conf;
}
重启nginx
docker restart mynginx
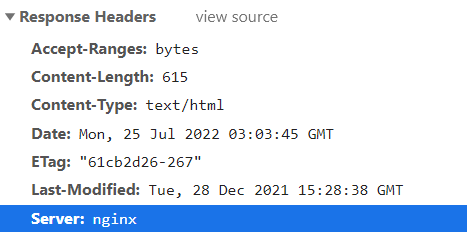
浏览器访问:http://ip:8088/,按住F12,发现Response Headers中已经没有nginx的版本号。
再次扫描
nmap -n -p 8088 -sV localhost
结果如下:
[root@hecs-140905 conf]# nmap -n -p 8088 -sV localhost

Starting Nmap 6.40 ( http://nmap.org ) at 2022-07-25 11:04 CST
Nmap scan report for localhost (127.0.0.1)
Host is up (0.000059s latency).

Other addresses for localhost (not scanned): 127.0.0.1
PORT     STATE SERVICE VERSION
8088/tcp open  http    nginx

Service detection performed. Please report any incorrect results at http://nmap.org/submit/ .
Nmap done: 1 IP address (1 host up) scanned in 6.33 seconds
发现nginx的版本号已经不见。
Original: https://www.cnblogs.com/zwh0910/p/16424641.html
Author: 周文豪
Title: docker安装nginx实现负载均衡
原创文章受到原创版权保护。转载请注明出处:https://www.johngo689.com/534825/
转载文章受原作者版权保护。转载请注明原作者出处!