


前言
通过语音方式与机器进行交互可以在很多场景下提高效率,也是当下人工智能领域内研究的热点之一。语音识别技术的应用场景可以划分为以车载语音助手为例的车载场景、以智能家居设备的家庭场景等。要实现人与机器间的语音交互,需要首先让机器能够识别声音内容,但通用的语音识别服务无法完全满足不同场景下的需求,因此客户需要根据自己的需求训练模型。
本文会为大家展示如何 使用Amazon SageMaker服务训练自己的语音识别模型,我们选择了一个 开源的语音识别项目WeNet作为示例。
Amazon SageMaker是一项完全托管的机器学习服务,涵盖了数据标记、数据处理、模型训练、超参调优、模型部署及持续模型监控等基本流程;也提供自动打标签,自动机器学习,监控模型训练等高阶功能。其通过全托管的机器学习基础设施和对主流框架的支持,可以降低客户机器学习的整体拥有成本。
WeNet是一个面向工业级产品的开源端到端语音识别解决方案,同时支持流式及非流式识别,并能高效运行于云端及嵌入式端。模型在训练的过程中,需要用到大量的计算资源,我们可以借助Amazon SageMaker非常方便的启动包含多台完全托管的训练实例集群,加速训练过程。

???? 想要了解更多亚马逊云科技最新技术发布和实践创新,敬请关注在上海、北京、深圳三地举办的2021亚马逊云科技中国峰会!点击图片报名吧~
准备工作
在开始训练模型之前,我们需要做一些准备工作,包括准备FSx文件系统以存放训练过程中的数据、创建Amazon SageMaker Notebook作为实验环境、在笔记本中挂载FSx文件系统、准备实验代码,以及准备数据处理及模型训练的运行环境(Docker镜像)并把镜像推送到Amazon ECR(Elastic Container Registry)中。
本文中的实验内容均使用us-east-1区域中的服务完成,您可以自行使用其他区域。
创建FSx for Lustre存储
以往,在Amazon SageMaker中训练模型一般使用 Amazon Simple Storage Service(Amazon S3)作为存储, 现在, Amazon SageMaker 做模型训练时已经支持多种数据源,比如Amazon FSx for Lustre和Amazon Elastic File System (EFS)。Amazon SageMaker通过直接读取存储在EFS或者FSx for Luster上的数据来加快训练模型时数据加载进度。
FSx for Lustre支持从Amazon S3中导入数据,以及将数据导出到Amazon S3,如果您的数据已经存放在Amazon S3中,FSx for Lustre以透明方式将对象显示为文件。同一个FSx文件系统还可用于多个Amazon SageMaker训练任务,省去多次重复下载训练数据集的时间。
这里,我们会选择使用FSx for Lustre作为主要的数据存储。接下来,我们会创建一个FSx for Lustre存储。
创建基于Amazon S3的FSx for Lustre
在”网络和安全性”处设置VPC,子网组和安全组,并确认安全组入站规则是否允许了端口998的流量。
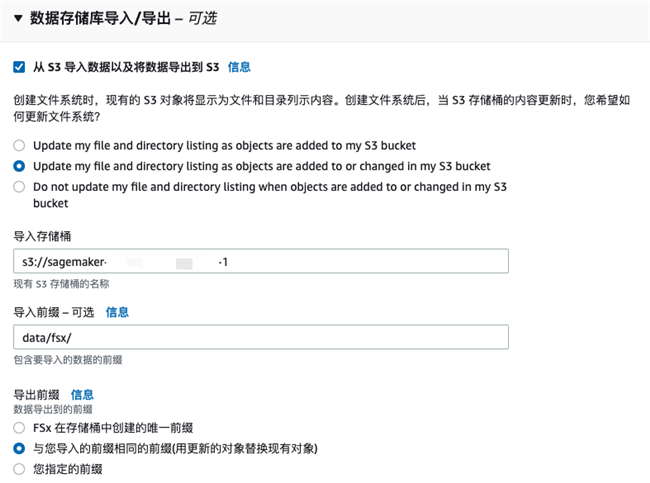
在”数据存储库导入/导出”处选择” 从Amazon S3导入数据及将数据导出到Amazon S3″并指定Amazon S3训练数据所在的存储桶和路径。
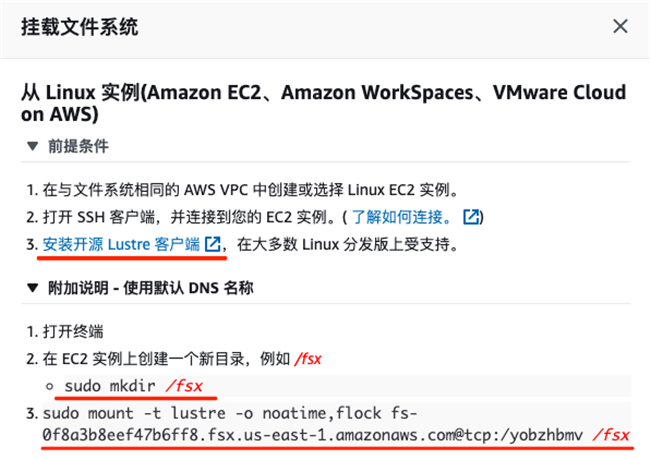
创建完成后,点击”挂载”按钮就会弹出挂载此文件系统的步骤,稍后我们会在Amazon SageMaker Notebook中使用到。

创建Amazon SageMaker Notebook
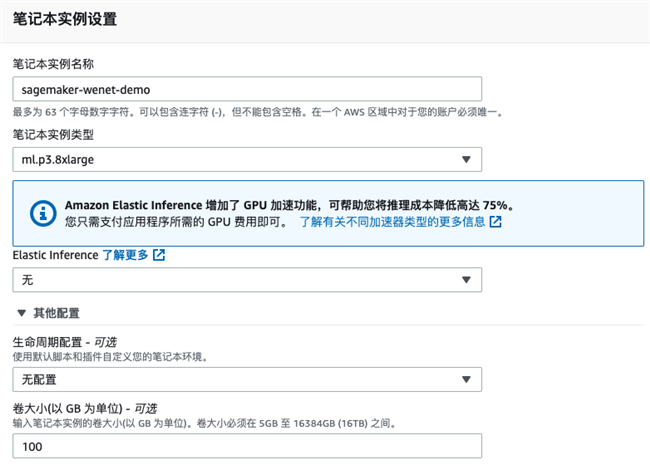
选择笔记本实例类型,这里我们选择一台ml.p3.8xlarge的机器,其包含4张Tesla V100 GPU卡。您可以选择其他GPU机器,如果您不需要GPU卡,也可以选择CPU机器。
此外,您可以自行决定笔记本实例的卷大小,如本实例选择了100GB的存储。您可以在后续调整此存储的大小。
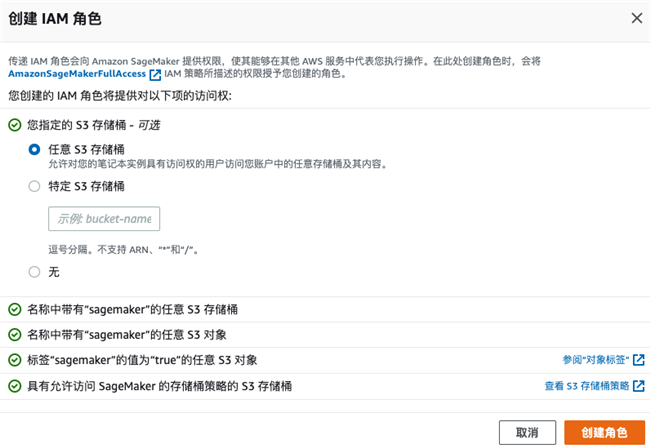
选择新建IAM角色,包含所需的权限,如下图:
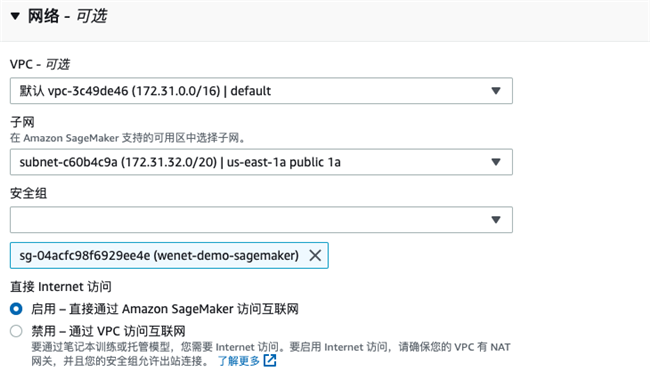
网络部分,选择FSx所在VPC以及公有子网即可,安全组需要允许Amazon SageMaker访问FSx。
在笔记本中挂载FSx存储
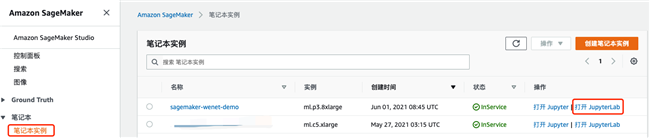
在笔记本控制台页面,点击”打开JupyterLab”。
在Launcher页面,点击”Terminal”以创建一个新的命令行终端。根据”创建基于Amazon S3的FSx”章节中提示的步骤,在命令终端中安装Lustre客户端,并执行挂载命令。
此外,您还可以配置笔记本生命周期策略,在创建或者启动Notebook实例的时候,实现笔记本自动挂载FSx文件系统,参考文档[2]。
下载WeNet源代码
在上一步的命令行终端,执行以下命令,代码下载即完成。
[En]
At the command line terminal in the previous step, execute the following command, and the code download will be completed.
1sudo chown ec2-user.ec2-user /fsx
2
3ln -s /fsx /home/ec2-user/SageMaker/fsx
4
5cd ~/SageMaker/fsx
6
7git clone -b sagemaker https://github.com/chen188/wenet
这里, 我们建议您将试验相关文件都放置在~/Amazon SageMaker目录下,该目录下的数据在Notebook实例关机之后依然可以单独存在。
您可以打开Notebook文件
/fsx/wenet/examples/aishell/s0/SM-WeNet.ipynb,
后续指令可在本笔记本中找到。
[En]
Follow-up commands can be found in this notebook.
准备Docker 镜像
在Amazon SageMaker中,很多任务都是基于Docker 镜像实现,如数据预处理、模型训练及模型托管等。 采用Docker镜像可以极大程度保证环境的一致性,并且降低环境预置的运维成本。
接下来,我们会需要构建自己的Docker镜像,来实现数据格式转换、模型训练。Amazon Web Service已经提供了一些通用的Deep Learning Container(DLC)环境,具体列表可以参考[6]。但是其中尚未包含TorchAudio包,此时,我们可以选择基于开源版本构建运行环境。
该镜像基于Ubuntu来构建,并安装pytorch 1.8.1、torchaudio及其他相关依赖。
文件/fsx/wenet/Dockerfile:
 1FROM ubuntu:latest
 2ENV DEBIAN_FRONTEND=noninteractive
 3ENV PATH /opt/conda/bin:$PATH
 4
 5RUN apt-get update --fix-missing && \
 6    apt-get install -y gcc net-tools && \
 7    apt-get install -y --no-install-recommends wget bzip2 ca-certificates libglib2.0-0 libxext6 libsm6 libxrender1 git mercurial subversion && \
 8    apt-get clean && \
 9    rm -rf /var/lib/apt/lists/* && \
10    wget --quiet https://repo.anaconda.com/archive/Anaconda3-2021.05-Linux-x86_64.sh -O ~/anaconda.sh && \
11    /bin/bash ~/anaconda.sh -b -p /opt/conda && \
12    rm ~/anaconda.sh && \
13    ln -s /opt/conda/etc/profile.d/conda.sh /etc/profile.d/conda.sh && \
14    echo ". /opt/conda/etc/profile.d/conda.sh" >> ~/.bashrc && \
15    echo "conda activate base" >> ~/.bashrc && \
16    find /opt/conda/ -follow -type f -name '*.a' -delete && \
17    find /opt/conda/ -follow -type f -name '*.js.map' -delete && \
18    /opt/conda/bin/conda clean -afy
19
20COPY ./requirements.txt /tmp/
21
22RUN pip install -r /tmp/requirements.txt && \
23    pip install torch==1.8.1+cu111 torchvision==0.9.1+cu111 torchaudio==0.8.1 -f https://download.pytorch.org/whl/lts/1.8/torch_lts.html && \
24    pip install sagemaker-training && \
25rm /tmp/requirements.txt
您可以注意到,我们 额外安装了Amazon SageMaker-training包,来提供镜像对Amazon SageMaker训练功能的支持。
构建镜像并推送到ECR
ECR是Amazon完全托管的容器注册表服务,我们可以将构建好的镜像推送到ECR,后续Amazon SageMaker在训练或者托管模型的时候,会从这里下载对应的镜像。
 1import boto3
 2account_id = boto3.client('sts').get_caller_identity().get('Account')
 3region = boto3.Session().region_name
 4ecr_repository = 'sagemaker-wenet'
 5
 6# 登录ECR服务
 7!aws ecr get-login-password --region {region} | docker login --username AWS --password-stdin {account_id}.dkr.ecr.{region}.amazonaws.com
 8
 9# 训练镜像
10training_docker_file_path = '/fsx/wenet'
11!cat $training_docker_file_path/Dockerfile
12
13tag = ':training-pip-pt181-py38'
14training_repository_uri = '{}.dkr.ecr.{}.amazonaws.com/{}'.format(account_id, region, ecr_repository + tag)
15print('training_repository_uri: ', training_repository_uri)
16
17!cd $training_docker_file_path && docker build -t "$ecr_repository$tag" .
18!docker tag {ecr_repository + tag} $training_repository_uri
19!docker push $training_repository_uri
20Python
使用Amazon SageMaker训练模型
现在,我们已经完成实验环境准备工作,接下来,我们就进入正题,利用 Amazon SageMaker完成模型训练工作。
WeNet支持训练多种模型,如Conformer、Transformer等,这里我们会以unified transformer为例展示整个训练流程。对于训练数据,WeNet同样支持多种来源,只需要在训练的时候,按照 格式整理数据即可,如AIShell-1、AIShell-2及LibriSpeech等,这里,我们会以AIShell-1为例。
- 格式 https://wenet-e2e.github.io/wenet/tutorial.html#stage-0-prepare-training-data
数据下载
我们首先需要将训练数据下载到本地FSx存储中,在notebook中执行命令:
1cd /fsx/wenet/examples/aishell/s0 && \
2bash run.sh --stage -1 --stop_stage -1 --data /fsx/asr-data/OpenSLR/33
3Bash
数据会自动被下载到/fsx/asr-data/OpenSLR/33目录中,下载完成后的状态为:
1sh-4.2$ ls /fsx/asr-data/OpenSLR/33
2data_aishell  data_aishell.tgz  resource_aishell  resource_aishell.tgz
3Bash
数据预处理
接下来,我们需要将数据整理为WeNet所需的格式。这里我们借助Amazon SageMaker来执行数据预处理的逻辑。
挂载FSx文件系统到数据预处理容器
在前面我们提到,模型训练所需的数据已经存放在FSx文件系统中,我们在通过Amazon SageMaker处理数据的时候,需要把此FSx文件系统挂载到容器里。挂载文件系统的代码如下:
 1from sagemaker.inputs import FileSystemInput
 2from sagemaker.pytorch.estimator import PyTorch
 3
 4file_system_id = 'fs-0f8a3xxxxf47b6ff8'
 5file_system_path = '/yobzhbmv'
 6file_system_access_mode = 'rw'
 7file_system_type = 'FSxLustre'
 8
 9security_group_ids = ['sg-04acfcxxxx929ee4e']
10subnets= ['subnet-07ce0abxxxxcfeb25']
11
12file_system_input_train = FileSystemInput(file_system_id=file_system_id,
13                                  file_system_type=file_system_type,
14                                  directory_path=file_system_path,
15                                  file_system_access_mode=file_system_access_mode)
16Python
需要注意,subnets参数中指定的子网,需要有访问Amazon S3等服务的能力,您可以选择使用私有子网,并为子网指定到NAT网关的默认路由。
security_group_ids指定的安全组会被绑定到Amazon SageMaker启动的实例上,需要有访问FSx服务的能力。
启动数据预处理作业
至此,我们通过指定文件系统的id、文件系统的路径、读写模式等信息,定义好了需要挂载的文件系统。接下来,就可以设置数据处理的时候,运行环境及需要传递的参数信息。代码如下:
 1hp= {
 2    'stage': 0, 'stop_stage': 3, 'train_set':'train',
 3    'trail_dir':'/opt/ml/input/data/train/sm-train/trail0',
 4    'data': '/opt/ml/input/data/train/asr-data/OpenSLR/33',
 5    'shared_dir': '/opt/ml/input/data/train/shared'
 6}
 7
 8estimator=PyTorch(
 9    entry_point='examples/aishell/s0/sm-run.sh',
10    image_uri=training_repository_uri,
11    instance_type='ml.c5.xlarge',
12    instance_count=1,
13    source_dir='.',
14    role=role,
15    hyperparameters=hp,
16
17    subnets=subnets,
18    security_group_ids=security_group_ids,
19
20    debugger_hook_config=False,
21    disable_profiler=True
22)
23Python
我们通过image_uri参数指定数据处理代码运行的容器环境,instance_type指定需要的实例类型,instance_count指定需要的实例数量,hyperparameters指定需要传递的超参数。
接下来,您可以启动指定的计算资源,并使用单个命令执行数据处理逻辑。
[En]
Next, you can start the specified computing resource and execute the data processing logic with a single command.
1estimator.fit(inputs={'train': file_system_input_train})
2Python
我们通过inputs参数设置了容器运行时的数据输入信息,Amazon SageMaker支持多种数据来源,如本地文件(file://),Amazon S3路径(s3://bucket/path)及文件系统(FSx或者EFS)。这里,我们的FSx文件系统会被映射到容器的 /opt/ml/input/data/train 目录下,train为自定义的channel名称,其他常见的channel包括test,validation等。Amazon SageMaker中具体的路径映射规则可以参考[1]。
查看处理后的数据
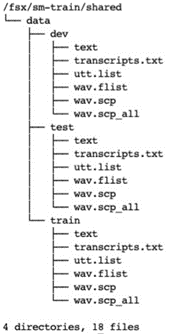
处理完成之后,会在trail_dir及shared_dir目录下创建对应的文件。在Notebook实例上执行命令,具体如下:
tree -L 3 /fsx/sm-train/trail0

tree -L 3 /fsx/sm-train/shared
启动模型训练作业
至此,我们已经准备好了训练数据。接下来,我们可以进入模型训练阶段。我们将展示两种培训模式:本地培训和全托管实例培训。
[En]
At this point, we have prepared the training data. Next, we can enter the model training phase. We will show two training modes: * local training * and * fully managed instance training * .
本地训练模式
在模型研发过程中,算法人员需要反复调整代码逻辑,如果每次代码调整就打包一个docker镜像就显得很麻烦,因此,您可以先通过Amazon SageMaker的本地训练模式,来调试代码。本地训练模式会直接在Notebook所在实例中启动对应的容器并执行训练逻辑,并自动将数据映射给容器。有关本地模式训练的细节,可以参考文档[3],这里我们使用的本地训练代码如下:
 1instance_type='local_gpu'
 2instance_count = 1
 3CUDA_VISIBLE_DEVICES='0'
 4
 5hp= {
 6    'stage': 4, 'stop_stage': 4, 'train_set':'train',
 7    'data': data_dir, 'trail_dir': trail_dir, 'shared_dir': shared_dir,
 8    'CUDA_VISIBLE_DEVICES': CUDA_VISIBLE_DEVICES,
 9    'num_nodes': instance_count
10}
11
12estimator=PyTorch(
13    entry_point='examples/aishell/s0/sm-run.sh',
14    image_uri=training_repository_uri,
15    instance_type =instance_type,
16    instance_count=instance_count,
17    source_dir='.',
18    role=role,
19    hyperparameters=hp,
20
21    subnets=subnets,
22    security_group_ids=security_group_ids,
23
24    debugger_hook_config=False,
25    disable_profiler=True
26)
27
28
29estimator.fit({'train': 'file:///fsx'})
30Python
代码的输出如下:
 1Creating 2n0im72bz3-algo-1-tpyyu ...
 2Creating 2n0im72bz3-algo-1-tpyyu ... done
 3Attaching to 2n0im72bz3-algo-1-tpyyu
 4...

 52n0im72bz3-algo-1-tpyyu | Invoking script with the following command:
 62n0im72bz3-algo-1-tpyyu |
 72n0im72bz3-algo-1-tpyyu | /bin/sh -c ./examples/aishell/s0/sm-run.sh --CUDA_VISIBLE_DEVICES 0 --data /opt/ml/input/data/train/asr-data/OpenSLR/33 --num_nodes 1 --shared_dir /opt/ml/input/data/train/sm-train/shared --stage 4 --stop_stage 4 --trail_dir /opt/ml/input/data/train/sm-train/trail0 --train_set train
 8...

 92n0im72bz3-algo-1-tpyyu | algo-1-tpyyu: 2021-06-24 15:50:09,408 INFO     [checkpoint.py:33] Checkpoint: save to checkpoint /opt/ml/input/data/train/sm-train/trail0/exp/unified_transformer/init.pt
102n0im72bz3-algo-1-tpyyu | algo-1-tpyyu: 2021-06-24 15:50:09,669 INFO     [train.py:228] Epoch 0 TRAIN info lr 8e-08
112n0im72bz3-algo-1-tpyyu | algo-1-tpyyu: 2021-06-24 15:50:09,670 INFO     [executor.py:32] using accumulate grad, new batch size is 1 timeslarger than before
122n0im72bz3-algo-1-tpyyu | algo-1-tpyyu: 2021-06-24 15:50:12,560 DEBUG    [executor.py:103] TRAIN Batch 0/7507 loss 417.150146 loss_att 148.725983 loss_ctc 1043.473145 lr 0.00000008 rank 0Python
上述参数中,source_dir指定的路径会被打包上传到Amazon S3,然后,下载到容器实例中。这样的话,我们每次的代码变更都可以直接体现在容器中。
此外,在使用本地训练模式时,Amazon SageMaker会借助本地的docker-compose启动对应的训练任务,您可以在/tmp目录下找到相关的docker-compose文件,
如/tmp/tmp6y009akq,我们可以观察到如下内容:
1sh-4.2$ tree /tmp/tmp6y009akq
2/tmp/tmp6y009akq
3├── artifacts
4├── docker-compose.yaml
5├── model
6└── output
7    └── data
8Bash
其中,docker-compose.yaml包含了相关的配置信息,内容如下:
 1sh-4.2$ cat /tmp/tmp6y009akq/docker-compose.yaml
 2networks:
 3  sagemaker-local:
 4    name: sagemaker-local
 5services:
 6  algo-1-tpyyu:
 7    command: train
 8    container_name: 2n0im72bz3-algo-1-tpyyu
 9    environment:
10    - AWS_REGION=us-east-1
11    - TRAINING_JOB_NAME=sagemaker-wenet-2021-06-24-15-49-58-018
12    image: .dkr.ecr.us-east-1.amazonaws.com/sagemaker-wenet:training-pip-pt181-py38
13    networks:
14      sagemaker-local:
15        aliases:
16        - algo-1-tpyyu
17    stdin_open: true
18    tty: true
19    volumes:
20    - /tmp/tmp6y009akq/algo-1-tpyyu/output:/opt/ml/output
21    - /tmp/tmp6y009akq/algo-1-tpyyu/output/data:/opt/ml/output/data
22    - /tmp/tmp6y009akq/algo-1-tpyyu/input:/opt/ml/input
23    - /tmp/tmp6y009akq/model:/opt/ml/model
24    - /opt/ml/metadata:/opt/ml/metadata
25    - /fsx:/opt/ml/input/data/train
26version: '2.3'
27Bash
可以看到,docker-compose通过volumes参数,将本地的路径映射为容器里的目录,而不需要执行训练数据的二次复制。
托管训练模式
在确定代码的逻辑正确之后,我们可以通过修改参数使用托管实例轻松启动实际的培训任务。
[En]
After determining that the logic of the code is correct, we can easily start a real training task using a managed instance by modifying the parameters.
这里,我们只需要调整实例类型、需要的实例数量及数据输入方式。我们以2台ml.p3.8xlarge的实例为例,其各自包含4张Tesla V100显卡,共8张显卡。
训练代码如下:
 1instance_type='ml.p3.8xlarge'
 2instance_count = 2
 3CUDA_VISIBLE_DEVICES='0,1,2,3'
 4
 5hp= {
 6    'stage': 4, 'stop_stage': 4, 'train_set':'train',
 7    'data': data_dir, 'trail_dir': trail_dir, 'shared_dir': shared_dir,
 8    'CUDA_VISIBLE_DEVICES': CUDA_VISIBLE_DEVICES,
 9    'ddp_init_protocol': 'tcp',
10    'num_nodes': instance_count
11}
12
13estimator=PyTorch(
14    entry_point='examples/aishell/s0/sm-run.sh',
15    image_uri=training_repository_uri,
16    instance_type =instance_type,
17    instance_count=instance_count,
18    source_dir='.',
19    role=role,
20    hyperparameters=hp,
21
22    subnets=subnets,
23    security_group_ids=security_group_ids,
24
25    debugger_hook_config=False,
26    disable_profiler=True,
27    environment={
28        'NCCL_SOCKET_IFNAME': 'eth0',
29        'NCCL_IB_DISABLE': 1
30    }
31)
32
33estimator.fit(inputs={'train': file_system_input_train})
34Python
其中,参数CUDA_VISIBLE_DEVICES需设定为训练实例的GPU卡数量。如果仅有一张GPU显卡,则其值为’0’。
这里需要注意的是,撰写本文时,Amazon SageMaker训练任务在挂载FSx时,还不支持指定挂载选项flock,导致无法使用基于file的分布式初始化方法。因此,我们简单调整WeNet的训练代码,转而使用基于TCP的初始化方法,来继续模型训练。
您还可以观察到,我们传入了environment参数,其表示设定容器中对应的环境变量。由于Amazon SageMaker拉起的训练实例会包含不止一个网卡,因此,我们需要通过NCCL_SOCKET_IFNAME环境变量,将NCCL使用的网卡设定为eth0。
此外,Amazon SageMaker支持使用竞价实例来训练模型,以有效降低成本,您可以参考文档[4]查看使用方法。
模型文件
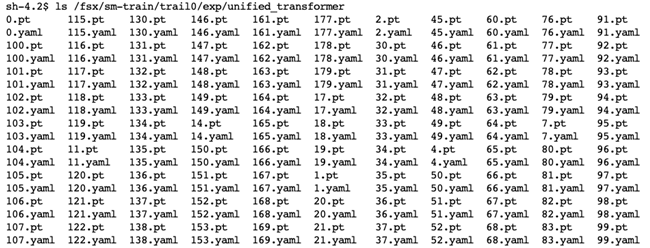
在训练完成之后,会在您设定的目录生成对应的模型文件,本文为/fsx/sm-train/trail0/exp/unified_transformer目录。
如果您需要导出支持序列化和优化的(TorchScript)模型,则可以调整hp变量中的stage及stop_stage,通过本地模式执行训练代码即可。有关TorchScript,可以参考[5]。
相关代码逻辑如下:
 1instance_type='local_gpu'
 2...

 3hp= {
 4    'stage': 5, 'stop_stage': 6, 'train_set':'train',
 5...

 6}
 7
 8estimator=PyTorch(
 9...

10)
11
12estimator.fit({'train':'file:///fsx'})
13Python
执行完成之后,会在上述目录生成对应的模型文件final.zip及量化模型final_quant.zip文件。
现在,我们已经完成了一次模型训练工作。我们知道, 想要得到一个满足当下需求的模型,需要经历多次试验,多次迭代及训练。您可以通过上述方法 ,在Amazon SageMaker上快速尝试不同的超参数或者其他的算法,而无需考虑如何配置机器学习的基础环境等运维相关工作。
模型托管
至此,我们已经得到了训练好的模型文件。您可以通过Amazon SageMaker部署模型,也可以通过其他方式部署。在后续的文章中,我们会详细介绍如何在Amazon Web Services部署训练好的模型。
总结
本文展示了 使用Amazon SageMaker 运行开源端到端语音识别模型WeNet的方法,涵盖数据处理、Docker运行环境构建、模型训练等内容。
参考资料
[1] Amazon SageMaker Toolkits:
https://docs.aws.amazon.com/sagemaker/latest/dg/amazon-sagemaker-toolkits.html
[2] 笔记本自动挂载FSx文件系统:
https://github.com/aws-samples/amazon-sagemaker-notebook-instance-lifecycle-config-samples/blob/master/scripts/mount-fsx-lustre-file-system/on-start.sh
[3] 使用本地模式训练模型:
https://sagemaker.readthedocs.io/en/stable/overview.html#local-mode
[4] 使用Spot模式训练模型:
https://docs.aws.amazon.com/sagemaker/latest/dg/model-checkpoints.html
[5] TorchScript compiler:
https://pytorch.org/docs/1.8.1/jit.html
[6] DLC列表:
https://github.com/aws/deep-learning-containers/blob/master/available_images.md
本篇作者
陈斌
亚马逊云科技解决方案架构师
负责咨询和设计基于亚马逊云技术的云计算解决方案架构,在解决客户实际问题方面拥有丰富经验,目前专注于深度学习的研究和应用。
[En]
Responsible for consulting and designing the architecture of cloud computing solutions based on Amazon cloud technology, with rich experience in solving customers’ practical problems, and currently focusing on the research and application of in-depth learning.


听说,点完下面4个按钮
就不会碰到bug了!

Original: https://blog.csdn.net/u012365585/article/details/118716229
Author: 亚马逊云开发者
Title: Amazon SageMaker新玩法——定制你的语音识别模型
原创文章受到原创版权保护。转载请注明出处:https://www.johngo689.com/525091/
转载文章受原作者版权保护。转载请注明原作者出处!