

Lab3 Part A
内核维护有关用户环境的三个全局量
[En]
The kernel maintains three global quantities about the user environment
struct Env *envs = NULL;    // All environments
struct Env *curenv = NULL;  // The current env
static struct Env *env_free_list; // Free environment list
对应于所有环境、当前运行的用户环境、空闲环境链表。
[En]
Corresponding to all the environments, the currently running user environment, and the free environment linked list.
Environment State
Env结构体的定义如下:
struct Env {
    struct Trapframe env_tf;    // Saved registers
    struct Env *env_link;       // Next free Env
    envid_t env_id;             // Unique environment identifier
    envid_t env_parent_id;      // env_id of this env's parent
    enum EnvType env_type;      // Indicates special system environments
    unsigned env_status;        // Status of the environment
    uint32_t env_runs;          // Number of times environment has run
    // Address space
    pde_t *env_pgdir;           // Kernel virtual address of page dir
};
各个字段的解释如下:
env_tf:
当用户环境暂停时,重要寄存器(受保护站点)的值。当切换到用户状态内核模式时,内核也会保存这些值,稍后可以恢复用户环境。
[En]
When the user environment pauses, the value of the important register (the protected site). The kernel also saves these values when switching in user state kernel mode, and the user environment can be restored later.
env_link:
这个指针指向env_free_list的后一个空闲的Env结构体。
env_id:
唯一地确定使用这个结构体的用户环境。用户环境终止后,内核也许会把这个结构体分给另外一个环境,新的环境会有新的 env_id值。
env_parent_id:
创建这个用户环境的环境(parent)的 env_id,构建一颗tree。
env_type:
用于区别特别的用户环境。大多数清空下值都是 ENV_TYPE_USER.
env_status:
此变量可能具有以下值:
[En]
This variable has the following possible values:
ENV_FREE: 代表这个Env结构体不活跃的,应该在链表env_free_list中。
ENV_RUNNABLE: 对应的用户环境已经 就绪,等待被分配处理机。
ENV_RUNNING: 对应的用户环境正在运行。
ENV_NOT_RUNNABLE: Env结构体所代表的是一个当前状态下活跃的用户环境,但是并未就绪,在等待IPC(Interprocess communication)。
ENV_DYING: Env对应的是一个僵尸环境(Zombie environment)。一个僵尸环境在下一次陷入内核时会被释放回收(Lab4 会使用)。
env_pgdir:
存储此环境的页目录的虚拟地址。
[En]
The virtual address of the page directory where this environment is stored.
Allocating the Environment Array

需要进一步地修改mem_init()函数,分配一个envs数组,这个数组保存所有的环境,并进行映射。需要新增的代码如下:
struct Env* envs = (struct Env*)boot_alloc(NENV * sizeof(struct Env));
memset(envs,0,NENV * sizeof(struct Env));
//... ...

boot_map_region(kern_pgdir,UENVS,PTSIZE,PADDR(envs),PTE_U);
Creating and Running Environments
现在需要完成如何让用户环境跑起来的代码了。因为还没有文件系统,因此只能加载嵌入内核自身的静态二进制映像。Lab3的makefile会生成几个二进制文件放在 obj/user中,一些技巧将这些二进制文件link到了内核之中。二进制文件中会有一个特殊的符号,通过生成的这些符号可以来引用到这些代码。
- 第一个函数env_init(),需要初始化所有的Env结构,将其挂入链表,也调用env_init_percpu来配置底层的信息。
void
env_init(void)
{
    // Set up envs array
    // LAB 3: Your code here.
    for(int i=NENV-1;i>=0;i++){
        envs[i].env_id=0;
        envs[i].env_status=ENV_FREE;
        envs[i].env_link=env_free_list;
        env_free_list=&envs[i];
    }
    // Per-CPU part of the initialization
    env_init_percpu();
}
与lab2的pages数组处理类似。注意 链表的顺序。
* 第二个函数env_setup_vm(),为新的环境分配页目录,并且初始化
static int
env_setup_vm(struct Env *e)
{
    //------------------------------------------
    // 源代码中的注释此处为了篇幅,很多详细说明都略去了
    // 详细的信息,请自行阅读源代码
    //------------------------------------------
    int i;
    struct PageInfo *p = NULL;
    // 给页目录的分配一个物理页来存储
    if (!(p = page_alloc(ALLOC_ZERO)))
        return -E_NO_MEM;

    // 得到页目录的虚拟地址所在
    e->env_pgdir = (pde_t*)page2kva(p);
    // 要求的自增引用计数
    p->pp_ref++;

    // 这部分的页目录值,和kern_pgdir是一致的
    // 因此 也可以使用
    // memcpy(e->env_pgdir,kern_pgdir,PGSIZE);
    for(i=0;ienv_pgdir[i]=0;
    }
    for(i=PDX(UTOP);ienv_pgdir[i]=kern_pgdir[i];
    }
    // 唯一和kern_pgdir不一样的是对于自身的映射
    e->env_pgdir[PDX(UVPT)] = PADDR(e->env_pgdir) | PTE_P | PTE_U;
    return 0;
}
在设置了页目录后,用户环境继承了内核的地址映射,后续每个用户进程都可以拥有自己的虚拟地址空间,共享内核。
[En]
After setting the page directory, the user environment inherits the address mapping of the kernel, and for the follow-up, each user process can have its own virtual address space and share the kernel.
* 第三个函数region_alloc(),作用是为环境分配物理空间。分配物理空间,就是之前说的分配物理页,使用的是page_alloc()。分配物理也,然后更改页表。
static void
region_alloc(struct Env *e, void *va, size_t len)
{
    void * beigin =ROUNDDOWN(va,PGSIZE);
    void * end = ROUNDUP(va+len,PGSIZE);
    for(;beiginenv_pgdir,apage,beigin,PTE_U|PTE_W);
    }
}
- 第四个函数 load_icode(),用来解析一个ELF映像,像Lab1中bootloader做的一样。并把映像加载到新环境的用户空间。在编写时,如下几点值得注意:
- 阅读boot/main.c 来得到灵感
- 只有p_type=ELF_PROG_LOAD的段才需要被被加载
- ph->p_va 是需要被加载到的虚地址
- ph->p_memsz 是整个在内存中占的大小,也是我们申请空间时的大小
- 从 binary + ph->p_offset 开始的ph->p_filesz字节需要被复制到ph->p_va处
- 需要考虑一些ELF头的入口点处理
- 这个过程在进行环境处理时,因为需要映射新的页,因此需要切换页目录
- 哪些地方会产生panic?
static void
load_icode(struct Env *e, uint8_t *binary)
{
    struct Proghdr *ph,*end_ph;
    struct Elf * elf_header = (struct Elf*)binary;
    if(elf_header->e_magic!=ELF_MAGIC){
        panic("not a elf format file");
    }
    ph=(struct Proghdr*)((uint8_t*)elf_header+elf_header->e_phoff);
    end_ph=ph+elf_header->e_phnum;
    lcr3(PADDR(e->env_pgdir));
    for(;php_type==ELF_PROG_LOAD){
            if(ph->p_memsz-ph->p_fileszp_va,ph->p_memsz);
            memcpy((void*)ph->p_va,(void*)binary+ph->p_offset,ph->p_filesz);
            memset((void*)(ph->p_va+ph->p_filesz),0,ph->p_memsz-ph->p_filesz);
        }
    }
    e->env_tf.tf_eip=elf_header->e_entry;
    region_alloc(e,(void*)(USTACKTOP-PGSIZE),PGSIZE);
    lcr3(PADDR(kern_pgdir));
}
- 第五个函数env_create(),用来分配环境并加载ELF文件。实现很简单,使用env_alloc获得一个新的环境,然后用load_icode加载。
void
env_create(uint8_t *binary, enum EnvType type)
{
    struct Env* new_env;
    int r;
    if((r=env_alloc(&new_env,0))!=0){
        panic("env alloc fail in env creat :%e",r);
    }
    new_env->env_type=type;
    load_icode(new_env,binary);
}
- 第六个函数env_run(),在用户态中开始运行一个环境。这部分函数只要按照注释完成即可。
void
env_run(struct Env *e)
{
    if((curenv!=NULL) && curenv->env_status==ENV_RUNNING){
        curenv->env_type=ENV_RUNNABLE;
    }
    curenv=e;
    e->env_status=ENV_RUNNING;
    e->env_runs++;
    lcr3(PADDR(e->env_pgdir));
    //保存环境
    env_pop_tf(&e->env_tf);
}
有一个函数也值得讨论,那就是env_pop_tf(),相关的结构和定义如下:
struct PushRegs {
    /* registers as pushed by pusha */
    uint32_t reg_edi;
    uint32_t reg_esi;
    uint32_t reg_ebp;
    uint32_t reg_oesp;      /* Useless */
    uint32_t reg_ebx;
    uint32_t reg_edx;
    uint32_t reg_ecx;
    uint32_t reg_eax;
} __attribute__((packed));

struct Trapframe {
    struct PushRegs tf_regs;
    uint16_t tf_es;
    uint16_t tf_padding1;
    uint16_t tf_ds;
    uint16_t tf_padding2;
    uint32_t tf_trapno;
    /* below here defined by x86 hardware */
    uint32_t tf_err;
    uintptr_t tf_eip;
    uint16_t tf_cs;
    uint16_t tf_padding3;
    uint32_t tf_eflags;
    /* below here only when crossing rings, such as from user to kernel */
    uintptr_t tf_esp;
    uint16_t tf_ss;
    uint16_t tf_padding4;
} __attribute__((packed));

void
env_pop_tf(struct Trapframe *tf)
{
    asm volatile(
        "\tmovl %0,%%esp\n"     //  esp指向tf结构,弹出时会弹到tf里
        "\tpopal\n"             //  弹出tf_regs中值到各通用寄存器
        "\tpopl %%es\n"         //  弹出tf_es 到 es寄存器
        "\tpopl %%ds\n"         //  弹出tf_ds 到 ds寄存器
        "\taddl $0x8,%%esp\n"   //  跳过tf_trapno和tf_err
        "\tiret\n"              //  中断返回 弹出tf_eip,tf_cs,tf_eflags,tf_esp,tf_ss到相应寄存器
        : : "g" (tf) : "memory");
    panic("iret failed");  /* mostly to placate the compiler */
}
运行 make qemu-gdb和 make gdb,然后断点打在env_pop_tf,执行到iret指令,在iret之前
eax            0x0                 0
ecx            0x0                 0
edx            0x0                 0
ebx            0x0                 0
esp            0xf01d1030          0xf01d1030
ebp            0x0                 0x0
esi            0x0                 0
edi            0x0                 0
eip            0xf01038e2          0xf01038e2
eflags         0x96                [ PF AF SF ]
cs             0x8                 8
ss             0x10                16
ds             0x23                35
es             0x23                35
fs             0x23                35
gs             0x23                35
可以看到此时的cs为00001 000,是我们GDT中的第一个段,内核段。在iret之后
eax            0x0                 0
ecx            0x0                 0
edx            0x0                 0
ebx            0x0                 0
esp            0xeebfe000          0xeebfe000
ebp            0x0                 0x0
esi            0x0                 0
edi            0x0                 0
eip            0x800020            0x800020
eflags         0x2                 [ ]
cs             0x1b                27
ss             0x23                35
ds             0x23                35
es             0x23                35
fs             0x23                35
gs             0x23                35
cs=0X1b=0001 1011,所以是GDT中的第三个描述符(user code segment),权限为3(用户态)。
在 obj/user/hello.asm找到
800b93: cd 30                   int    $0x30
    syscall(SYS_cputs, 0, (uint32_t)s, len, 0, 0, 0);
断点设置在此处,由于系统调用还没有实现,这里往下执行就会触发triple fault。
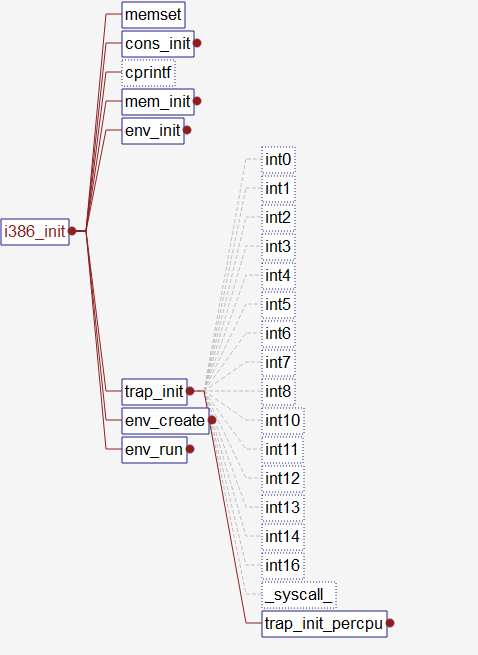
可以有如下的函数调用图:
- start (kern/entry.S)
- i386_init (kern/init.c)
- cons_init
- mem_init
- env_init
- trap_init (still incomplete at this point)
- env_create
- env_alloc
- env_setup_vm
- load_icode
- region_alloc
- env_run
- env_pop_tf
User stack and Kernel stack
这里先来讲解一下用户堆栈和内核堆栈,以及两者的切换过程,在后续的过程中等处,这套机制是非常有用的。
[En]
Here to explain in advance about the user stack and kernel stack, as well as the switching process of the two, in the follow-up process and other places, this set of mechanism is very useful.
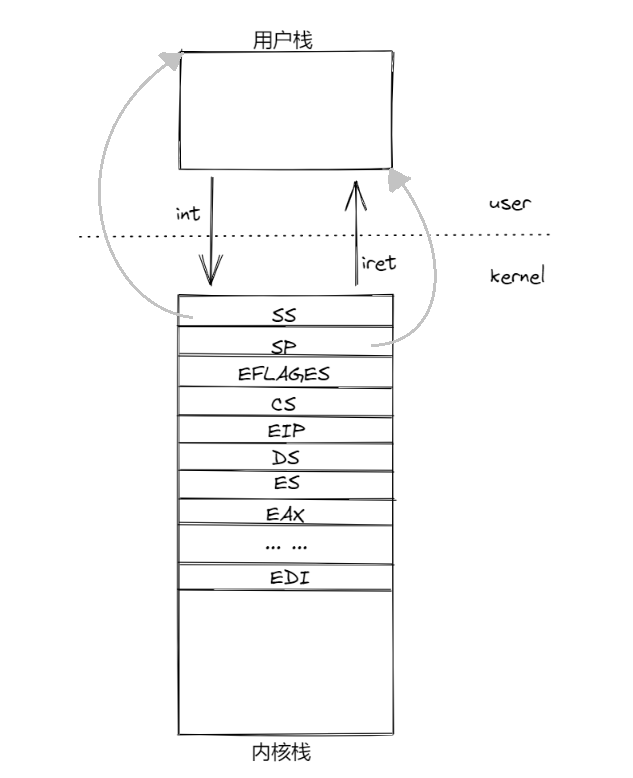
这是涉及到特权级切换的情况,用户程序的栈和内核的栈,组合形成一套栈。这个过程ss,sp,eflags,cs,eip在中断发生时由处理器压入,通用寄存器部分需要自己实现,详情可以参考 哈工大李治军老师关于操作系统的课程。
Handling Interrupts and Exceptions
Part of 80386 Programmer’s Manual

这是本节开头练习的要求,因此请阅读此处的8086程序员手册。
[En]
This is the requirement of the exercise at the beginning of this section, so read the 8086 programmer’s manual here.
第一个是中断和溢出的分类:
[En]
The first is the classification of interrupts and overflows:
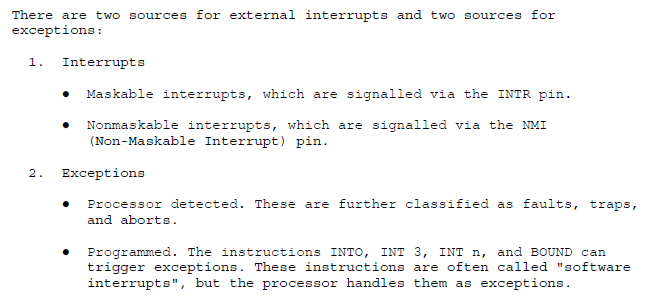
这些术语之间通常没有刻意的区别(在这个系统中)。
[En]
There is generally no deliberate distinction between these terms (in this system).
NMI和Exception都分配了唯一的中断号,系统保留0~31这32个中断号(因此,如果用户自定义中断,中断号应从32开始)。
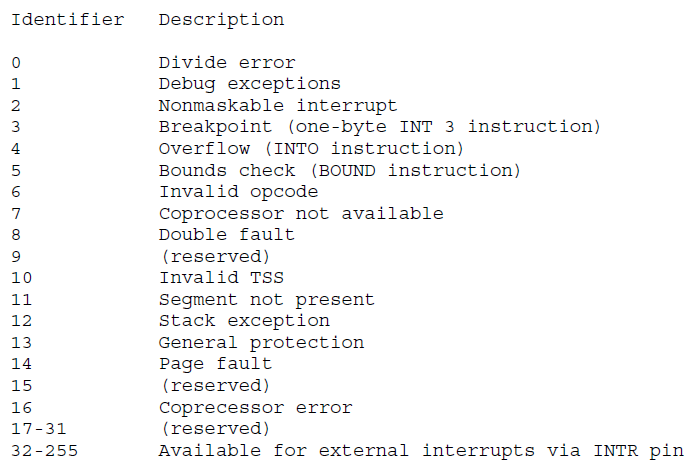
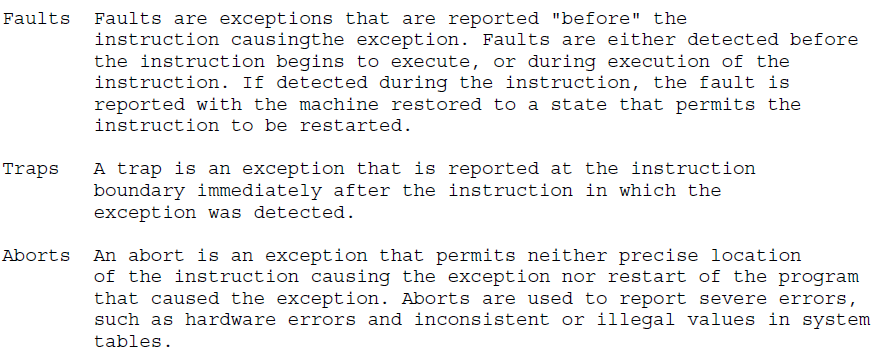
如果一定要区分的话,exception被分为faults, traps和aborts, 区分的标准是这些exception如何被通知,何时重新执行造成溢出的指令。
下一个话题是中断描述符表IDT,每个中断或者溢出的服务程序都和IDT中的8B中断描述符相关联。和GDT,LDT不同,IDT的第一个描述符并不是空的。
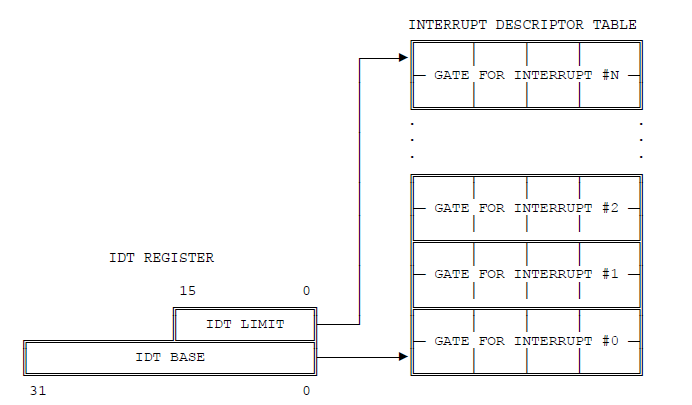
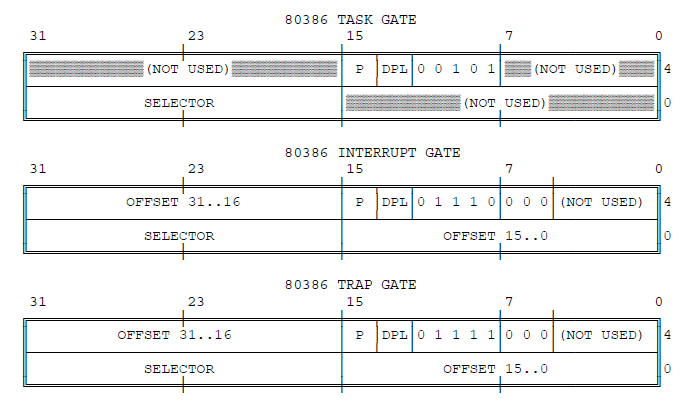
IDT中的描述符有三种类别:任务们,中断门,陷阱门(由type字段标识)。
至于中断服务程序的定位,就是在查GDT或LDT之前,多查一次IDT
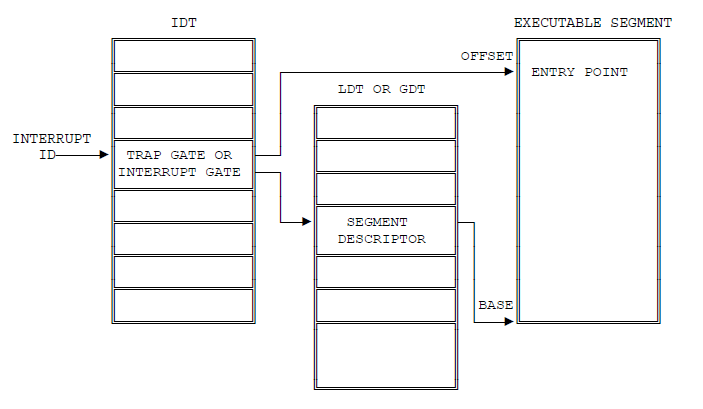
如果中断服务程序和当前代码之间存在特权级别的传输,则堆栈更改已在上面解释过。
[En]
If there is a privilege-level transfer between the interrupt service program and the current code, then the stack change has been explained above.
An Example
汇集了很多以前的知识,通过一个例子来贯穿整个过程。
[En]
Put together a lot of the previous knowledge, through an example to go through the whole process.
当处理器遇到除以零的指令时,它正在用户空间执行代码,这会导致溢出:
[En]
The processor is executing code in user space when it encounters an instruction * divided by zero * , which causes an overflow:
- 处理器切换到内核栈(由SS0 ESP0进行内核栈的定位),此时内核栈为空。
- 内核栈压入一系列溢出现场,进行现场保护
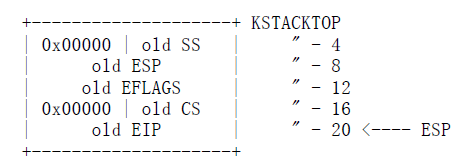
- 因为正在处理 除以零溢出,因此 中断向量0被索引到了,因此处理器读取IDT的第0项,将cs:eip指向中断处理程序。
- 处理程序获得控制权并处理该溢出,比如说该程序终止该用户环境的运行。
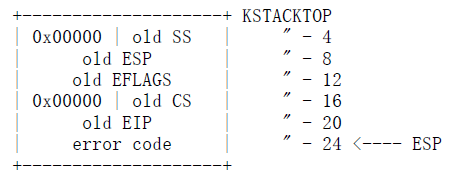
某些特定的x86溢出,除了会压入上面的经典5个字段,还会压入error code。在处理栈时,不要忘了跳过这个字段,如果需要的话。
Setting Up the IDT
经过了理论部分,现在到了该实现IDT的时候了。


首先是trapentry.S, 在这个文件中提供了如下两个宏:
作用是压入中断号,跳转到_alltraps;其中对于压入错误码的使用TRAPHANDLER,对于不压入错误码的使用TRAPHANDLER_NOEC。此处入口的name应该是一个函数的名字,正如内部声明: .type name, @function; /* symbol type is function */
#define TRAPHANDLER(name, num)                                  \
    .globl name;        /* define global symbol for 'name' */   \
    .type name, @function;  /* symbol type is function */       \
    .align 2;       /* align function definition */             \
    name:           /* function starts here */                  \
    pushl $(num);                                               \
    jmp _alltraps

#define TRAPHANDLER_NOEC(name, num)                 \
    .globl name;                                    \
    .type name, @function;                          \
    .align 2;                                       \
    name:                                           \
    pushl $0;                                       \
    pushl $(num);                                   \
    jmp _alltraps
阅读评论以改进文件:
[En]
Read the comments to improve the file:
_alltraps中的push %esp 相当于传递了一个Trapframe结构,因为经典的5个字段由处理器自动压入,而_alltraps中压入的顺序,正好可以与Trapframe结构对应起来,因此trap函数可以获得Trapframe信息。
/*
 * Lab 3: Your code here for generating entry points for the different traps.

 */
    TRAPHANDLER_NOEC(int0,0);
    TRAPHANDLER_NOEC(int1,1);
    TRAPHANDLER_NOEC(int2,2);
    TRAPHANDLER_NOEC(int3,3);
    TRAPHANDLER_NOEC(int4,4);
    TRAPHANDLER_NOEC(int5,5);
    TRAPHANDLER_NOEC(int6,6);
    TRAPHANDLER_NOEC(int7,7);
    TRAPHANDLER(int8,8);
    TRAPHANDLER(int10,10);
    TRAPHANDLER(int11,11);
    TRAPHANDLER(int12,12);
    TRAPHANDLER(int13,13);
    TRAPHANDLER(int14,14);
    TRAPHANDLER_NOEC(int16,16);
    TRAPHANDLER_NOEC(__syscall,T_SYSCALL);
/*
 * Lab 3: Your code here for _alltraps
 */
_alltraps:
    pushl %ds
    pushl %es
    pushal
    push $GD_KD
    popl %ds
    push $GD_KD
    popl %es
    pushl %esp
    call trap
下面要建立IDT,首先关于门描述符,在mmu.h中提供了相关的工具

// Gate descriptors for interrupts and traps
struct Gatedesc {
    unsigned gd_off_15_0 : 16;   // low 16 bits of offset in segment
    unsigned gd_sel : 16;        // segment selector
    unsigned gd_args : 5;        // # args, 0 for interrupt/trap gates
    unsigned gd_rsv1 : 3;        // reserved(should be zero I guess)
    unsigned gd_type : 4;        // type(STS_{TG,IG32,TG32})
    unsigned gd_s : 1;           // must be 0 (system)
    unsigned gd_dpl : 2;         // descriptor(meaning new) privilege level
    unsigned gd_p : 1;           // Present
    unsigned gd_off_31_16 : 16;  // high bits of offset in segment
};

// Set up a normal interrupt/trap gate descriptor.

// - istrap: 1 for a trap (= exception) gate, 0 for an interrupt gate.

    //   see section 9.6.1.3 of the i386 reference: "The difference between
    //   an interrupt gate and a trap gate is in the effect on IF (the
    //   interrupt-enable flag). An interrupt that vectors through an
    //   interrupt gate resets IF, thereby preventing other interrupts from
    //   interfering with the current interrupt handler. A subsequent IRET
    //   instruction restores IF to the value in the EFLAGS image on the
    //   stack. An interrupt through a trap gate does not change IF."
// - sel: Code segment selector for interrupt/trap handler
// - off: Offset in code segment for interrupt/trap handler
// - dpl: Descriptor Privilege Level -
//    the privilege level required for software to invoke
//    this interrupt/trap gate explicitly using an int instruction.

#define SETGATE(gate, istrap, sel, off, dpl)            \
{                               \
    (gate).gd_off_15_0 = (uint32_t) (off) & 0xffff;     \
    (gate).gd_sel = (sel);                  \
    (gate).gd_args = 0;                 \
    (gate).gd_rsv1 = 0;                 \
    (gate).gd_type = (istrap) ? STS_TG32 : STS_IG32;    \
    (gate).gd_s = 0;                    \
    (gate).gd_dpl = (dpl);                  \
    (gate).gd_p = 1;                    \
    (gate).gd_off_31_16 = (uint32_t) (off) >> 16;       \
}
因此trap_init()函数如下
void
trap_init(void)
{
    extern struct Segdesc gdt[];

    // LAB 3: Your code here.
    void int0();
    void int1();
    void int2();
    void int3();
    void int4();
    void int5();
    void int6();
    void int7();
    void int8();
    void int10();
    void int11();
    void int12();
    void int13();
    void int14();
    void int16();
    void _syscall_();

    SETGATE(idt[0],0,GD_KT,int0,0);
    SETGATE(idt[1],0,GD_KT,int1,0);
    SETGATE(idt[2],0,GD_KT,int2,0);
    SETGATE(idt[3],0,GD_KT,int3,0);
    SETGATE(idt[4],0,GD_KT,int4,0);
    SETGATE(idt[5],0,GD_KT,int5,0);
    SETGATE(idt[6],0,GD_KT,int6,0);
    SETGATE(idt[7],0,GD_KT,int7,0);
    SETGATE(idt[8],0,GD_KT,int8,0);
    SETGATE(idt[10],0,GD_KT,int10,0);
    SETGATE(idt[11],0,GD_KT,int11,0);
    SETGATE(idt[12],0,GD_KT,int12,0);
    SETGATE(idt[13],0,GD_KT,int13,0);
    SETGATE(idt[14],0,GD_KT,int14,0);
    SETGATE(idt[16],0,GD_KT,int16,0);
    SETGATE(idt[T_SYSCALL],0,GD_KT,_syscall_,0);

    // Per-CPU setup
    trap_init_percpu();
}
至此,函数的调用关系如图所示:
[En]
So far, the calling relationship of the function is shown in the figure:
当遇到中断时,会调用trap:
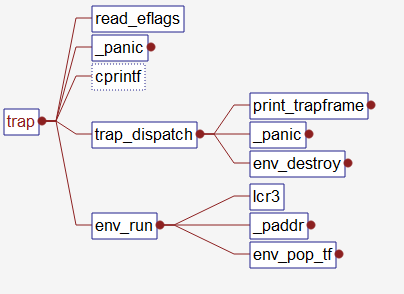
trap会打印出相关的信息。
现在可以开始测试了:

实验三的A部分到此完结。下一篇文章,关于PartA 的一些问题和PartB
Original: https://www.cnblogs.com/oasisyang/p/15520180.html
Author: OasisYang
Title: MIT6.828——Lab3 PartA(麻省理工操作系统实验)
原创文章受到原创版权保护。转载请注明出处:https://www.johngo689.com/524389/
转载文章受原作者版权保护。转载请注明原作者出处!