

嗨嗨哈哈,已经很久没有坐下来胡编乱造一点笔记了,平时云服务器搞惯了,一个命令就安装好了docker了的,但这次生不逢时的新机房就没那么幸运了,有多不逢时超乎想象,不仅仅服务器没有外网,就连周围方圆一公里手机网络都没有,要查一个资料只能步行公里开外去搜寻网络。
不打无准备之战:我就是一名菜鸟,加上这样的环境,岂不是雪上加霜,为了能够顺利的完成部署工作,我也是拼了,哈哈哈哈,网上找了很多关于离线docker的安装资料,各种花式玩法真是百家争鸣,搜索珍藏了1 mole的资料,忐忑的去现场实施了。
乍一看服务器配置,哇,这个配置真的很奢侈,恰到好处的土豪,你看对了,这只是冰山一角。让我问你一件事:奢侈并不奢侈。
[En]
At first glance at the server configuration, wow, this configuration is really extravagant, proper tuhao, you read it correctly, this is only the tip of the iceberg. Let me ask you one thing: extravagance is not extravagant.


初出茅庐,手忙脚乱:怀着忐忑的心开始第一次docker离线安装之旅,第一次安装稳稳的宣布失败,根据错误飞奔到公里开外去找度大娘,找完度大娘又满怀憧憬的去修复,修复旧的问题又有新的问题,这样周而复始了N个回合,docker还是顽固的起不起来。该下班了,来日再战。
重整旗鼓,来日再战:自己电脑安装一个centos8虚拟机环境,持续搜索,尝试多次,测试成功了,整理好思路,饱饱睡一觉,来日再战。
第一次世界大战是成功的:第二天我回到了计算机室,发现了一台新的服务器。根据昨晚的成功经验,第一次世界大战是成功的。同样的方法继续做昨天不成功的服务器,否则宣告失败,成功就不能回头了。幸运的是,我有一个习惯。根据新的环境,我喜欢一步一步地记录操作,找到昨天的安装笔记,一步步退出,最终顺利返炉。
[En]
World War I was a success: I returned to the computer room the next day and found a new server. According to last night’s successful experience, World War I was a success. The same method to continue to do yesterday’s unsuccessful server, or declared a failure, the success can not go back. Fortunately, I have a habit. According to the new environment, I like to record the operation step by step, find yesterday’s installation notes, withdraw step by step, and finally successfully return to the furnace.
哈哈,我说了很久了,但还没有进入今天的话题。嘿,你在担心我的胡言乱语吗?嗯,好的,我会把安装成功的笔记整理出来,如果你需要的话,发给你参考。
[En]
Ha, I have been talking for a long time, but I have not yet entered today’s topic. Hey, are you worried about my babbling? um, OK, I will sort out the notes of the successful installation and send them out for reference if you need it.
1. 下载docker离线安装包
Docker离线版安装包下载很简单,直接根据下面的地址选择自己合适的版本下载即可:
https://download.docker.com/linux/static/stable/x86_64/
但在选择具体版本时,给出一些建议:不要选择太低的版本,无论是性能还是其他版本都比较理想,版本太新,不知道稳定性有没有问题,你是不是觉得我太保守了,呵呵,我的出发点是稳定性是第一位的观点,我建议选择19个以上的版本,以上纯属个人狭隘观点,如有冒犯,敬请原谅。
[En]
But when choosing a specific version, give some advice: do not choose a too low version, whether the performance or other versions are ideal, the version is too new and do not know whether there is a problem with stability, , do you think I am too conservative, uh-huh, my starting point is that stability is the first point of view, I suggest to choose more than 19 version, the above is purely personal narrow point of view, if there is offense, forgive me.
我习惯了一直用的是docker-19.03.6.tgz,这次也就选择它了。
2. 安装docker
2.1安装包上传
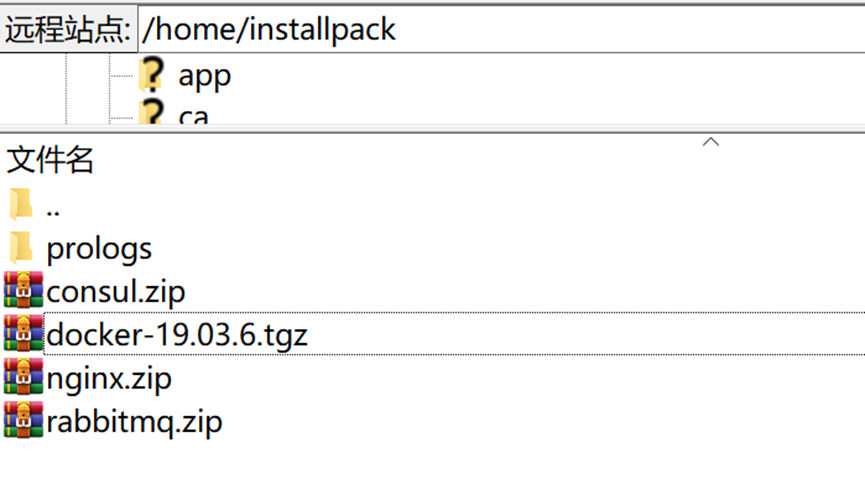
将上一步骤准备好的docker安装包上传到离线服务器,我习惯上传到目录:/home/installpack,具体目录木有什么要求,根据自己爱好来操作。
2.2安装包解压
首先,你需要进入安装包,并进行解压,当然,你用来确定路径,进入安装包是多余的,哈,我不介意麻烦,老实一步一步来。分别执行以下命令
[En]
First of all, you need to enter the installation package, and perform decompression, of course, you use to determine the path, enter the installation package is superfluous, ha, I do not mind the trouble, honestly step by step. Execute the following commands respectively
sql;gutter:true;
cd /home/installpack
tar xzvf docker-19.03.6.tgz</p>
<pre><code>
执行完毕以后,你会看到一个docker文件夹,那就大功告成,这一步我相信大家想错都难噢,不会给你错的机会。

### 2.3安装

安装也很简单,只要执行以下两个命令:<details><summary>*<font color='gray'>[En]</font>*</summary>*<font color='gray'>The installation is also easy, as long as the following two commands are executed:</font>*</details>
;gutter:true;
cp docker/* /usr/bin/
dockerd &
这一步对你来说可能没有那么幸运,如果是第一次安装,我想你会继续一如既往地顺利进行,只要你没有上报错误,就意味着你成功了。
[En]
This step may not be so lucky for you, if it is installed for the first time, I think you will continue to go smoothly as always, as long as you do not report an error, it means that you have succeeded.
2.4测试
总而言之,要测试安装是否成功,可以执行以下命令:
[En]
To test whether the installation is successful or not, in a word, execute the following command:
sql;gutter:true;
docker info</p>
<pre><code>
显示如下界面,祝贺您。第一步是成功安装,黎明即将到来。<details><summary>*<font color='gray'>[En]</font>*</summary>*<font color='gray'>The following interface is displayed, so congratulations. The first step is a successful installation, and dawn is just around the corner.</font>*</details>
当然,你不需要太在意这个内容的意思,或者简单地看安装的成功,只要没有红色的字,一切都会好的。<details><summary>*<font color='gray'>[En]</font>*</summary>*<font color='gray'>Of course, you don't need to care too much about the meaning of this content, or simply look at the success of the installation, as long as there is no red word, everything will be fine.</font>*</details>
如果你错了,不要惊慌。下面还有别的东西。<details><summary>*<font color='gray'>[En]</font>*</summary>*<font color='gray'>If you're wrong, don't panic. There's something else down there.</font>*</details>

### 2.5报错回撤
无论是安装过程中的错误,还是测试结果中的错误,都是错误的。如果错误,请按照以下步骤完成取款。<details><summary>*<font color='gray'>[En]</font>*</summary>*<font color='gray'>Whether it is an error during the installation process or an error in the test result, it is a mistake. if it is wrong, please follow the following steps to complete the withdrawal.</font>*</details>
首先,想想你是否在网上找到了其他大师的教程操作,如果有,首先要想想你做了哪些操作,并全部还原,特别是一些配置文件被修改了。老师经常说,好的记忆力不如糟糕的写作,这有道理吗?<details><summary>*<font color='gray'>[En]</font>*</summary>*<font color='gray'>First of all, think about whether you have found the tutorial operations of other masters on the Internet, and if so, you should first think about what operations you have done and restore them all, especially some configuration files have been modified. is it reasonable to remember that the teacher often says that good memory is not as good as bad writing?</font>*</details>
接下来,只需删除安装文件并执行以下命令:<details><summary>*<font color='gray'>[En]</font>*</summary>*<font color='gray'>Next, just delete the installation file and execute the following command:</font>*</details>
;gutter:true;
rm -rf /var/run/docker
rm -rf /var/lib/docker
rm -rf /var/run/docker.pid
rm -rf /var/run/docker.sock
停止docker相关的进程
ps -aux | grep docker
kill掉查询出来的全部进程
解除docker相关进程占用端口
netstat -nplt | grep docker
完成上述操作后,可以再次执行安装+测试命令。如果您对重复执行感到不满,我建议您解决问题并修复杀手锏:重新启动服务器。
[En]
After completing the above operations, you can execute the installation + test command again. If you are unhappy with repeated execution, I suggest you take out the problem and fix the killer’s mace: restart the server.
3. 设置docker为系统服务
3.1创建配置containerd服务
在etc目录下创建containerd文件夹,并在containerd文件夹下创建containerd.service文件。相关命令如下:
sql;gutter:true;
mkdir /etc/containerd
    touch /usr/lib/systemd/system/containerd.service
    vi /usr/lib/systemd/system/containerd.service</p>
<pre><code>
其中containerd.service文件的内容填写如下内容(先不关心里面配置的什么,先跑起来才是王道,后面有时间在慢慢研究):
;gutter:true;
[Unit]
Description=containerd container runtime
Documentation=https://containerd.io
After=network.target
[Service]
ExecStartPre=/sbin/modprobe overlay
ExecStart=/usr/bin/containerd
Delegate=yes
KillMode=process
LimitNOFILE=1048576
Having non-zero Limit*s causes performance problems due to accounting overhead
in the kernel. We recommend using cgroups to do container-local accounting.
LimitNPROC=infinity
LimitCORE=infinity
[Install]
WantedBy=multi-user.target
启动containerd服务,命令如下:
sql;gutter:true;
重新加载配置信息
systemctl daemon-reload</p>
<h1>设置containerd.service为开机启动</h1>
<p>systemctl enable containerd.service</p>
<h1>启动containerd服务</h1>
<p>systemctl start containerd.service</p>
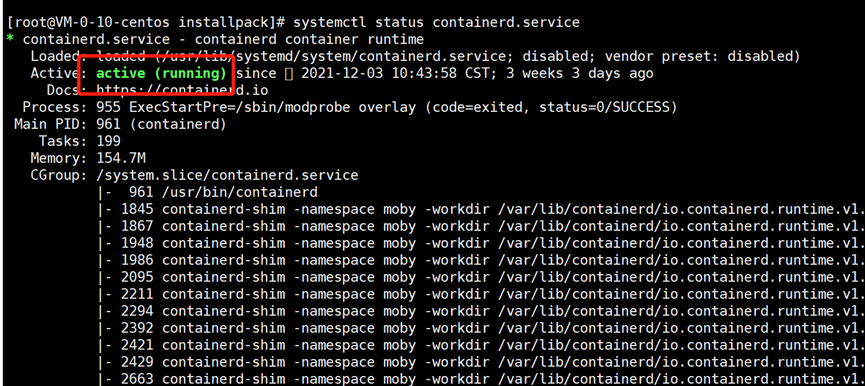
<h1>查看containerd服务启动状态</h1>
<p>systemctl status containerd.service</p>
<pre><code>
依次执行以上命令,最后看到绿色的【active (running)】,那恭喜您containerd服务配置启动成功。如果服务启动失败,还是终极杀手锏来解决:先尝试重启docker,如还是不行在尝试重启服务器,反正我是没有重启
##### 3.2创建配置docker.socket服务
</code></pre>
<p>在/usr/lib/systemd/system文件夹创建docker.socket文件,命令如下:</p>
<pre><code>
;gutter:true;
groupadd docker
touch /usr/lib/systemd/system/docker.socket
vi /usr/lib/systemd/system/docker. socket
其中docker.socket文件的内容填写如下内容(先不关心里面配置的什么,先跑起来才是王道,后面有时间在慢慢研究):
sql;gutter:true;
[Unit]
Description=Docker Socket for the API
PartOf=docker.service
[Socket]
ListenStream=/var/run/docker.sock
SocketMode=0660
SocketUser=root
如果出现错误:chown socket at step GROUP: No such process, 可以修改下面的 SocketGroup=root 或创建 docker 用户组(命令 groupadd docker)
SocketGroup=docker
[Install]
WantedBy=sockets.target</p>
<pre><code>
启动containerd服务,查看是否正常,命令如下:
</code></pre>
<p>重新加载配置信息
systemctl daemon-reload</p>
<h1>设置containerd.service为开机启动</h1>
<p>systemctl enable containerd.service</p>
<h1>启动containerd服务</h1>
<p>systemctl start containerd.service</p>
<h1>查看containerd服务启动状态</h1>
<p>systemctl status containerd.service</p>
<pre><code>
依次执行以上命令,最后看到绿色的【active (running)】,那恭喜您containerd服务配置启动成功。如果服务启动失败,还是终极杀手锏来解决:先尝试重启docker,如还是不行在尝试重启服务器,反正我是没有重启

### 3.3创建配置docker.service服务
</code></pre>
<p>在/usr/lib/systemd/system文件夹创建docker.service文件,命令如下:</p>
<pre><code>
;gutter:true;
touch /usr/lib/systemd/system/docker.service
vi /usr/lib/systemd/system/docker.service
其中docker.service文件的内容填写如下内容(先不关心里面配置的什么,先跑起来是王道,后面有时间在慢慢研究):
sql;gutter:true;
[Unit]
Description=Docker Application Container Engine
Documentation=https://docs.docker.com
BindsTo=containerd.service
After=network-online.target firewalld.service containerd.service
Wants=network-online.target
Requires=docker.socket
[Service]
Type=notify
the default is not to use systemd for cgroups because the delegate issues still
exists and systemd currently does not support the cgroup feature set required
for containers run by docker
ExecStart=/usr/bin/dockerd -H fd:// --containerd=/run/containerd/containerd.sock
ExecReload=/bin/kill -s HUP $MAINPID
TimeoutSec=0
RestartSec=2
Restart=always
Note that StartLimit* options were moved from "Service" to "Unit" in systemd 229.</p>
<p>Both the old, and new location are accepted by systemd 229 and up, so using the old location
to make them work for either version of systemd.</p>
<p>StartLimitBurst=3
Note that StartLimitInterval was renamed to StartLimitIntervalSec in systemd 230.</p>
<p>Both the old, and new name are accepted by systemd 230 and up, so using the old name to make
this option work for either version of systemd.</p>
<p>StartLimitInterval=60s
Having non-zero Limit*s causes performance problems due to accounting overhead
in the kernel. We recommend using cgroups to do container-local accounting.</p>
<p>LimitNOFILE=infinity
LimitNPROC=infinity
LimitCORE=infinity
Comment TasksMax if your systemd version does not support it.</p>
<p>Only systemd 226 and above support this option.</p>
<p>TasksMax=infinity
set delegate yes so that systemd does not reset the cgroups of docker containers
Delegate=yes
kill only the docker process, not all processes in the cgroup
KillMode=process
[Install]
WantedBy=multi-user.target</p>
<pre><code>
启动docker.service服务,命令如下:
;gutter:true;
#解除
systemctl unmask docker.service
systemctl unmask docker.socket
重新加载配置信息
systemctl daemon-reload
#设置docker为开机启动
systemctl enable docker
#启动docker服务
systemctl start docker
#查看docker服务启动状态
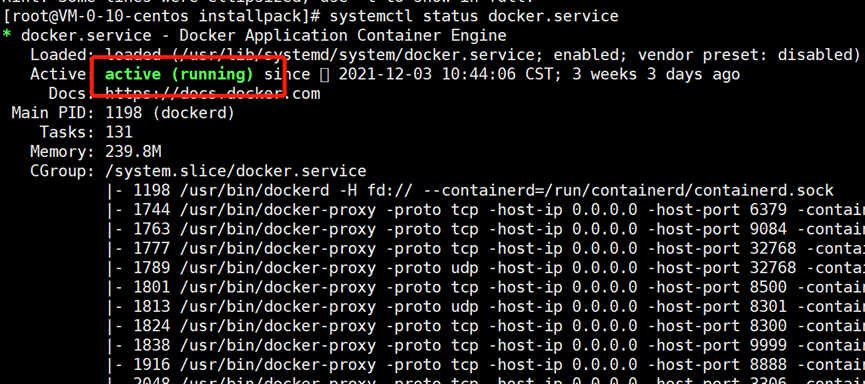
systemctl status docker
依次执行以上命令,最后看到绿色的【active (running)】,那恭喜您docekr.service服务配置启动成功。如果服务启动失败,还是终极杀手锏来解决:先尝试重启docker,如还是不行在尝试重启服务器,反正我是重启服务器才成功的。
当看到docker正常启动的那一刻,这次环境搭建之旅忐忑的心才算落地,实话。
4. 安装总结
走到这一步,恭喜您离线版docker搭建完成,简单回顾一下本次安装体会:
不要着急:不要着急,一个接一个地看文件。
[En]
Don’t be impatient: don’t be in a hurry, follow the documents one by one.
善于记笔记:好记性不如差笔记,记录下自己操作的每一步,便于事后提取和总结。
[En]
Be good at note-taking: good memory is not as good as bad writing, recording every step of your own operation, which is convenient for withdrawal and summary afterwards.
这个安排没有其他目的,它只是一个环境部署笔记的摘要,如果你也在寻找它,它可能会对你有所帮助。这不是我的荣幸吗?
[En]
This arrangement has no other purpose, it is just a summary of environmental deployment notes, and if you are also looking for it, it may help you with something. Isn’t it a pleasure?
好了,本次记录就在此see good by。后面有时间在将docker中的相关镜像迁移也做一个整理分享。
END
为了更高层次的交流,欢迎关注我的公众号。扫描下面的二维码进行跟踪。谢谢您:
[En]
For higher communication, you are welcome to follow my official account. Scan the QR code below to follow. Thank you:

Original: https://www.cnblogs.com/xiaoXuZhi/p/centos_doceker.html
Author: 程序员修炼之旅
Title: 离线版centos8安装docker笔记
原创文章受到原创版权保护。转载请注明出处:https://www.johngo689.com/524236/
转载文章受原作者版权保护。转载请注明原作者出处!