

背景
某个项目需要实现基础软件全部国产化,其中操作系统指定银河麒麟v4,CPU使用飞腾处理器。我本地没有这个国产的处理器,但飞腾是基于 _ARMv8_架构的64位处理器,所以理论上基于这个CPU架构的硬件应该都可以。
首先想到的是树莓派,这个开发板集成的ARM CPU,不过要看下是否为ARMv8架构,如果正好有的话可以试一试。不过这也有点重了,能模拟CPU就好了,最终找到了QEMU这个工具,可以在Windows上运行。
这篇文章就在Windows 10上创建一个模拟ARM64平台的虚拟机来安装银河麒麟操作系统。
环境
- 主机操作系统:Windows 10 专业版
- 主机CPU平台:x86-64
- 虚拟机软件:QEMU
下载
银河麒麟v4 ARM版下载地址:「Inspur」- NF2180M3 (ARMv8) – K4NZ BLOG
QEMU下载地址:Download QEMU – QEMU
QEMU的UEFI固件:https://releases.linaro.org/components/kernel/uefi-linaro/latest/release/qemu64/QEMU_EFI.fd
虚拟网卡工具:https://pan.baidu.com/s/1sFSH8AOnLb-I3JWLHV-3Ow?pwd=309c
安装
1、安装QEMU
执行安装文件并完全安装它。我这里有默认配置,并且没有更改它。
[En]
Execute the installation file and install it all the way. I have the default configuration here and have not changed it.
2、配置虚拟机网络
这一步是在主机创建一个Tap网卡给虚拟机使用,使用【下载】步骤中的 虚拟网卡工具。
此工具摘自一些软件,即创建虚拟网卡的命令:
[En]
This tool is extracted from some software, the command to create a virtual network card:
tapctl create --name tap0
通过这个命令可以删除:
tapctl delete tap0
注意:tap0是虚拟网卡的名字,可以按照自己的习惯命名,不重复就行了。
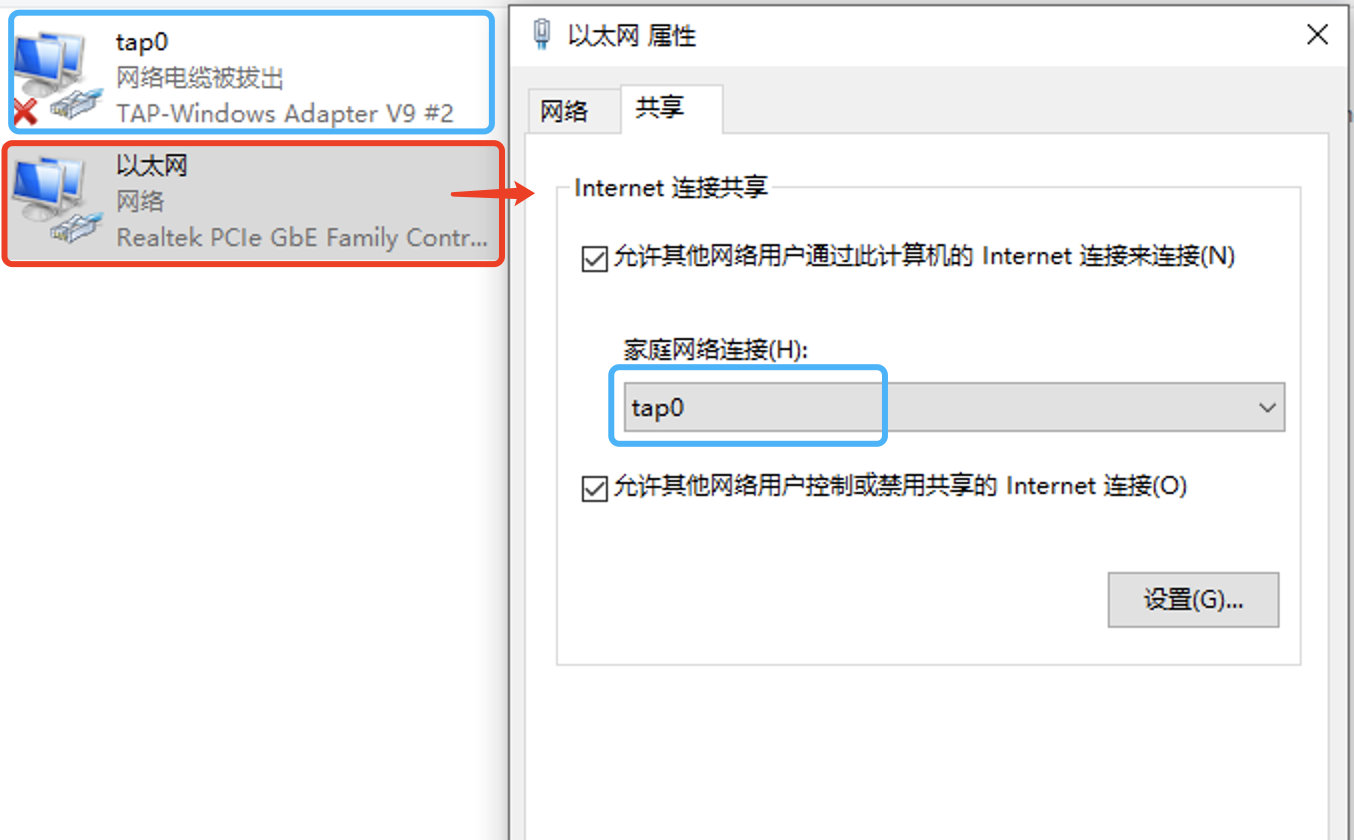
然后共享虚拟网卡的主机网络,如下图所示:
[En]
Then share the host network for the virtual network card, as shown below:

3、创建虚拟机
这个工具需要使用命令,这里编写一个批处理文件:create.bat,内容如下:
"C:\Program Files\qemu\qemu-img.exe" create -f qcow2 D:\qemu\kylin-v4-arm64\kylin-v4-arm64.qcow2 50G

"C:\Program Files\qemu\qemu-system-aarch64.exe" ^
-m 2048 ^
-cpu cortex-a53 ^
-smp 4,cores=4,threads=1,sockets=1 ^
-M virt ^
-bios D:\qemu\kylin-v4-arm64\QEMU_EFI.fd ^
-device VGA ^
-device nec-usb-xhci ^
-device usb-mouse ^
-device usb-kbd ^
-cdrom D:\qemu\kylin-4.0.2-server-sp2-arm64.iso ^
-net nic,model=virtio ^
-net tap,ifname=tap0 ^
-boot d D:\qemu\kylin-v4-arm64\kylin-v4-arm64.qcow2
简而言之,执行两个命令:
[En]
In a brief interpretation, two commands are executed:
第一行是创建一个镜像。镜像文件带路径的名字是:D:\qemu\kylin-v4-arm64\kylin-v4-arm64.qcow2,大小是50G。路径和名字都是可以按自己的需求定义的。
第二行是在第一行创建的映像中创建虚拟机。
[En]
The second line is to create the virtual machine in the image created in the first row.
- -m 指定内存大小,单位M,2048就是2G。
- -cpu 指定CPU型号,cortex-a53 是一款ARMv8架构的处理器。
- -smp 依次为:逻辑处理器的个数、每个CPU的核心数、每个CPU的线程数、CPU的个数。
- -bios UEFI固件的路径,前文【下载】的步骤中提到过。
- -cdrom 光盘镜像文件的地址,这里就是操作系统安装镜像的路径。
- -boot 当前虚拟机镜像的文件路径。
- -net tap 指定后端网络类型是TAP,ifname指定TAP网卡的名字是tap0。
4、安装操作系统
以管理员身份运行上文中的批处理程序 create.bat,然后会启动QEMU的窗口,并开启操作系统的安装。
这里没什么好说的,只是一步一步地按照指示去做。为方便操作,建议安装图形界面。
[En]
There is nothing to say here, just follow the instructions step by step. In order to facilitate operation, it is recommended to install a graphical interface.

安装过程缓慢,请耐心等待。
[En]
The installation process is slow, please wait patiently.
5、启动操作系统
安装完成后,重启时需要取出光盘镜像,否则进入安装界面。
[En]
After installation, you need to remove the CD image when you restart, otherwise you will enter the installation interface.
退出当前的的QEMU窗口,重新创建一个批处理文件 start.bat:
"C:\Program Files\qemu\qemu-system-aarch64.exe" ^
-m 2048 ^
-cpu cortex-a53 ^
-smp 4,cores=4,threads=1,sockets=1 ^
-M virt ^
-bios D:\qemu\kylin-v4-arm64\QEMU_EFI.fd ^
-device VGA ^
-device nec-usb-xhci ^
-device usb-mouse ^
-device usb-kbd ^
-net nic,model=virtio ^
-net tap,ifname=tap0 ^
-boot d D:\qemu\kylin-v4-arm64\kylin-v4-arm64.qcow2
这些参数类似于上面用于创建虚拟机的参数,因此我不在这里介绍它们。
[En]
These parameters are similar to the above parameters for creating a virtual machine, so I won’t cover them here.
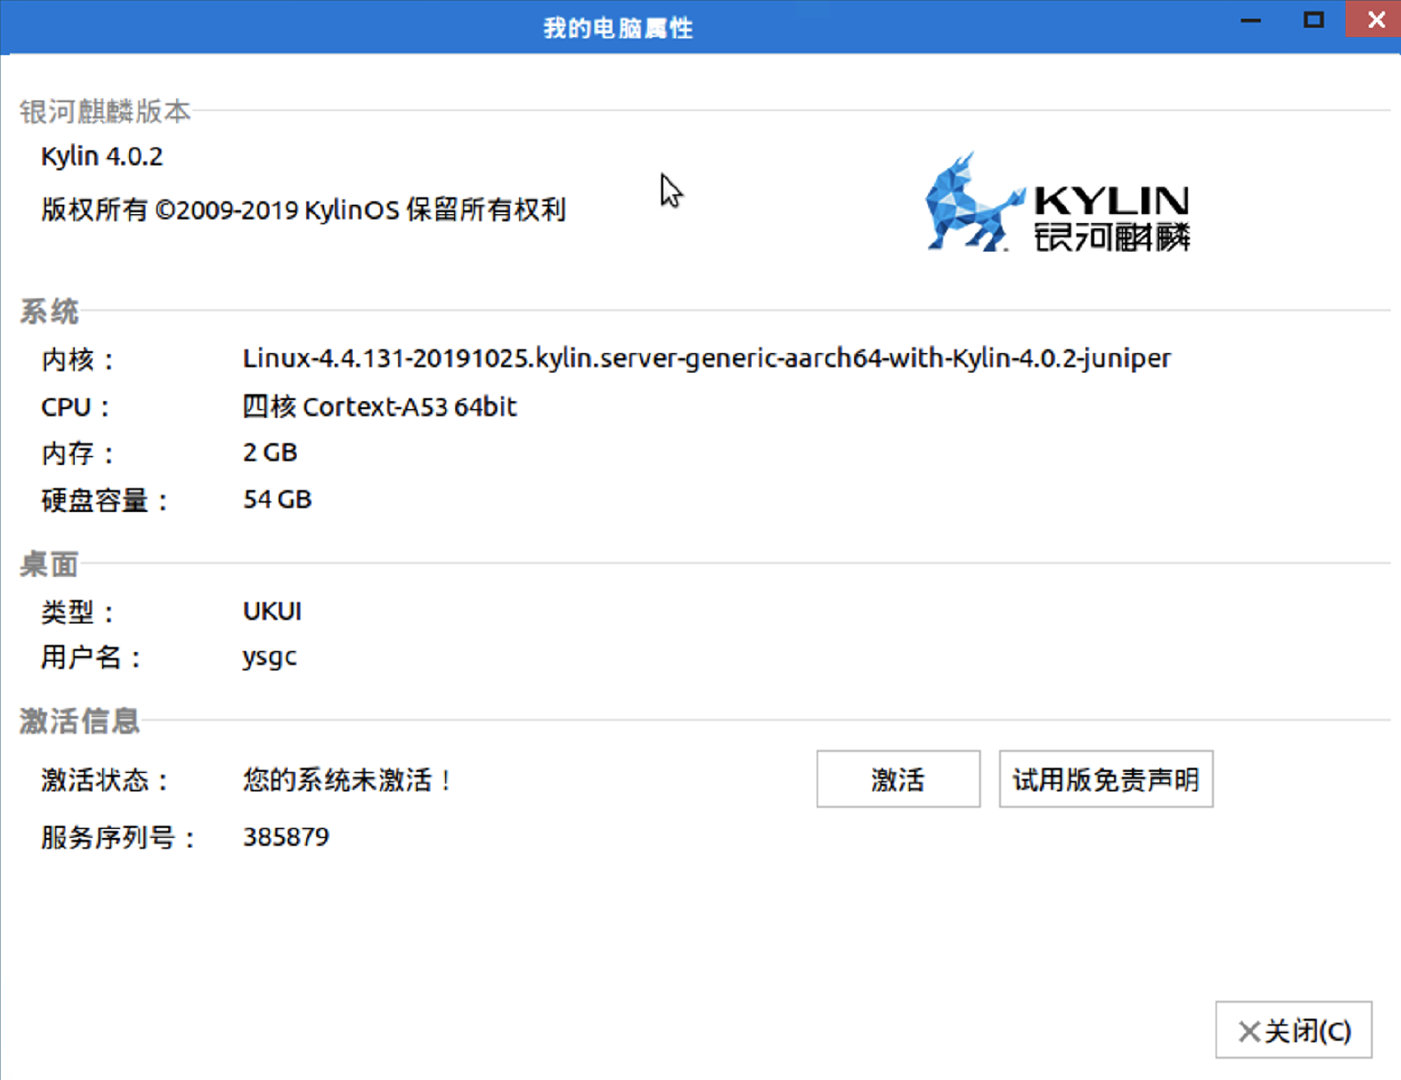
以管理员身份运行 start.bat ,启动后,查看电脑属性,其中系统内核中提到的的aarch64就是ARMv8架构支持的。
6、更改软件包源
银河麒麟v4的默认软件包源是光盘,这个可能不好搞。不过这个操作系统是基于ubuntu 16.04的,所以ubuntu 16.04的包源应该可以,但是还要注意针对ARM架构的包源和x64的不太一样,这里给出一个清华大学的镜像包源,国内访问比较快。
deb http://mirrors.ustc.edu.cn/ubuntu-ports/ xenial main multiverse restricted universe
deb http://mirrors.ustc.edu.cn/ubuntu-ports/ xenial-backports main multiverse restricted universe
deb http://mirrors.ustc.edu.cn/ubuntu-ports/ xenial-proposed main multiverse restricted universe
deb http://mirrors.ustc.edu.cn/ubuntu-ports/ xenial-security main multiverse restricted universe
deb http://mirrors.ustc.edu.cn/ubuntu-ports/ xenial-updates main multiverse restricted universe
deb-src http://mirrors.ustc.edu.cn/ubuntu-ports/ xenial main multiverse restricted universe
deb-src http://mirrors.ustc.edu.cn/ubuntu-ports/ xenial-backports main multiverse restricted universe
deb-src http://mirrors.ustc.edu.cn/ubuntu-ports/ xenial-proposed main multiverse restricted universe
deb-src http://mirrors.ustc.edu.cn/ubuntu-ports/ xenial-security main multiverse restricted universe
deb-src http://mirrors.ustc.edu.cn/ubuntu-ports/ xenial-updates main multiverse restricted universe
7、重用镜像
对于已安装系统的镜像,您可以通过复制镜像文件进行备份。
[En]
For the image of the installed system, you can make a backup by copying the image file.
如果不小心损坏了系统,您可以使用备份映像重新启动一个干净的环境,以避免漫长的系统安装过程。
[En]
If you accidentally break the system, you can restart a clean environment with the backup image to avoid a long system installation process.
您还可以通过复制多个镜像文件来启动多个虚拟机,但您必须弄清楚如何处理网络,因此您不必费心在这里执行此操作。
[En]
You can also start multiple virtual machines by copying multiple image files, but you have to figure out what to do with the network, so you don’t bother to do it here.
以上是本文的主要内容,如有任何错误和遗漏,欢迎更正。
[En]
The above is the main content of this article, if there are any mistakes and omissions are welcome to correct.
收获更多架构知识,请关注微信公众号 萤火架构。原创内容,转载请注明出处。
Original: https://www.cnblogs.com/bossma/p/15974392.html
Author: 波斯马
Title: 国产化之虚拟ARM64-CPU安装银河麒麟操作系统

原创文章受到原创版权保护。转载请注明出处:https://www.johngo689.com/524040/
转载文章受原作者版权保护。转载请注明原作者出处!