

镜像下载、域名解析、时间同步请点击阿里云开源镜像站
1-首先查看系统是否存在mysql,无则不返回
rpm -qa|grep mysql
2-安装wget
yum -y install wget
3-抓取mariadb并删除包,无则不返回
rpm -qa|grep mariadb
4-删除mariadb-libs-5.5.68-1.el7.x86_64
rpm -e --nodeps mariadb-libs-5.5.68-1.el7.x86_64
5-配置阿里云的yum
wget http://mirrors.aliyun.com/repo/Centos-7.repo
6-配置成功后需要重新加载yum
yum clean all    --清除yum
yum makecache    --清除缓存
yum repolist     --查看仓储包
7-进入tmp文件夹,并清空
cd /tmp/
rm -rf *
8-通过wget下载mysql8.0包(如果包不是最新的则需要注意在安装MYSQL前进行Mysql的GPG升级)
获取最新的包打开MYSQL官网wget https://dev.mysql.com/get/Downloads/
阿里云下载地址:https://mirrors.aliyun.com/mysql/


然后拼接在[wget https://dev.mysql.com/get/Downloads/]后面
wget https://dev.mysql.com/get/Downloads/mysql-community-server-8.0.27-1.el7.x86_64.rpm
本教程提供的yum源包
wget https://dev.mysql.com/get/mysql80-community-release-el7-3.noarch.rpm
9-配置mysql的yum源
sudo rpm -Uvh mysql80-community-release-el7-3.noarch.rpm
执行成功后会在/etc/yum.repos.d/目录下生成两个repo文件mysql-community.repo 及 mysql-community-source.repo
10-进入yum.repos.d查看
cd /etc/yum.repos.d/
ls -l
11-开始安装Mysql
yum install -y mysql-community-server
注意:上面提到过,通过wget获取的MYSQL包不是最新的前提下有可能报错,这是因为MYSQL的GPG升级了,需要重新获取
如果没有此类错误,请跳过此步骤。
[En]
If there is no such error, skip this step.
 报错信息如下:
 Failing package is: mysql-community-client-8.0.28-1.el7.x86_64
 GPG Keys are configured as: file:///etc/pki/rpm-gpg/RPM-GPG-KEY-mysql

12-这个时候需要重执行(2022则为今年的年份),执行完GPG升级,需要重新安装
rpm --import https://repo.mysql.com/RPM-GPG-KEY-mysql-2022
yum install -y  mysql-community-server
13-安装完成

打开my.cnf文件增加以下 [skip-name-resolve] 语句到末尾(这一步可不做设置)
vi /etc/my.cnf

#跳过名称解析,提高数据库的连接速度
skip-name-resolve
14-启动MYSQL服务,并查看状态,查看端口
systemctl start mysqld        --启动mysql服务
systemctl status mysqld       --查看mysql服务状态
netstat  -nlpt | grep mysqld  --查看端口

15-设置开机启动
systemctl enable mysqld
systemctl daemon-reload
16-抓取mysql临时密码
cat /var/log/mysqld.log | grep password

17-登录进mysql
mysql -u
mysql -uroot -p
18-更改密码(必须是强密码),并刷新(mysql结尾一定要加英文分号;)
mysql> alter user 'root'@'localhost'  identified by 'Root123..';  --修改密码(强密码)
mysql> flush privileges;                                          --刷新,立即生效
mysql> select user,host from mysql.user;                          --查看数据库中账号信息
弱密码会报错,如图

此步骤的先决条件:必须更改默认随机密码(执行第18步)
[En]
Prerequisite for this step: the default random password must be changed (perform step 18)
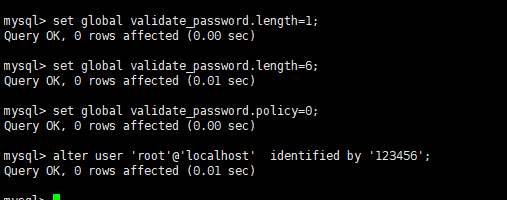
关闭强密码,密码长度至少更改为6位,并将密码更改为弱密码。
[En]
Turn off the strong password, change the password length to 6 digits at least, and change the password to weak password.
mysql> set global validate_password.policy=0; --关掉强密码认证
mysql> set global validate_password.length=6; --密码长度最短为6位数
mysql> alter user 'root'@'localhost'  identified by '123456';  --修改密码(弱密码)
firewall-cmd --zone=public --add-port=3306/tcp --permanent --开放3306端口
firewall-cmd --reload                                      --重启防火墙
firewall-cmd --list-ports                                  --查看开放的端口

做完如上部署,重新登录进到数据库,修改user表中的Host:
mysql -uroot -p123456                            --登录数据库
mysql> show databases;                             --查数据来库
mysql> use mysql;                                  --使用数据库
mysql> select Host, User from user;                --查询表
mysql> update user set Host='%' where User='root'; --修改User表内root用户的Host为%
mysql> flush privileges;                           --刷新


MYSQL知识点
如果创建一个用户,给予单个库权限
mysql> create database  test_data;                                          --创建一个数据库
mysql>  create user admin@'%' identified  by 'Admin@123..';                --创建一个新的用户 admin 密码 Admin@123..

mysql> grant all privileges on test_data.* to admin@'%' with grant option; --授权,给test_data库的所有权限
mysql> flush privileges;                                                   --刷新
MySQL5.6版本和8.0版本的的用户授权方式不同
MySQL5.6版本的用户授权
mysql> create user test identified by '123456';
mysql> grant all privileges on *.* to 'admin'@'%'identified by '123456' with grant option;
mysql> flush privileges ;
MySQL8.0版本的用户授权
mysql> create user test@'%' identified  by '123456';
mysql> grant all privileges on *.* to admin@'%' with grant option;
mysql> flush privileges;
本文转自:https://www.cnblogs.com/LaoPaoEr/p/16023644.html
Original: https://www.cnblogs.com/helong-123/p/16044573.html
Author: 萌褚
Title: CentOS7安装MYSQL8.X详细教程
原创文章受到原创版权保护。转载请注明出处:https://www.johngo689.com/523966/
转载文章受原作者版权保护。转载请注明原作者出处!