

镜像下载、域名解析、时间同步请点击阿里云开源镜像站
Virtual Box 安装虚拟机
一、下载安装Virtual Box
1. 下载Virtual Box
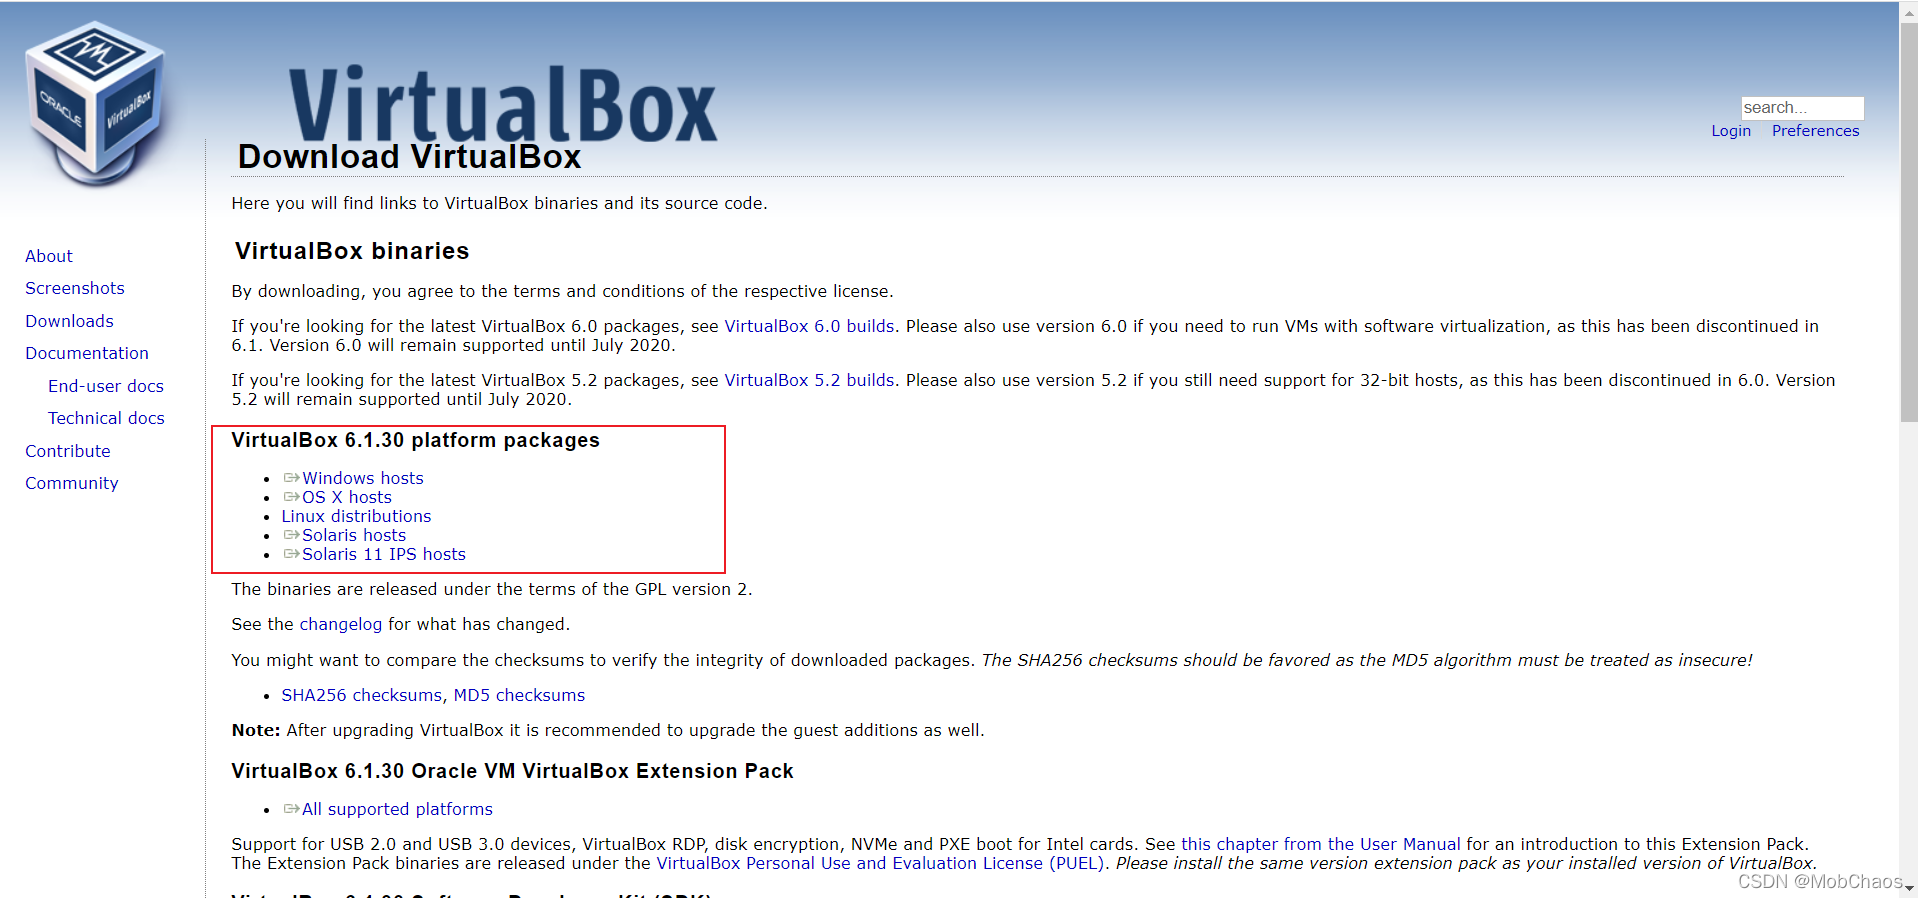

2. 安装Virtual Box
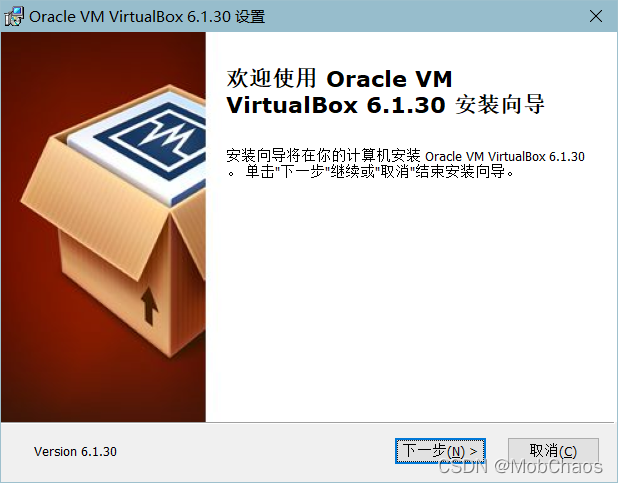
双击Virtual Box安装程序进入安装欢迎界面,如下图所示:
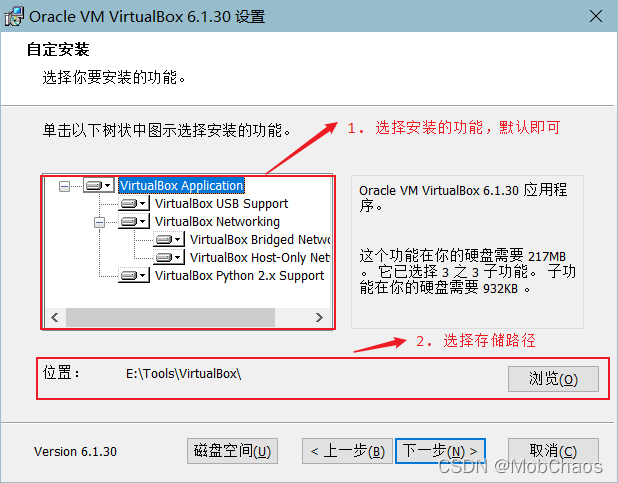
单击 下一步 按钮后进入下一安装界面,在此界面中,可以选择要安装的功能和磁盘存储位置 ,如下图所示:
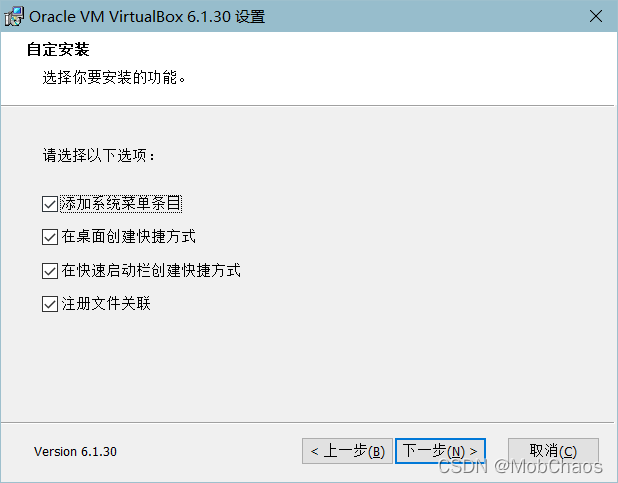
点击下一步按钮,进入下一步安装界面,如下图所示:
[En]
Click the next button and go to the next installation interface, as shown in the following figure:
点击下一步按钮,进入下一步安装界面,如下图所示:
[En]
Click the next button and go to the next installation interface, as shown in the following figure:
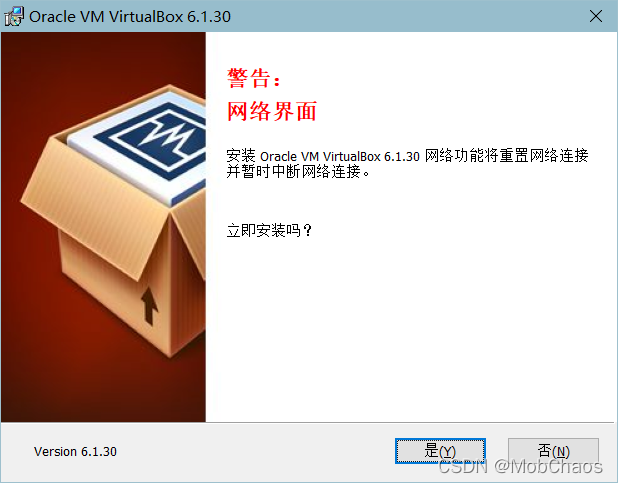
点击[是]按钮,进入下一个安装界面,如下图所示:
[En]
Click the Yes button to go to the next installation interface, as shown in the following figure:
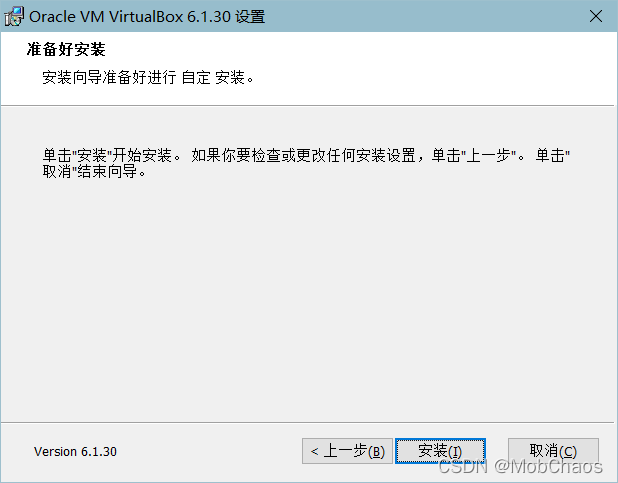
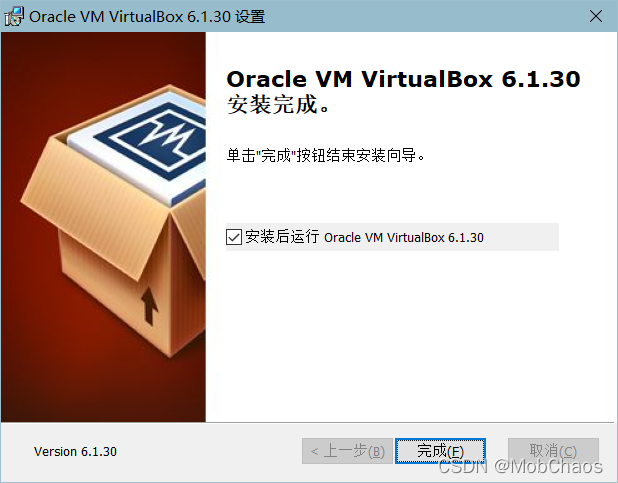
点击Installation按钮,等待安装。安装完成后,进入完成界面,点击完成按钮即可完成安装,如下图所示:
[En]
Click the installation button and wait for the installation. After the installation is completed, enter the completion interface, and click the finish button to complete the installation, as shown in the following figure:
重启电脑,完成Virtual Box安装
二、Virtual Box安装Ubuntu
1. 下载Ubuntu镜像

2. Virtual Box创建虚拟机
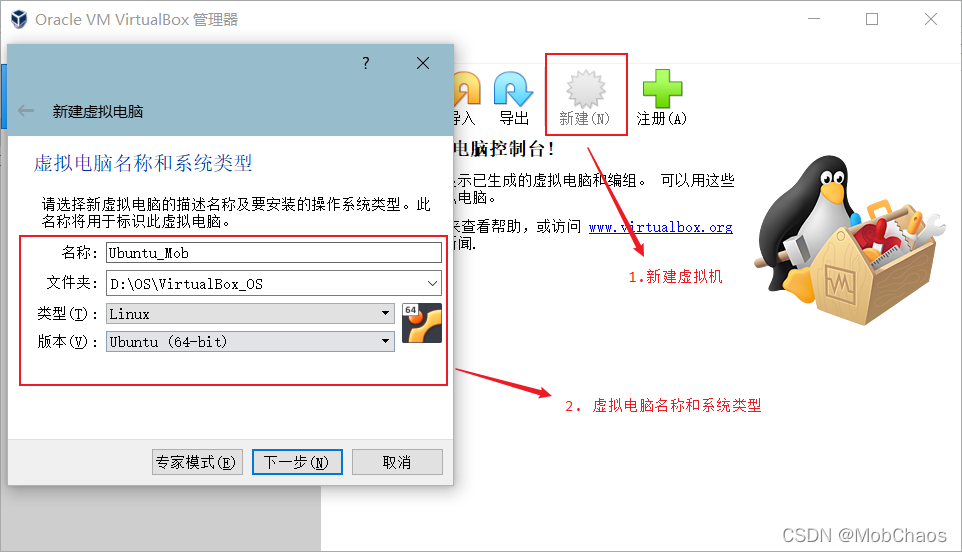
打开Virtual Box,单击新建按钮,出现新建虚拟电脑对话框,在对话框中自定义名称和存储路径,类型选择Linux,版本按照自己下载的镜像选择32位或64位,如下图所示:
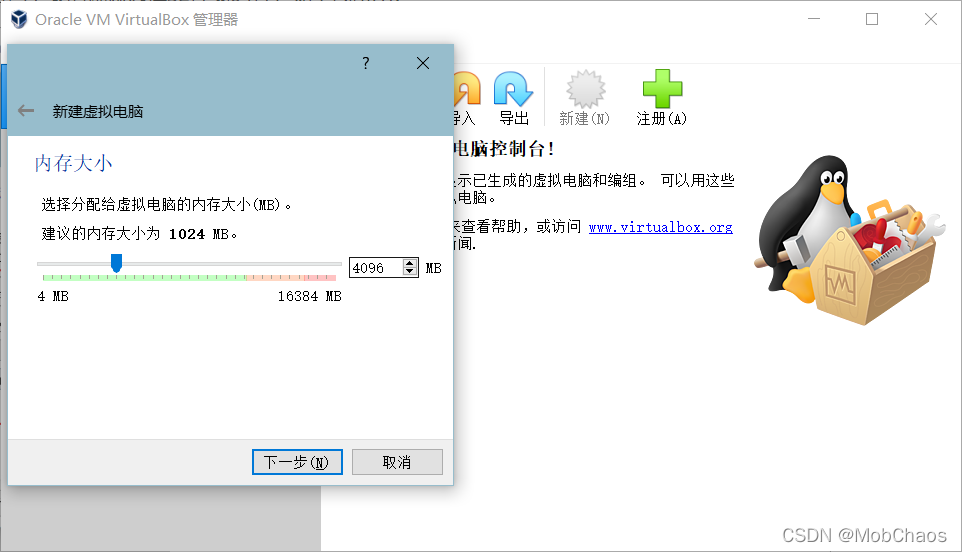
点击下一步按钮,根据您的需要和计算机内存分配大小,如下图所示:
[En]
Click the next button to allocate the size according to your needs and computer memory, as shown in the following figure:
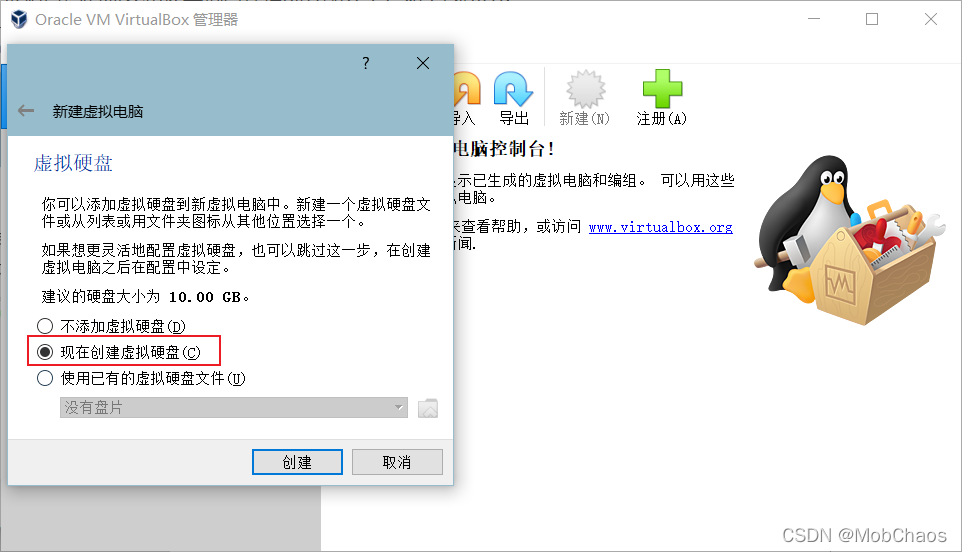
点击下一步按钮,在虚拟硬盘界面中选择立即创建虚拟硬盘,如下图所示:
[En]
Click the next button and select create a virtual hard disk now in the virtual hard disk interface, as shown in the following figure:
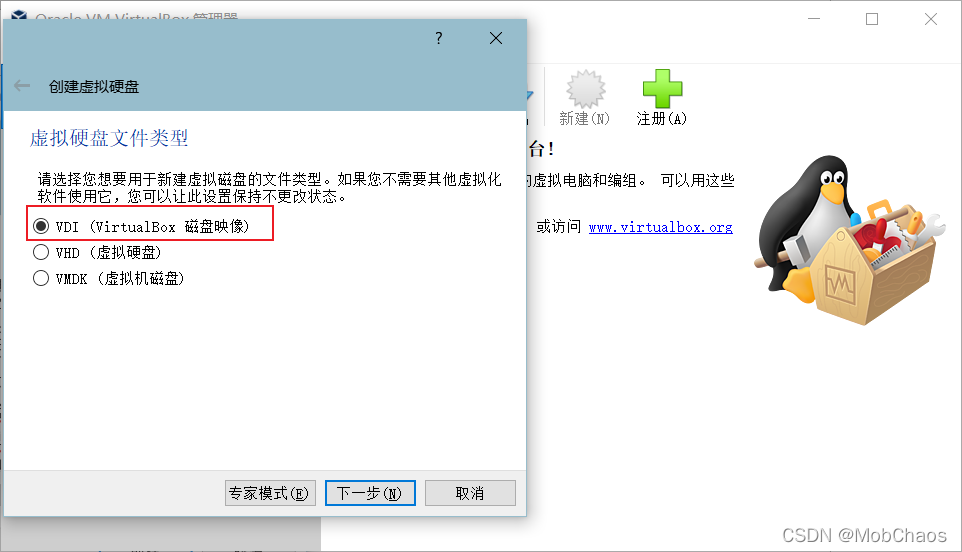
单击创建按钮,在虚拟硬盘文件类型界面选择VDI,如下图所示:
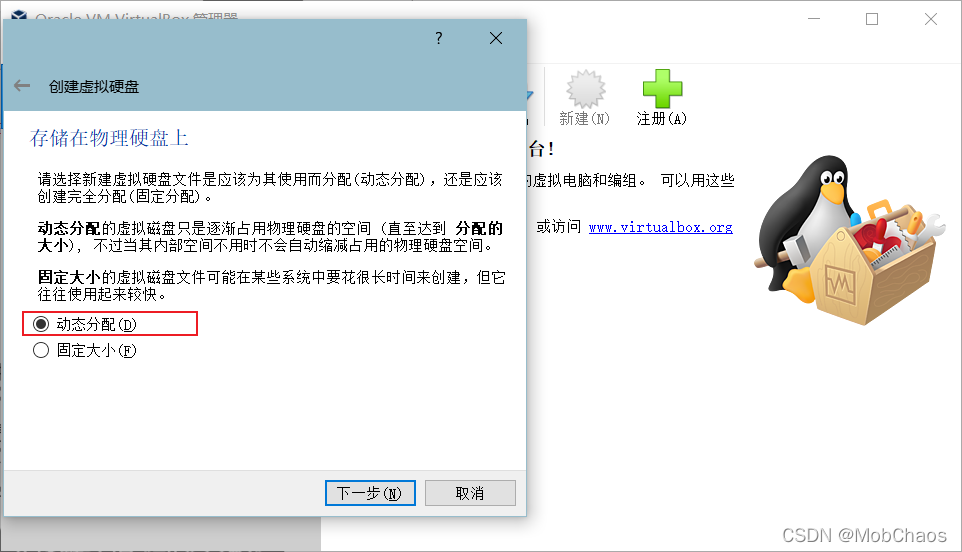
点击下一步按钮,在物理硬盘存储界面中选择动态分配,如下图所示:
[En]
Click the next button and select dynamic allocation in the interface stored on the physical hard disk, as shown in the following figure:
点击[下一步]按钮,在文件位置和大小界面设置文件位置,根据需要设置虚拟硬盘大小,如下图所示:
[En]
Click the next button, set the file location in the file location and size interface, and set the virtual hard disk size as needed, as shown in the following figure:

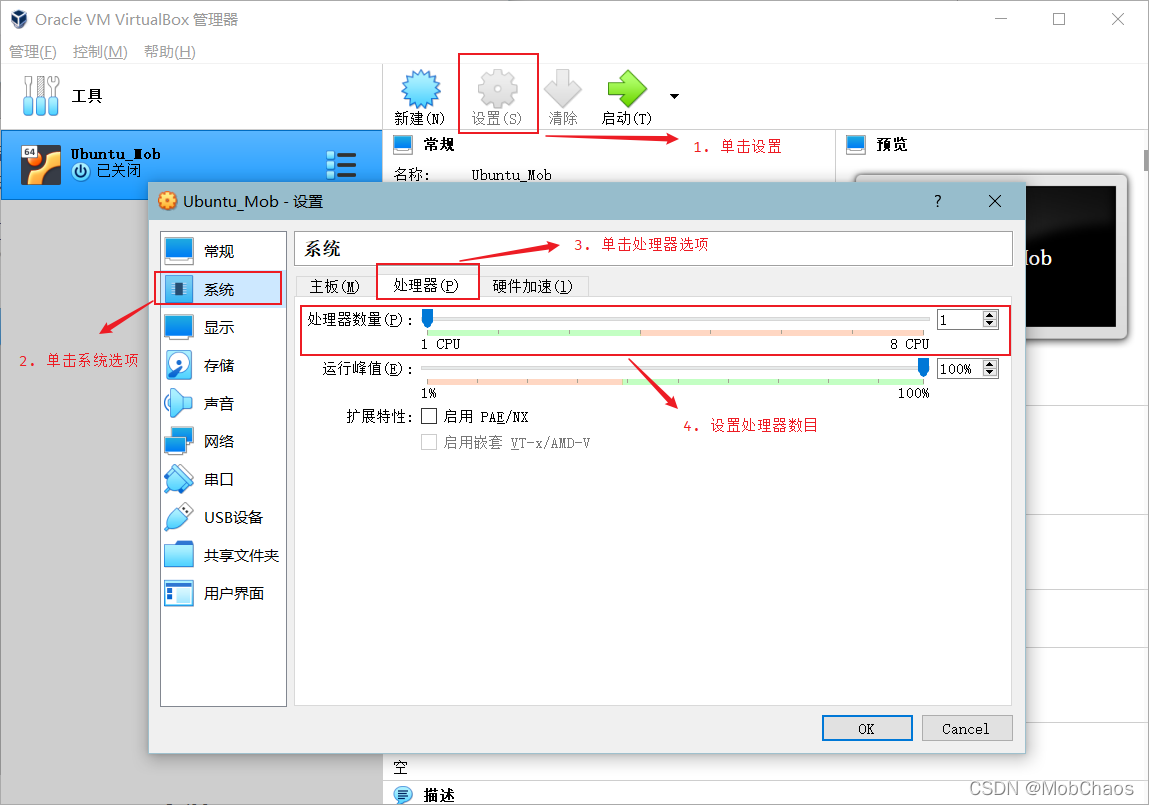
点击Create按钮,即可成功创建该虚拟机。点击[设置]按钮,在系统选项中选择处理器选项,即可设置处理器数量,如下图所示:
[En]
Click the create button, and the virtual machine has been created successfully. You can click the Settings button and select the processor option in the system options to set the number of processors, as shown in the following figure:
3. Virtual Box安装Ubuntu
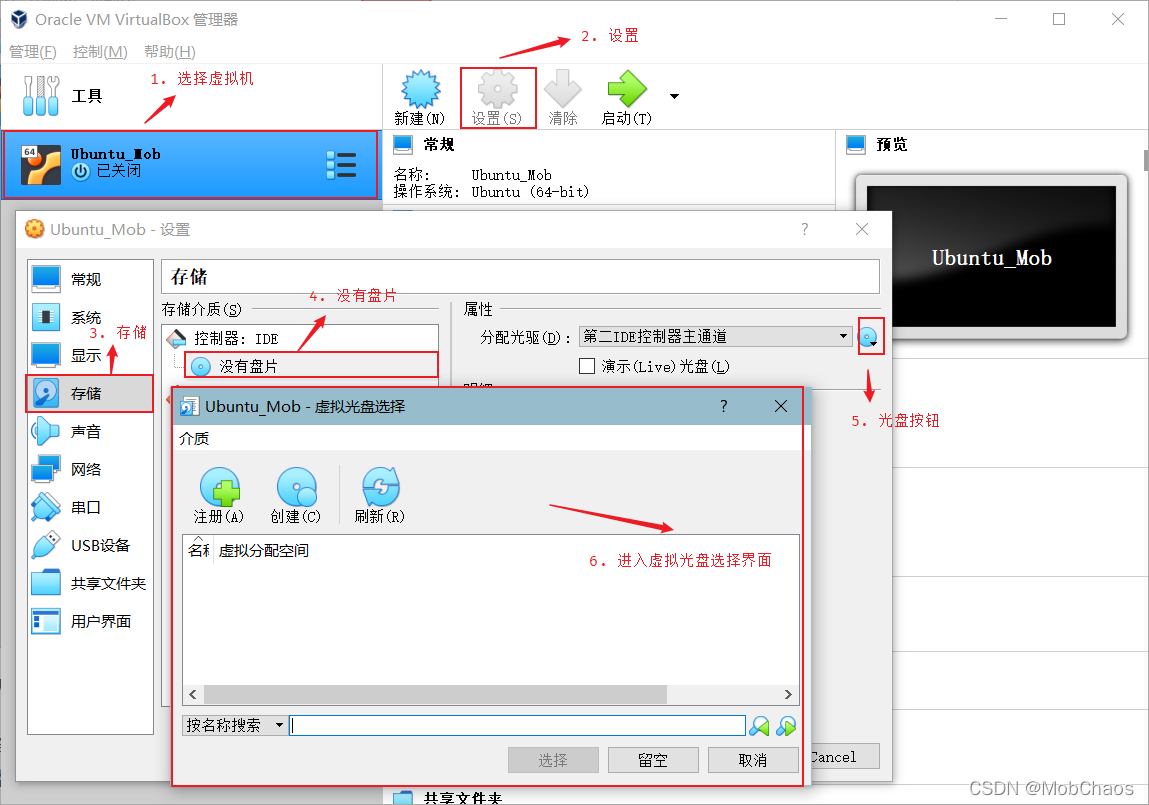
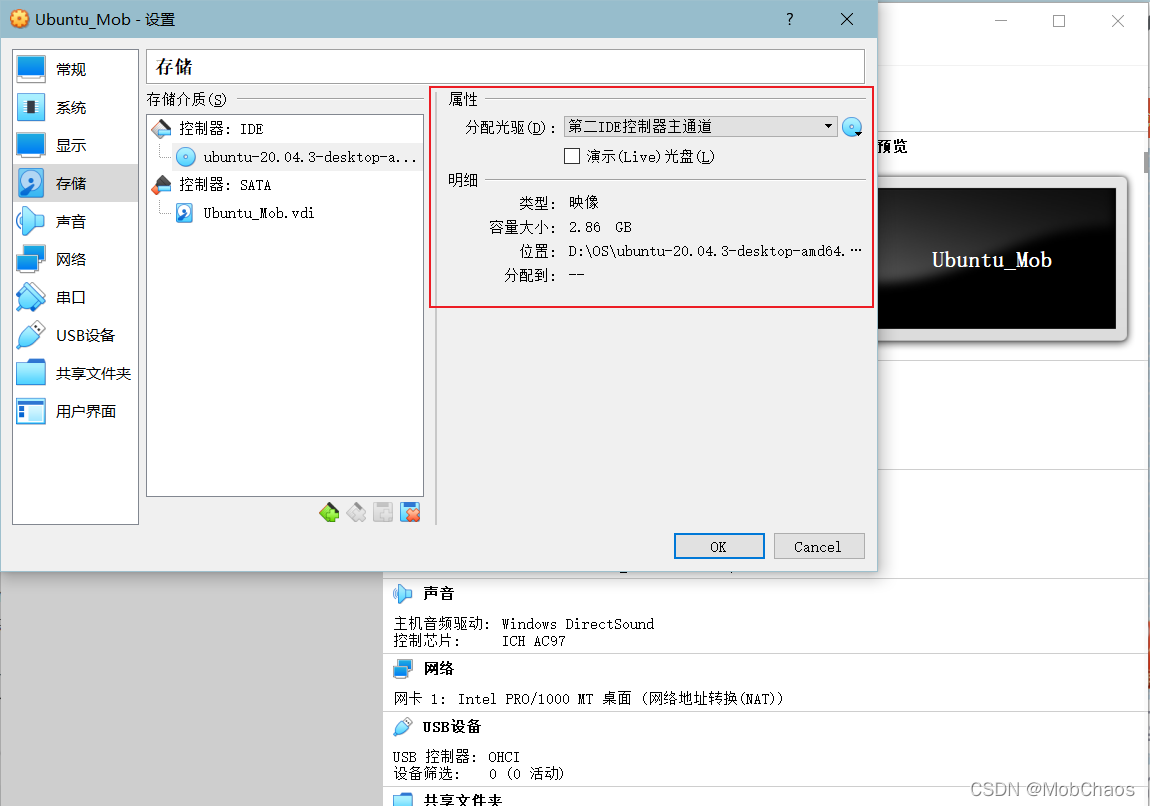
选择刚刚创建的虚拟机,点击设置按钮,在菜单栏中选择存储→无光盘→无光盘图标→选择一个虚拟光盘文件选项,进入虚拟光盘选择界面,如下图所示:
[En]
Select the virtual machine you just created, click the Settings button, and in the menu bar, select Storage → No CD → No CD icon → Select a virtual CD file option, and enter the virtual CD selection interface, as shown below:
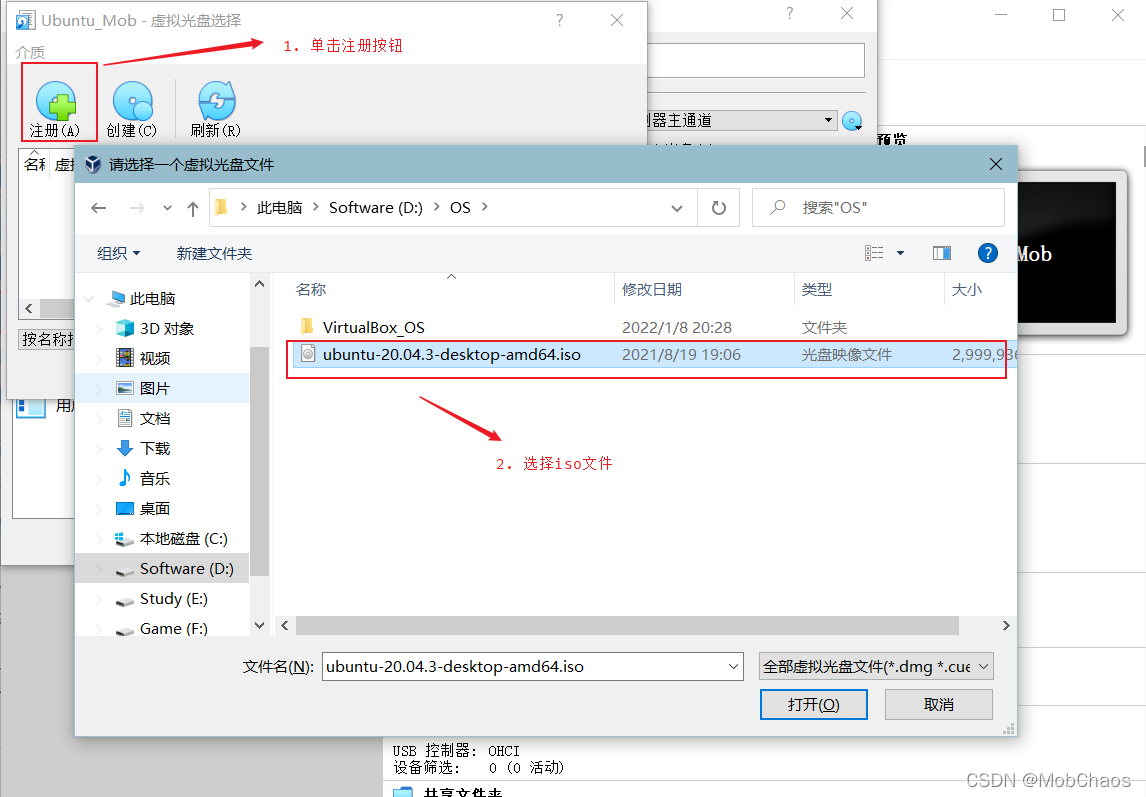
单击注册按钮,在弹出的文件对话框中选择Ubuntu的iso镜像文件,如下图所示:
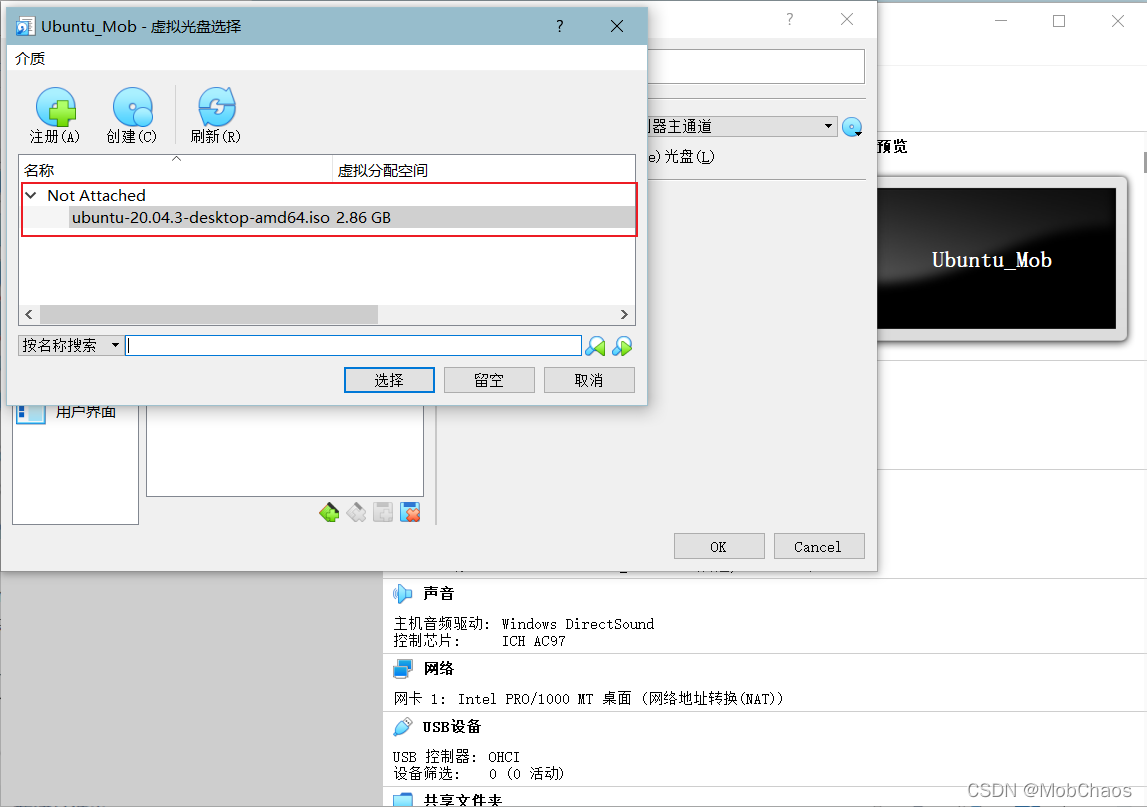
点击打开按钮后,返回虚拟光盘选择界面,选择您刚刚注册的虚拟光盘,如下图所示:
[En]
After clicking the open button, go back to the virtual CD selection interface and select the virtual CD you just registered, as shown in the following figure:
单击选择后,再单击OK按钮,完成虚拟光盘的设置,如下图所示:
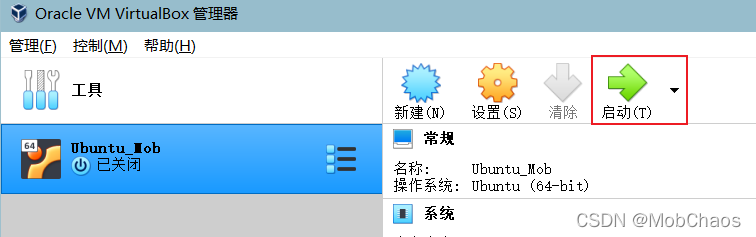
单击启动按钮启动虚拟机,开始安装Ubuntu,如下图所示:
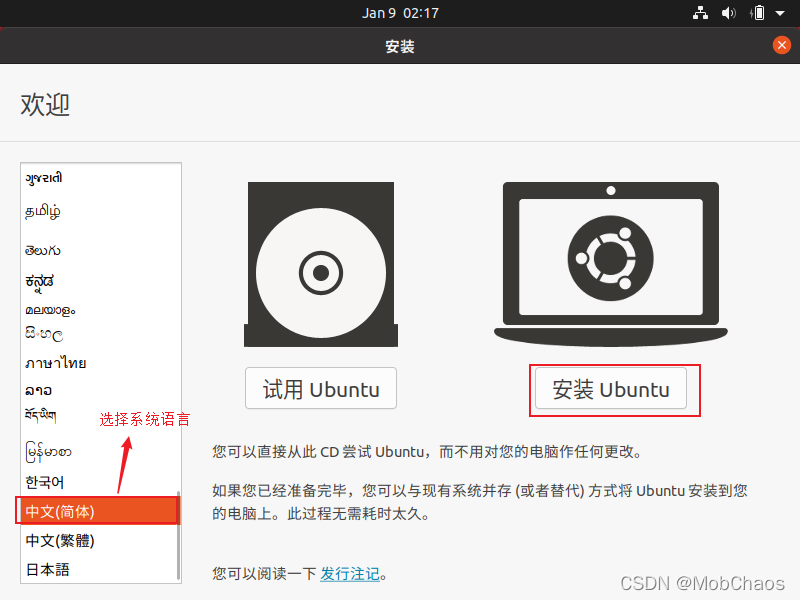
进入欢迎界面,选择Ubuntu系统语言为中文(简体),然后单击安装Ubuntu按钮进行安装,如图所示:
进入键盘布局界面,默认设置即可,单击继续按钮(如果没有看到继续按钮,这是由于计算机的分辨率问题导致的,遇到这种情形时,可以按住键盘的Win键移动鼠标拖动界面,其他版本的Ubuntu可能是Alt键 ),如图所示:

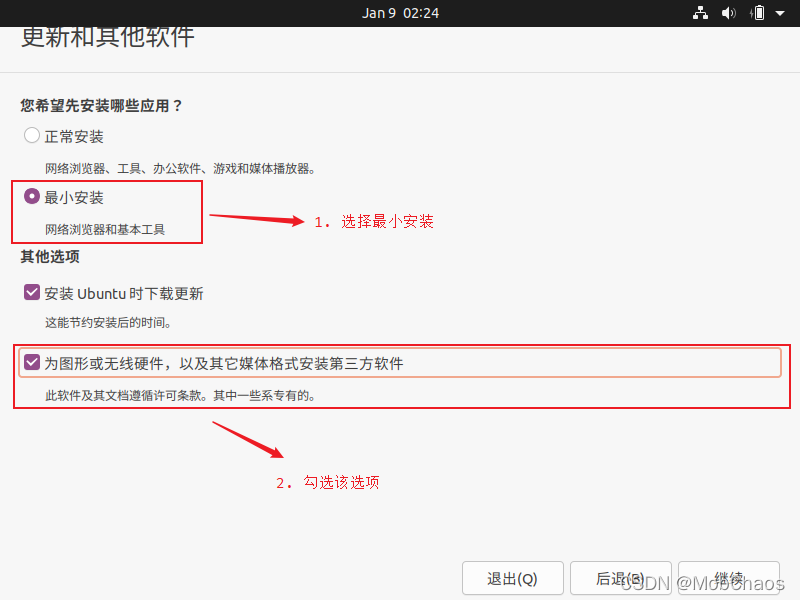
进入更新等软件界面,选择最小安装并检查图形或无线硬件等媒体格式安装第三方软件,点击继续按钮,如图所示:
[En]
Go to the update and other software interface, select minimum installation and check for graphics or wireless hardware, and other media formats to install third-party software, and then click the continue button, as shown in the figure:
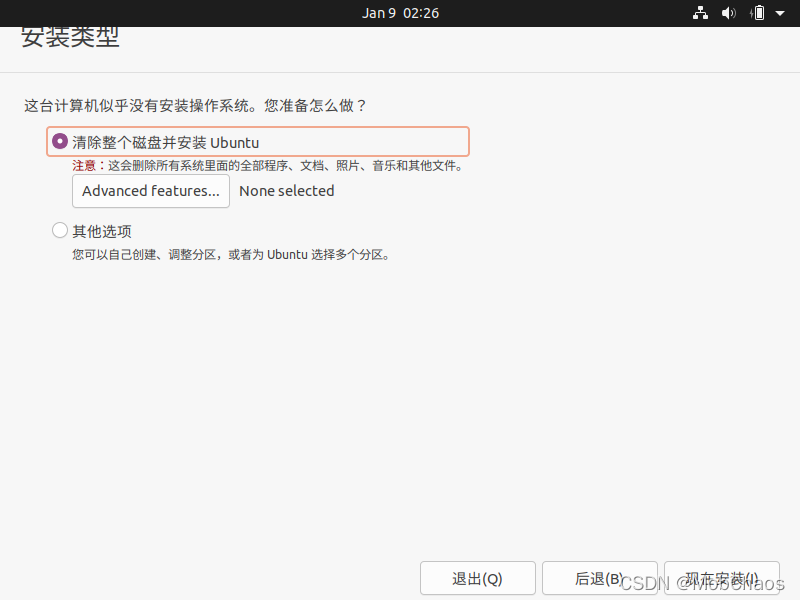
进入安装类型界面,默认选中清除整个磁盘并安装 Ubuntu,然后单击 现在安装 按钮,如图所示:
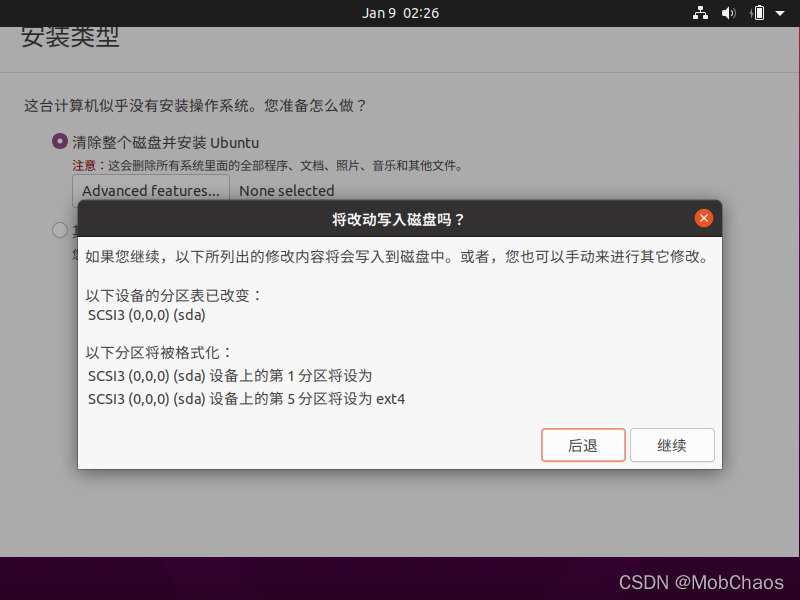
弹出时会将更改写入磁盘吗?对话框中,点击[继续]按钮,如图:
[En]
Will the changes be written to disk when popping up? Dialog box, click the continue button, as shown in the figure:
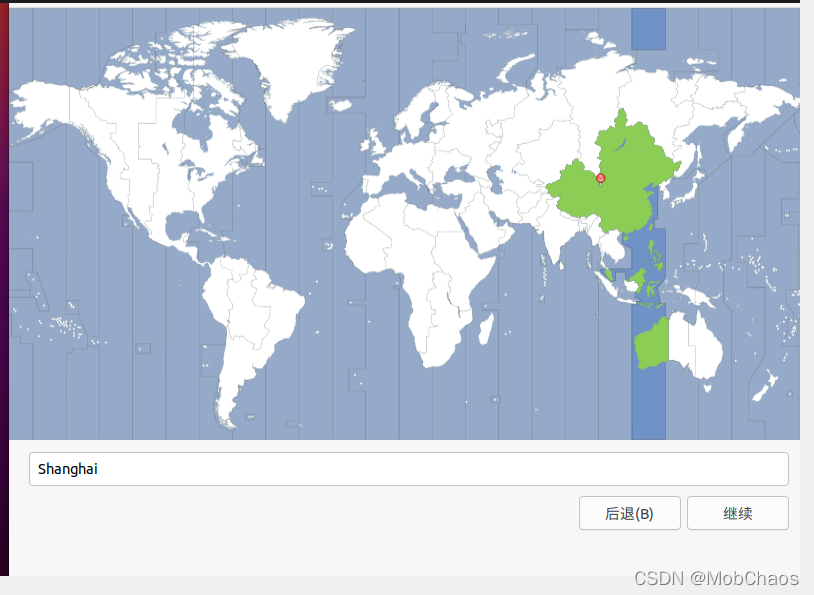
进入你在什么地方?界面,默认Shanghai即可,单击继续按钮,进入你是谁?界面,设置姓名,计算机名,选择一个用户名并设置账号密码 ,然后单击继续按钮,如图所示:

接下来就开始安装Ubuntu,等待安装,Ubuntu 系统安装完成后,需要重新启动,在 安装完成 对话框中单击 现在重启 按钮,如图所示 :
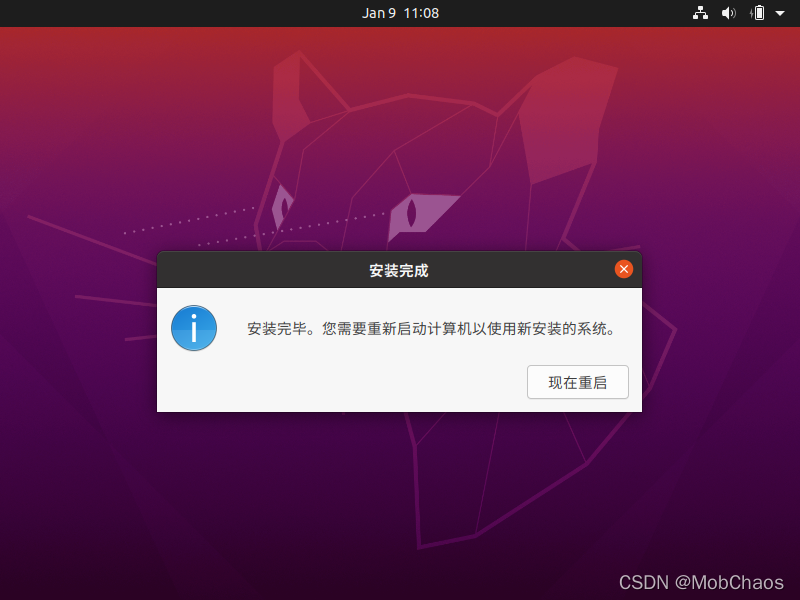
至此,Ubuntu就安装完成了
三、Virtual Box配置Ubuntu
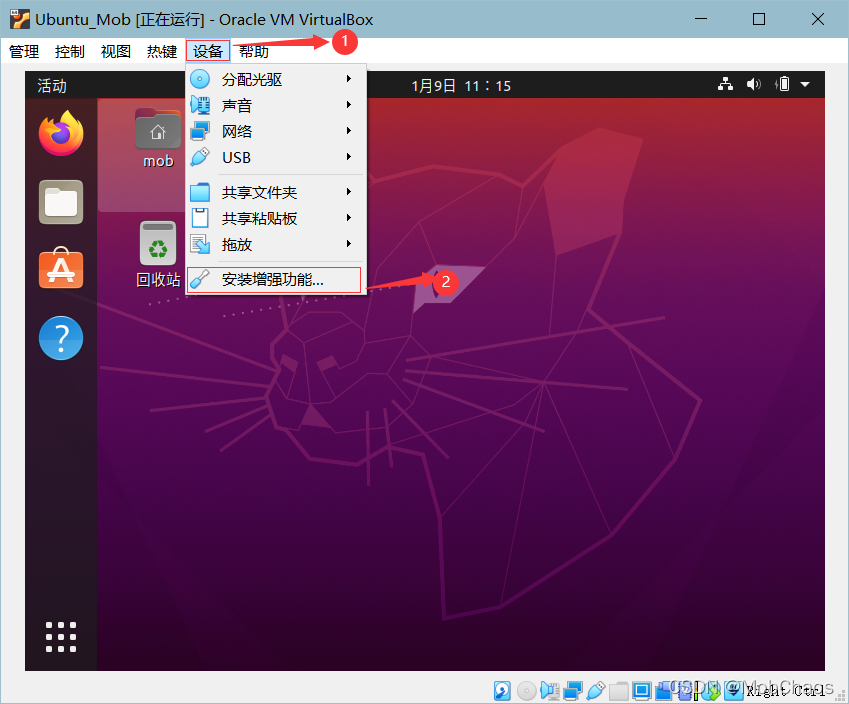
1. 安装增强功能
点击虚拟菜单栏上的Device选项,选择Install Enhancements,如下图:
[En]
Click the device option on the virtual menu bar and select install enhancements, as shown in the following figure:
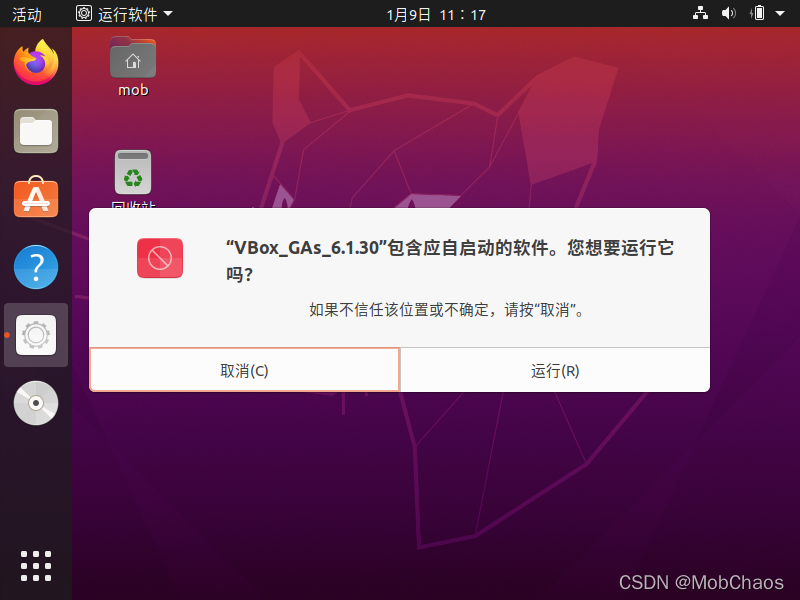
在弹出的对话框中,点击Run按钮,验证密码,等待安装,安装完成后按Enter退出,如下图所示:
[En]
In the pop-up dialog box, click the run button, verify the password, wait for the installation, and press enter to exit after the installation is complete, as shown in the following figure:

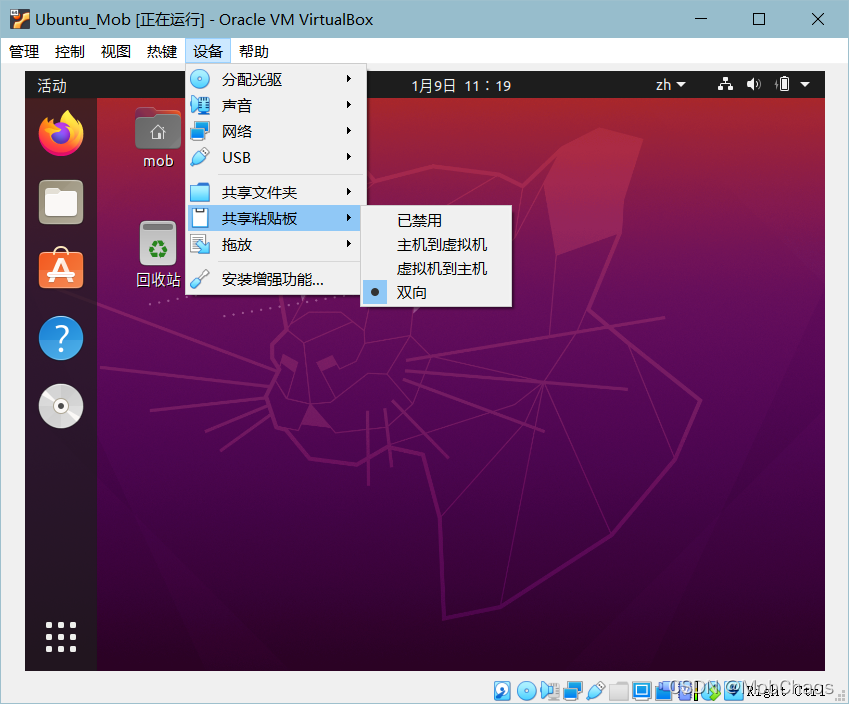
在虚拟机菜单栏中点击[设备选项],选择[共享粘贴板]->[双向],设置共享粘贴板,如下图所示:
[En]
In the virtual machine menu bar, click device options, select shared pasteboard-> Bidirectional, and set the shared pasteboard, as shown in the following figure:
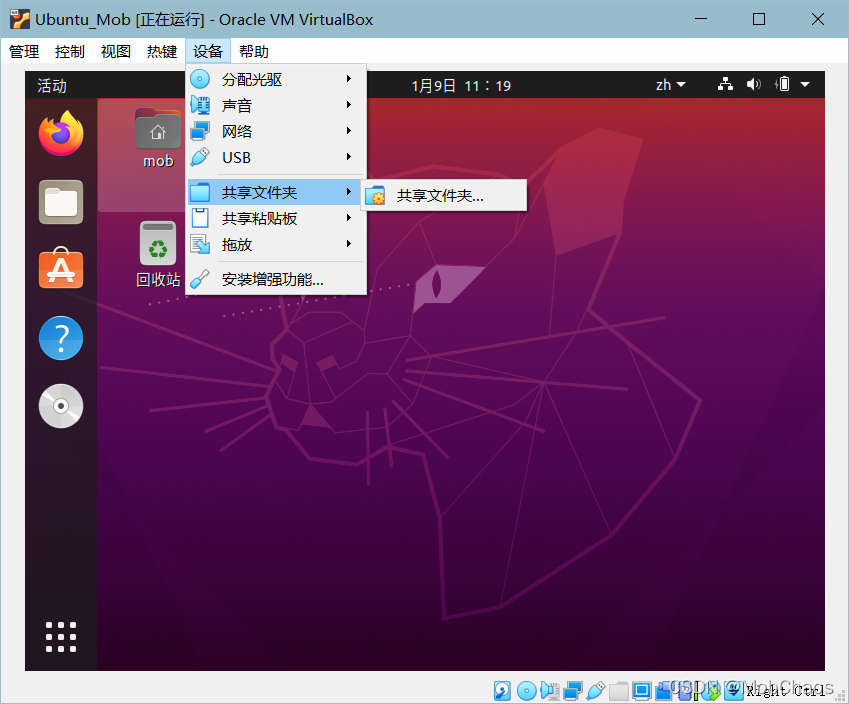
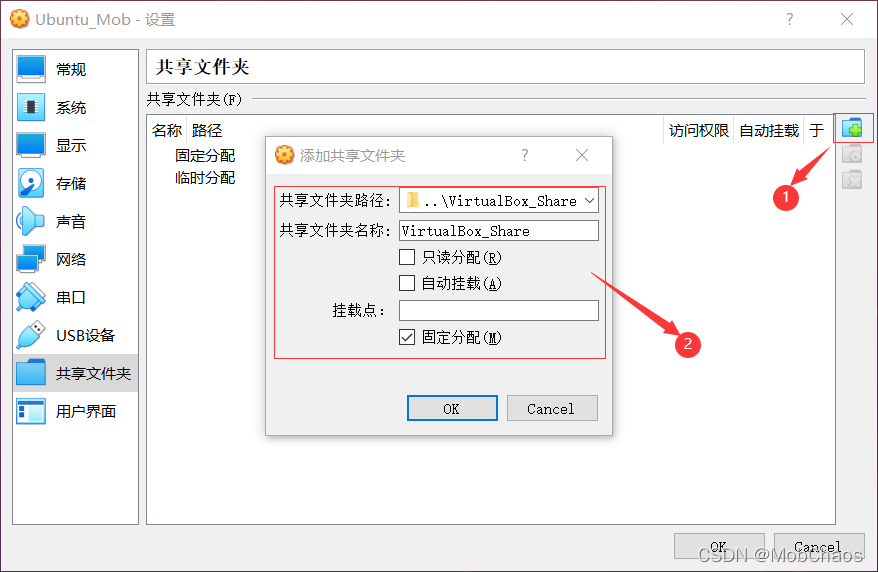
在虚拟机菜单栏中,单击设备选项,选择共享文件夹,设置共享文件夹,在弹出的对话框中设置windows共享文件夹路径和共享文件夹名称,勾选固定分配,如下图所示:
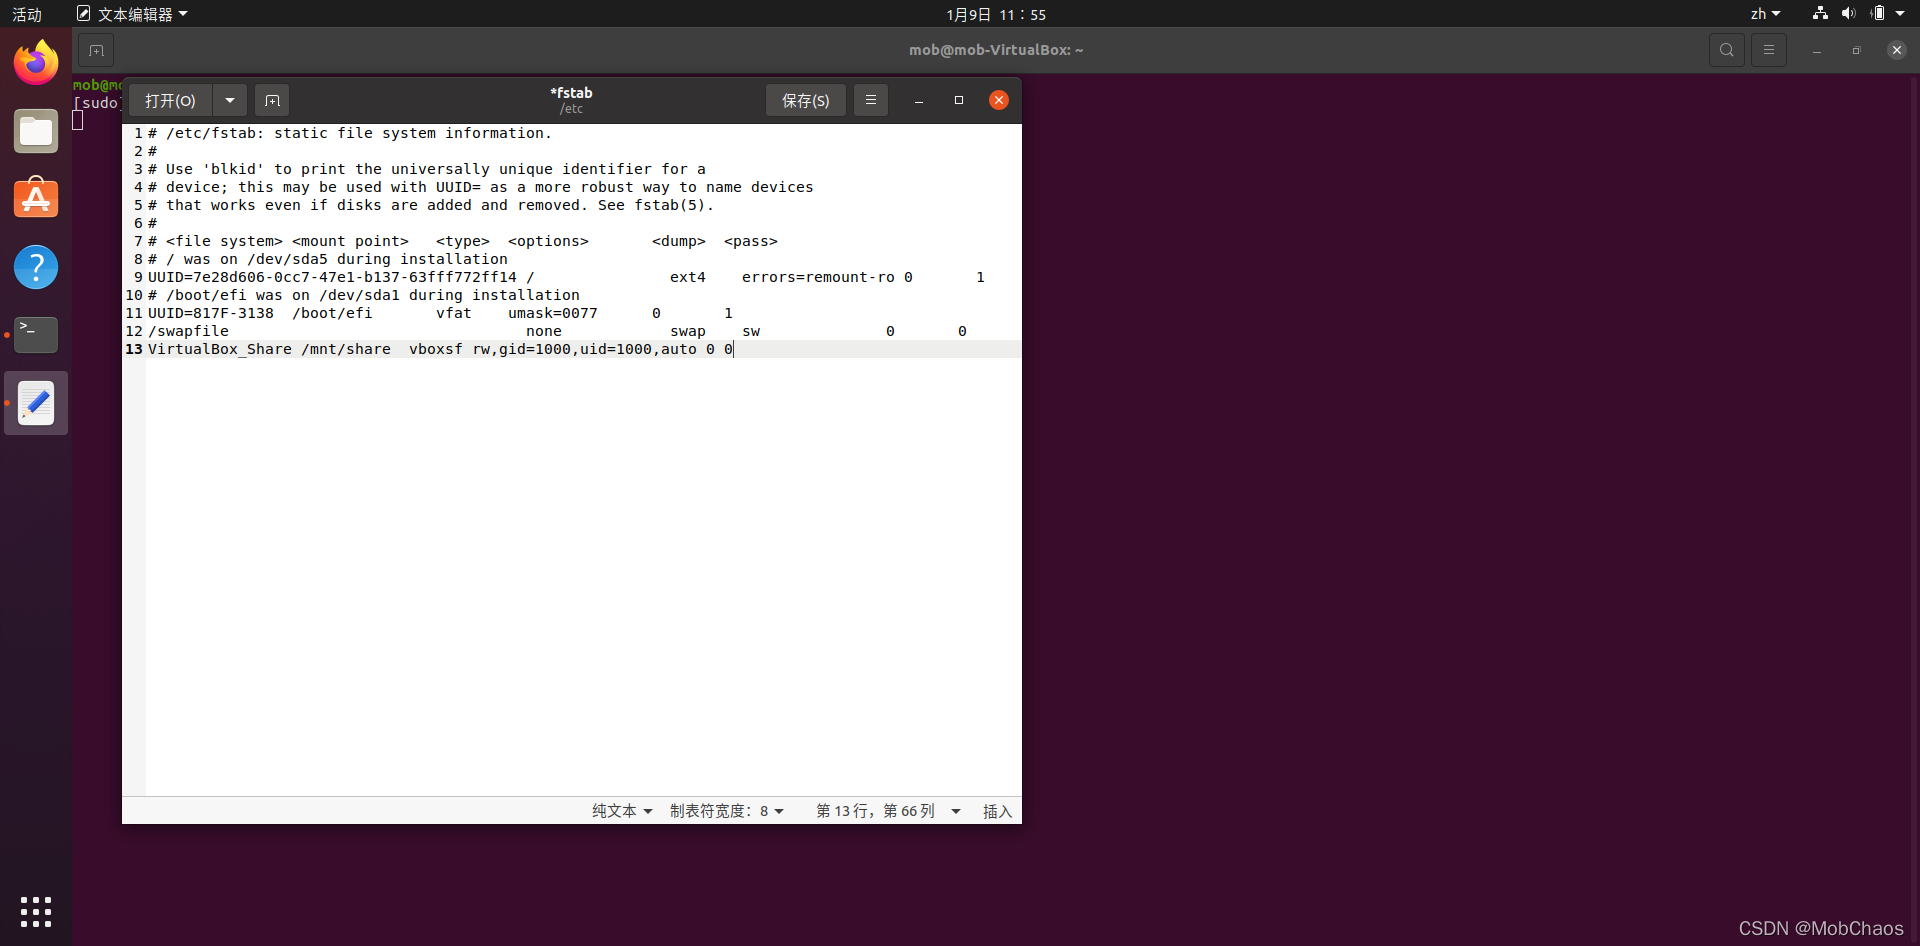
按下crtl+alt+t快捷键打开终端,输入以下指令:
cd /mnt
sudo mkdir share
sudo mount -t vboxsf VirtualBox_Share /mnt/share # VirtualBox_Share为自己的共享文件夹名称
而后输入sudo gedit /etc/fstab,打开的编辑器最后一行添加如下语句VirtualBox_Share /mnt/share vboxsf rw,gid=1000,uid=1000,auto 0 0,其中VirtualBox_Share为自己的共享文件夹名称,然后单击保存按钮,如下图所示:
至此,增强功能安装完毕
2. 更换”源”服务器
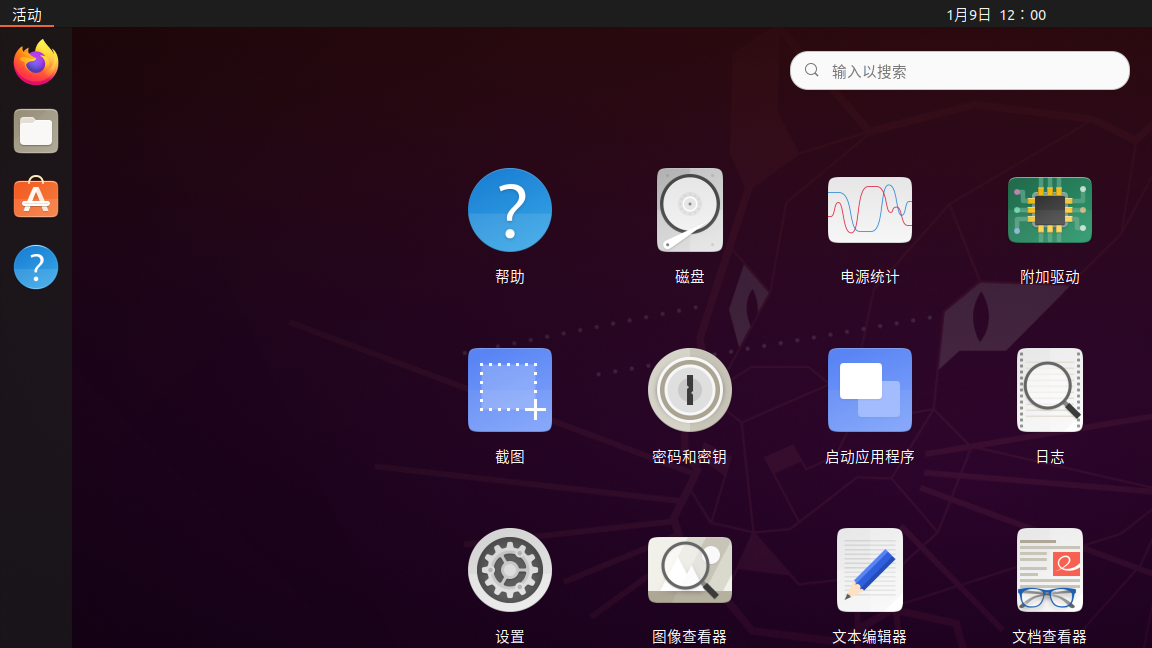
打开左下角开始菜单,选择全部,点击软件和更新图标,如下图所示:
[En]
Open the start menu in the lower left corner, select all, and click the software and update icon, as shown in the following figure:
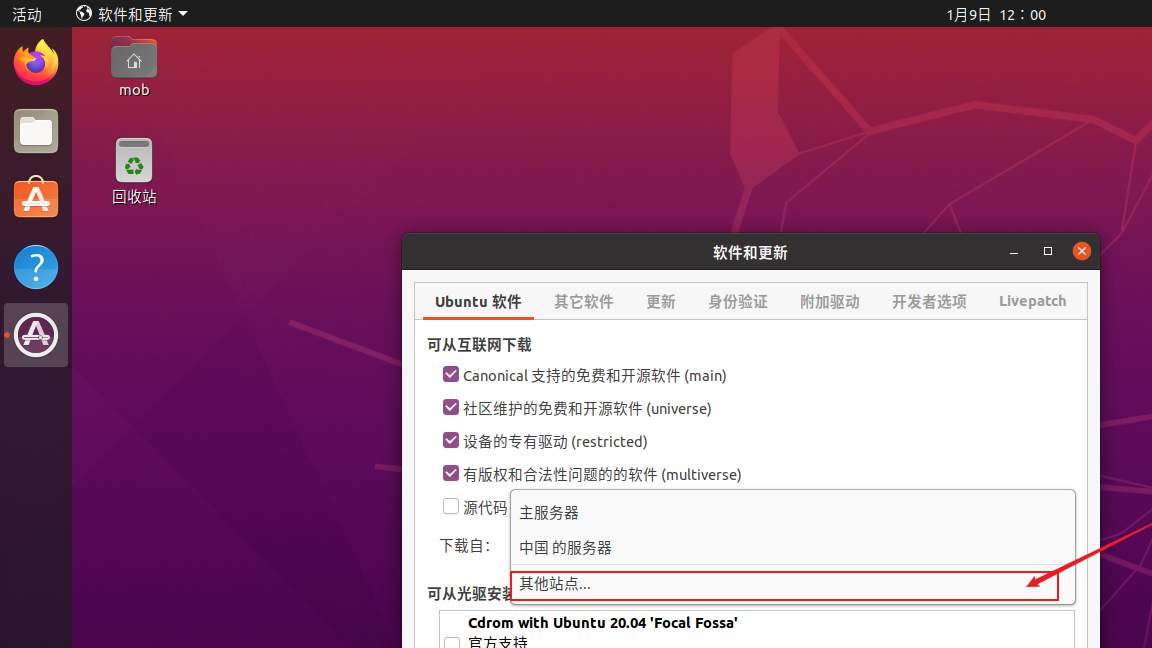
打开您下载到的下拉框,选择其他站点,如下图所示:
[En]
Open the drop-down box you downloaded to and select a different site, as shown in the following figure:
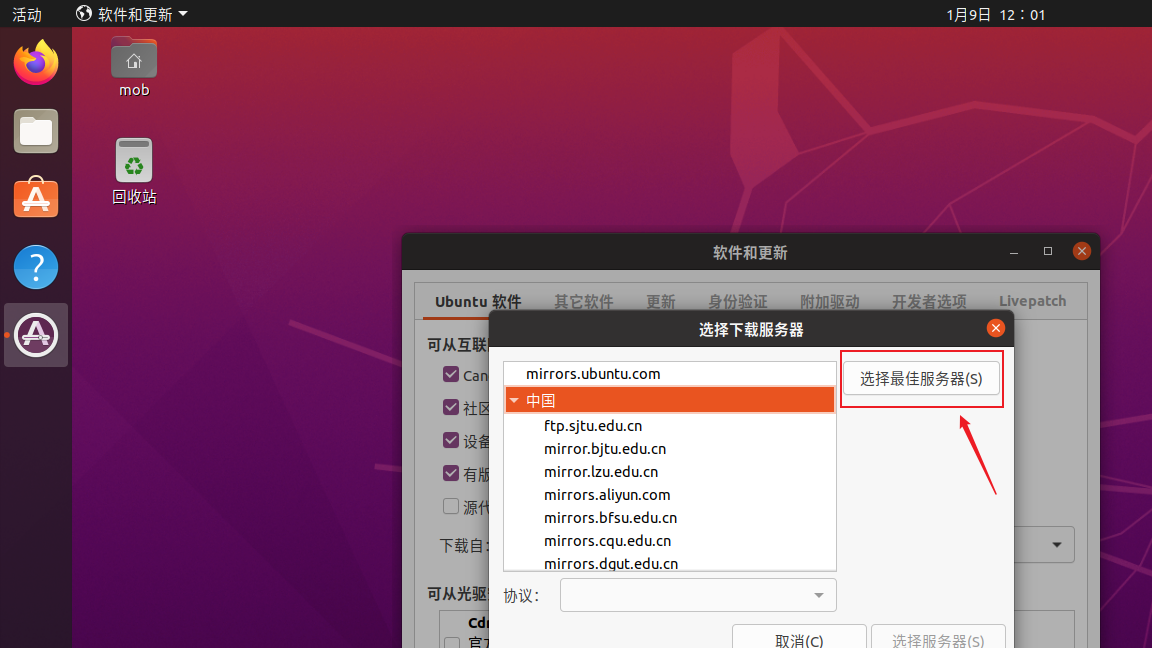
在选择下载服务器的弹出对话框中,点击选择最佳服务器按钮,一段时间后点击选择服务器按钮,如下图所示:
[En]
In the pop-up dialog box for Select download Server, click the Select Best Server button, and after a period of time, click the Select Server button, as shown in the following figure:
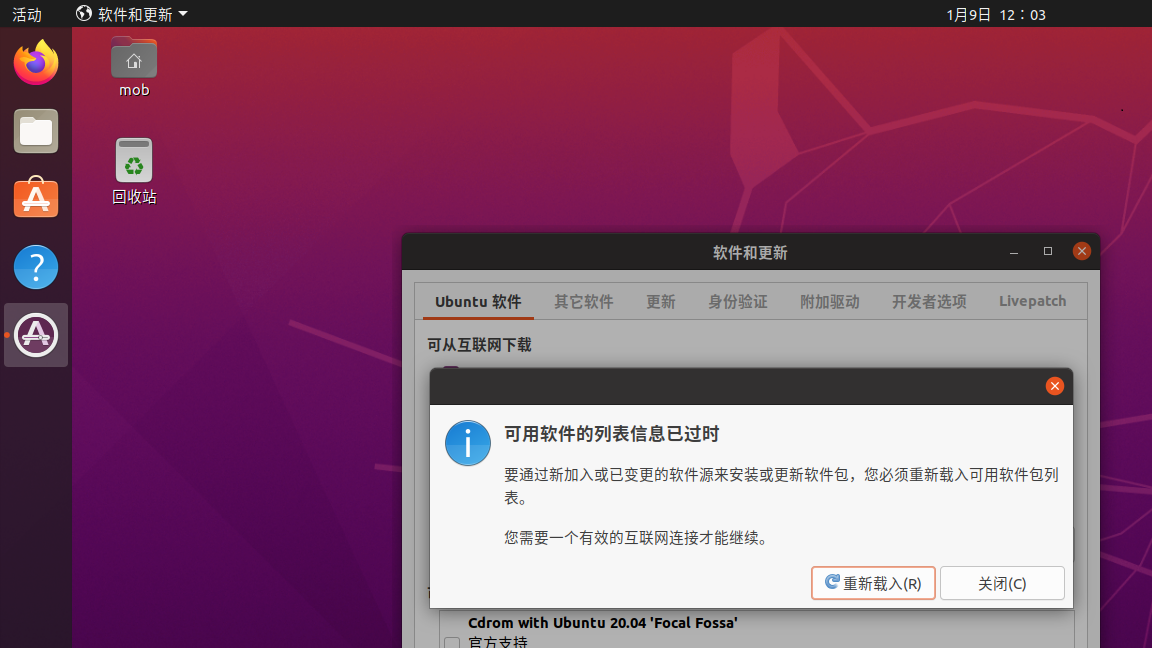
点击[关闭]按钮,弹出对话框选择[重新加载]按钮,如下图所示:
[En]
Click the close button to pop up the dialog box and select the reload button, as shown in the following figure:
此时,完成源服务器的更新
[En]
At this point, complete the update of the source server
3. 更新系统
打开左下角的开始菜单,选择全部,点击软件更新程序图标,然后更新系统,更新后重新启动计算机,如下图所示:
[En]
Open the start menu in the lower left corner, select all, click the software updater icon, then update the system, and restart the computer after the update, as shown in the following figure:

4. 完善语言
打开左下角的开始菜单,选择全部,点击设置图标,如下图所示:
[En]
Open the start menu in the lower left corner, select all, and click the settings icon, as shown in the following figure:

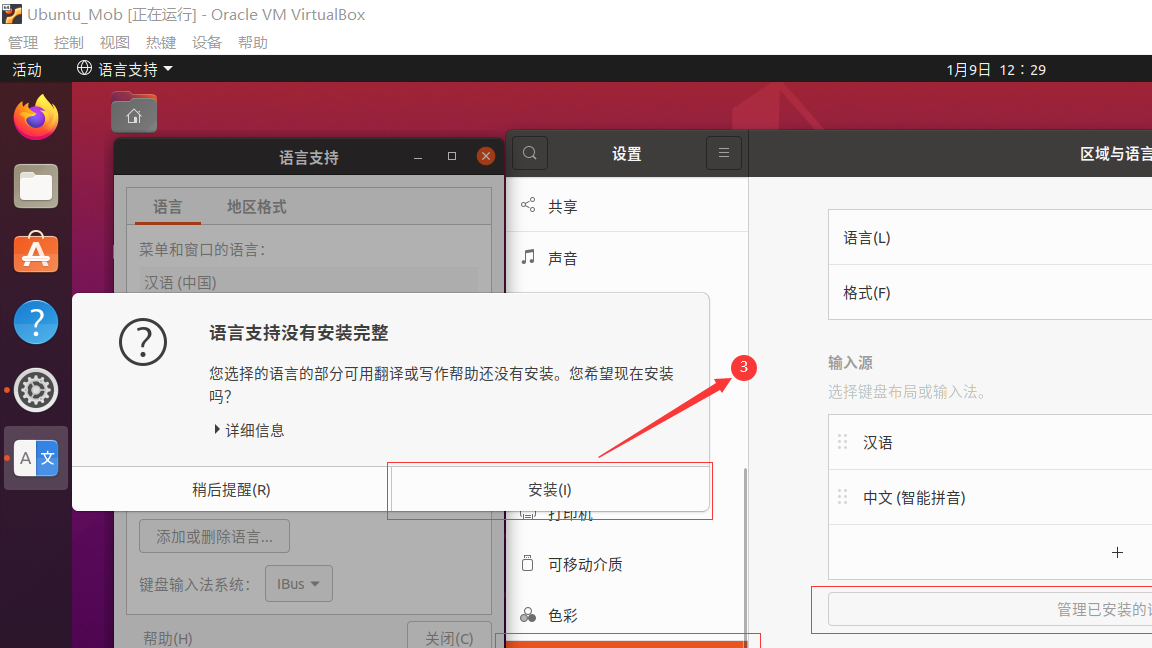
在设置界面,选择[地区和语言]->[管理已安装语言]->[安装]。安装后无需重启,只需重新登录即可,如下图所示:
[En]
In the settings interface, select region and language-> manage installed languages-> install. After installation, you do not need to restart, just log in again, as shown in the following figure:
四、其他注意事项
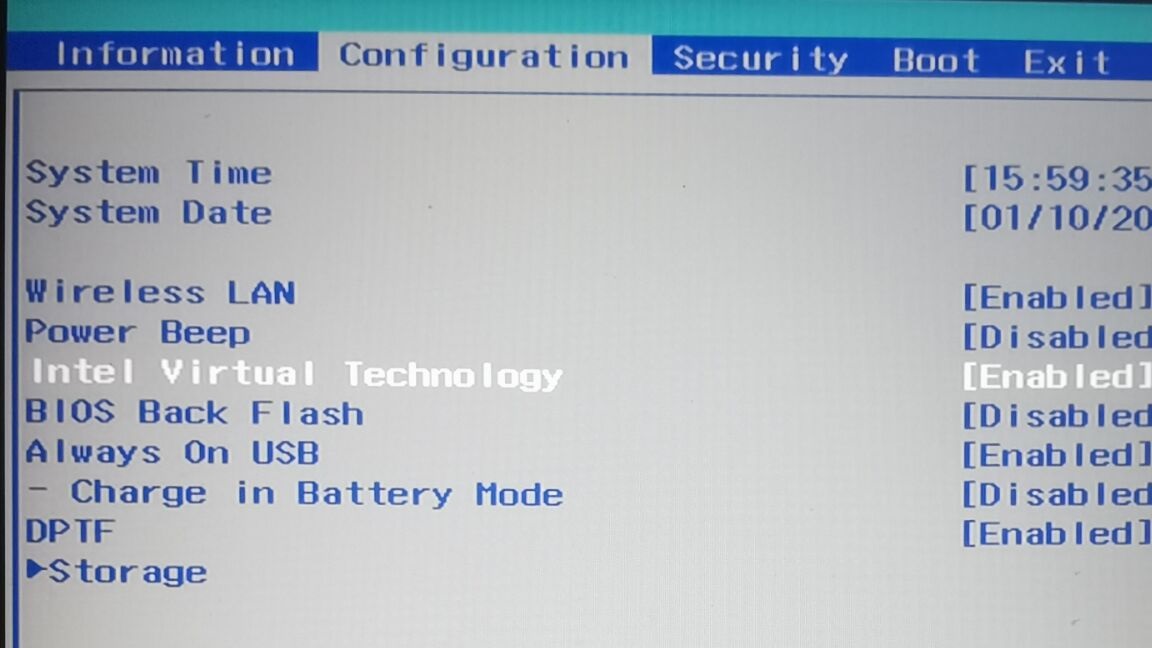
1. 无法安装64位虚拟机问题
需要进入BIOS开启CPU虚拟化才能安装64位虚拟机,联想Y7000操作过程是开机时狂按F2键进入BIOS界面,而后进入Configuration选项,将Intel Virtual Technology设为Enable,最后按F10保存并离开,如下图所示:
2. 安装Ubuntu过程分辨率问题
安装过程,Ubuntu20.04可以按住键盘的Win键拖动键盘,其他版本的Ubuntu可能是Alt键
3. Ubuntu分辨率问题
安装完增强功能重启后,放大按两次右ctrl+c应该就可以了
本文转自:https://blog.csdn.net/qq_45373920/article/details/122409002
Original: https://www.cnblogs.com/helong-123/p/16186936.html
Author: 萌褚
Title: VirtualBox安装Ubuntu20.04图文教程
原创文章受到原创版权保护。转载请注明出处:https://www.johngo689.com/523764/
转载文章受原作者版权保护。转载请注明原作者出处!