

1 详解协程
1.1 多线程的困境
人类压榨CPU的脚步从未停止过。在实际的生产过程中,我们将CPU的任务分为两大类:
- 计算密集型:数值计算、逻辑判断的任务较多。CPU利用率非常高。
- IO密集型:与IO设备交互,如读取磁盘和网卡,频繁等待IO操作结果。CPU利用率非常低。
为了提高IO密集型任务的CPU利用率,常常采用异步加回调的方案。我们去餐厅吃饭,点菜之后就可以回座位上刷手机了,这叫异步;饭菜做好了,服务员把菜端过来,这叫回调。
在软件开发过程中,异步加回调的方案将一件事情分成两个过程,这不符合人类的线性思维,增加了代码的复杂性,提高了错误排除的难度。这就像,在我们下了订单后,我们回到座位上等待。虽然我们有时间做其他事情,但我们不能离开餐厅,记住食物还没有上桌。
[En]
In the process of software development, the scheme of asynchronous plus callback divides one thing into two processes, which does not accord with human linear thinking, increases the code complexity and improves the difficulty of troubleshooting errors. It’s like, after we place an order, we go back to our seats and wait. Although we have time to do something else, we can’t leave the restaurant, keeping in mind that the food hasn’t been served yet.
最简单的方法是在下单后在窗口等待,直到厨师准备好了我们才拿食物。这称为同步阻塞。同步分块的方案简单明了,程序员的心理负担最小,如以下代码所示:
[En]
The easiest way is to wait at the window after placing the order, and we don’t pick up the food until the cook is ready. This is called synchronous blocking. The scheme of synchronous blocking is simple and straightforward, and the programmer has the least mental burden, as shown in the following code:
    /**
     * 顾客用餐
     *
     * @param customerOrder 顾客订单
     * @return
     */
    public void customerDish(CustomerOrder customerOrder) {
        // 顾客下单,生成订单
        RestaurantOrder restaurantOrder = submitOrder(customerOrder);
        // 厨房接到订单,开始做饭,耗时5分钟
        CustomerDish customerDish = cookCustomerDish(restaurantOrder);
        // 顾客拿到饭菜,开始吃饭
        customerEating(customerDish);
    }
如果许多客户前来就餐并聚集在窗口等待,则相当于将进程转换为线程并将其放入线程池中执行,如以下代码所示:
[En]
If many customers come to eat and gather at the window to wait, it is equivalent to turning the process into a thread and putting it into a thread pool for execution, as shown in the following code:
    /**
     *  顾客吃饭的线程
     */
    class CustomerDishThread extends Thread {
        private CustomerOrder customerOrder;

        CustomerDishThread(CustomerOrder customerOrder) {
            this.customerOrder = customerOrder;
        }

        @Override
        public void run() {
            // 顾客用餐
            customerDish(customerOrder);
        }
    }

    private static final ExecutorService THREAD_POOL = Executors.newCachedThreadPool();

    /**
     * 餐厅接待很多顾客
     * @param customerOrderList
     */
    public void serveManyCustomer(List customerOrderList) {

        for (CustomerOrder customerOrder : customerOrderList) {
            THREAD_POOL.execute(new CustomerDishThread(customerOrder));
        }
    }
同步阻塞方案效率低,浪费客户时间,不能把太多人挤进窗口。如果将餐厅视为服务器,将客户视为客户端的请求,则服务器可以并发执行的线程数是有限的。当有很多线程时,操作系统会频繁地调度线程,并且上下文切换会带来大量开销。有什么方法可以减少线程调度的开销吗?
[En]
The synchronous blocking scheme is inefficient, wastes customers’ time, and can’t squeeze too many people in the window. If the restaurant is regarded as the server and the customer as the request of the client, the number of threads that the server can execute concurrently is limited. When there are a lot of threads, the operating system schedules threads frequently, and context switching is a lot of overhead. Is there any way to reduce the overhead of thread scheduling?
协程登场了。

1.2 协程的优势
协程(Coroutines)的完整定义是”协作式调度的用户态线程”。首先,要理解线程调度的两种方式:
- 协作式调度:当前线程完全占用CPU时间,除非自己让出时间片,直到运行结束,系统才执行下一个线程。可能出现一个线程一直占有CPU,而其他线程等待。
- 抢占式调度:操作系统决定下一个占用CPU时间的是哪一个线程,定期的中断当前正在执行的线程,任何一个线程都不能独占。不会因为一个线程而影响整个进程的执行。
此外,还需要理解用户状态和内核状态的概念。
[En]
In addition, it is necessary to understand the concepts of user state and kernel state.
操作系统的核心是内核(kernel),它独立于普通的应用程序,可以访问受保护的内存空间,也有访问底层硬件设备的所有权限。有些CPU 的指令是非常危险的,一旦用错可能导致系统崩溃。如果所有的程序都可以任意使用这些指令,那么系统崩溃的概率将大大增加。为了保证内核的安全,操作系统一般都禁止用户进程直接操作内核。具体的实现方式是将虚拟内存空间划分为两部分,一部分为内核空间,另一部分为用户空间。 当进程运行在内核空间时就处于内核态,进程运行在用户空间时则处于用户态。
无论是进程还是线程,它们的上下文切换和”内核态、用户态”没有直接的关系。比如只要需要系统调用,即使不做任何切换,都需要进入内核态。举个例子:一个线程调用函数在屏幕上打印 hello world,就已经进入了内核态了,因为打印字符的功能是由内核程序提供的。总的来说,应用程序通常运行在用户态,遇到下列三种情况会切换到内核态:
- 系统调用:创建和调度线程、锁定和解锁等。
[En]
system calls: create and schedule threads, lock and unlock, etc.*
- 异常事件:当发生未知异常时切换到内核状态,执行相关异常事件。
[En]
abnormal events: switch to kernel state when an unknown exception occurs to execute related abnormal events.*
- 设备中断:如果外围设备完成了用户请求,比如硬盘读写操作,就会给CPU发送中断信号。CPU会转去处理中断事件,切换到内核态。
线程的代码在用户模式下运行,而调度在内核模式下运行。操作系统切换线程上下文的步骤如下:
[En]
The thread’s code runs in user mode, while scheduling runs in kernel mode. The steps for the operating system to switch thread context are as follows:
- 1)保留用户态现场(上下文、寄存器、用户栈等)
- 2)复制用户态参数,用户栈切到内核栈,进入内核态
- 3)代码安全检查(内核不信任用户态代码)
- 4)执行内核态代码
- 5)复制内核态代码执行结果,回到用户态
- 6)恢复用户态现场(上下文、寄存器、用户栈等)
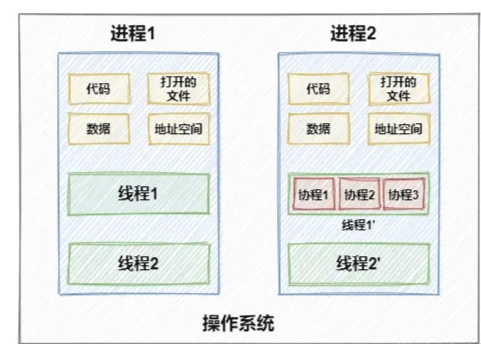
协作程序不是操作系统的基本功能,系统不知道它的存在。它在线程中运行,通过分时和多路复用线程运行,而不增加线程数量。协同程序也有上下文切换,但它不会切换到内核模式,这比线程切换要便宜得多。每个协同程序都比一个线程小得多,一个线程可以容纳相当多的合作者。
[En]
The cooperative program is not the underlying feature of the operating system, and the system is not aware of its existence. It runs in threads and runs by time-sharing and multiplexing threads without increasing the number of threads. The co-program also has context switching, but it does not switch to kernel mode, which is much less expensive than thread switching. Each co-program is much smaller than a thread, and a thread can hold a considerable number of collaborators.
在IO密集型的任务中有着大量的阻塞等待过程,协程采用协作式调度,在IO阻塞的时候让出CPU,当IO就绪后再主动占用CPU,牺牲任务执行的公平性换取吞吐量。
任何事情都有两面性,合作过程也有几个不利之处:
[En]
Everything has two sides, and the cooperation process also has several disadvantages:
- 线程可以在多核CPU上并行,无法将一个线程的多个协程分摊到多核上。
- 协同程序执行过程中不能有阻塞操作,否则整个线程都会被阻塞。
[En]
there must be no blocking operation in the execution of the co-program, otherwise the whole thread will be blocked.*
- 协作过程的控制取决于用户状态,可能会执行恶意代码。
[En]
the control of the collaboration process is determined by the user state, and malicious code may be executed.*
1.3 协程的原理
无论是线程还是协同编程,它都只是操作系统层面的一个抽象概念,本质上是函数执行的载体。我们可以简单地将协作程序视为可以暂停和恢复的功能,在协作调度器的控制下执行,并且一次只能运行一个函数。
[En]
Whether it is thread or co-program, it is only an abstract concept at the operating system level, which is essentially the carrier of function execution. We can simply think of the cooperative program as a function that can be paused and resumed, executed under the control of the cooperative scheduler, and can only run one function at a time.
我们来看看下面的Java代码,代码中出现的注解 Coroutine 和 CoroutineSchedule ,只是为了更好的演示而编造出来,JDK并没有这两个注解。
public class CoroutineDemo {

    static void functionA() {
        System.out.println("A");
    }

    static void functionB() {
        System.out.println("B");
    }

    static void functionC() {
        System.out.println("C");
    }

    /**
     * 普通的函数
     */
    static void commonFunction() {
        functionA();
        functionB();
        functionC();
    }

    /**
     * @Coroutine 标识函数为协程
     */
    @Coroutine
    static void coroutineFunction() {
        functionA();
        functionB();
        functionC();
    }

    /**
     * @Coroutine 标识协程调度器,跟随主线程一起启动
     */
    @CoroutineSchedule
    void coroutineScheduleRule() {
        //如果等待IO,暂停协程coroutineFunction,否则就恢复
        if(waitIO()){
            yieldFunction("coroutineFunction");
        }else {
            resumeFunction("coroutineFunction");
        }
    }

    public static void main(String[] args) {

        Thread commonThread = new Thread(() -> {
            //执行普通函数
            commonFunction();
        });
        commonThread.start();

        Thread  coroutineThread = new Thread(() -> {
            //执行协程
            coroutineFunction();
        });
        coroutineThread.start();
    }
}
main方法启动了两个线程,普通函数 commonFunction 执行后,会依次打印出 A B C。协程 coroutineFunction 执行后,不确定打印什么,因为协程调度器有规则:如果CPU繁忙就暂停协程。如果协程打印了 A 之后就被暂停了,当它被再次唤醒,可能会接着打印 B C,而不是打印 A 。因为协程记录了函数执行的上下文信息,知道自己上一次执行到了哪里。这和操作系统调度线程是一样的,暂停当前线程,保存运行状态后去调度其它线程,该线程再次被分配CPU后继续运行,就像没有被暂停过一样。
1.4 如何实现协程
我们尝试一下用 C/C++ 实现一个简单的协程。协程有两个重要的部分:调度器和用户态的上下文切换。Linux系统已经提供了操作用户态上下文的接口,只需要实现调度器即可。glibc是一个C语言库,封装了系统最重要的系统服务,提供了最底层的API。glibc包含一个ucontext库,支持用户态的上下文切换。
首先看看ucontext提供的四个基本函数:
函数 作用 int getcontext(ucontext_t ucp) 获得当前上下文保存的栈和入口执行点 int setcontext(const ucontext_t ucp) 设置当前上下文。初始化ucp结构体,将当前的上下文保存到ucp中 void makecontext(ucontext_t
ucp, void (
func)(), int argc, …) 创建一个新的上下文。修改上下文ucp,给该上下文指定一个栈空间ucp->stack,设置后继的上下文ucp->uc_link int swapcontext(ucontext_t oucp, ucontext_t ucp) 切换上下文。保存当前上下文到oucp,设置到ucp所指向的上下文,跳转到ucp所指的地方
ucontext_t 是用户态上下文数据,看看它的数据结构:
typedef struct ucontext {
    // 后继的上下文,表示当前程序执行之后下一个上下文
    struct ucontext *uc_link;
    sigset_t         uc_sigmask;
    // 上下文堆栈
    stack_t          uc_stack;
    mcontext_t       uc_mcontext;
  } ucontext_t;
在下面的代码演示中,你将会进一步理解这4个函数的用法,代码的调试环境是Ubuntu 16、Visual Studio Code(包含 C/C++ 开发插件):
#include
#include
#include

int i = 1 , max = 5;
int main() {
    ucontext_t context;

    puts("上菜了");
    getcontext(&context);

    if (i > max ) return 0;
    puts("张三吃饭了");
    i++;

    setcontext(&context);

    puts("李四吃饭了");
    return 0;
}
李四吃上饭吗?你大概能够猜到代码不会执行到 puts("李四吃饭了");,以上代码的输出结果是:
上菜了
张三吃饭了
张三吃饭了
张三吃饭了
张三吃饭了
张三吃饭了
getcontext(&context)获取了程序执行的上下文, setcontext(&context)给当前程序设置上下文,程序立即重新执行。 &context记录了已经执行的代码行,那么再次执行的起始行是 if (i > max ) return 0,这样永远不会走到 puts("李四吃饭了")。
以下代码演示了 makecontext 和 swapcontext 函数的用法,以及设置上下文堆栈参数:
#include
#include

void eating()
{
    puts("李四吃饭了");
}

int main()
{
    //指定栈空间
    char stack[512*128];
    ucontext_t child,main;

    //获取当前上下文
    getcontext(&child);
    //指定栈空间
    child.uc_stack.ss_sp = stack;
    //指定栈空间大小
    child.uc_stack.ss_size = sizeof(stack);
    child.uc_stack.ss_flags = 0;
    //设置后继上下文
    child.uc_link = &main;

    puts("上菜了");

    //修改 child 上下文,指向eating函数
    makecontext(&child,(void (*)(void))eating,0);

    //切换到child上下文,保存当前上下文到main
    swapcontext(&main,&child);

    puts("张三吃饭了");

    return 0;
}
以上代码的输出结果是:
上菜了
李四吃饭了
张三吃饭了
入口main方法是一个线程,函数 swapcontext(&main,&child)交换了上下文参数,将会执行函数 eating(),之后再执行child的后继上下文main,回到了主线程main。从这段代码你能否想到如何实现一个协程调度器?
在实际生产环境中,协同程序调度器是一个在后台运行的线程,它会自动调度所有的协同程序,而且调度规则比较复杂。下面的代码实现了一个无法自动调度的调度程序。
[En]
In the real production environment, the co-program scheduler is a thread running in the background, which automatically schedules all co-programs, and the scheduling rules are more complex. The following code implements a scheduler that cannot be scheduled automatically.
首先定义协程结构体:
//上下文堆栈
#define DEFAULT_STACK_SZIE (512*128)

//定义协程状态
enum ThreadState{FREE,RUNNABLE,RUNNING,SUSPEND};

//定义协程结构体
typedef struct uthread_t
{
    ucontext_t ctx;
    Fun func;
    void *arg;
    enum ThreadState state;
    char stack[DEFAULT_STACK_SZIE];
}uthread_t;
定义调度器结构体:
//最大协程数量
#define MAX_UTHREAD_SIZE  512

typedef struct schedule_t
{
    ucontext_t main;
    //正在运行的协程的ID,一个线程只能运行一个协程
    int running_thread;
    uthread_t *threads;
    //协程数量
    int uthread_count;

    schedule_t():running_thread(-1), uthread_count(0) {
        threads = new uthread_t[MAX_UTHREAD_SIZE];
        for (int i = 0; i < MAX_UTHREAD_SIZE; i++) {
            threads[i].state = FREE;
        }
    }

    ~schedule_t() {
        delete [] threads;
    }
}schedule_t;
定义协程调度方法:
// 创建协程
int  uthread_create(schedule_t &schedule,Fun func,void *arg);

// 挂起协程
void uthread_yield(schedule_t &schedule);

// 恢复协程
void uthread_resume(schedule_t &schedule,int id);
实现协程调度方法:
// 创建协程
int uthread_create(schedule_t &schedule, Fun func, void *arg)
{
    int id = 0;

    for (id = 0; id < schedule.uthread_count; ++id)
    {
        if (schedule.threads[id].state == FREE)
        {
            break;
        }
    }

    if (id == schedule.uthread_count)
    {
        schedule.uthread_count++;
    }

    uthread_t *t = &(schedule.threads[id]);

    t->state = RUNNABLE;
    t->func = func;
    t->arg = arg;

    getcontext(&(t->ctx));

    t->ctx.uc_stack.ss_sp = t->stack;
    t->ctx.uc_stack.ss_size = DEFAULT_STACK_SZIE;
    t->ctx.uc_stack.ss_flags = 0;
    t->ctx.uc_link = &(schedule.main);
    schedule.running_thread = id;

    //创建协程结构体
    makecontext(&(t->ctx), (void (*)(void))(uthread_init), 1, &schedule);
    //切换上下文,执行func函数
    swapcontext(&(schedule.main), &(t->ctx));

    return id;
}

//初始化一个协程,配合uthread_create使用
void uthread_init(schedule_t *ps)
{
    int id = ps->running_thread;
    if (id != -1)
    {
        uthread_t *t = &(ps->threads[id]);
        t->func(t->arg);
        t->state = FREE;
        ps->running_thread = -1;
    }
}

// 恢复执行协程
void uthread_resume(schedule_t &schedule, int id)
{
    if (id < 0 || id >= schedule.uthread_count)
    {
        return;
    }

    uthread_t *t = &(schedule.threads[id]);
    if (t->state == SUSPEND)
    {
        // 上下文切到t->ctx,即恢复执行协程
        swapcontext(&(schedule.main), &(t->ctx));
    }
}

// 挂起协程
void uthread_yield(schedule_t &schedule)
{
    if (schedule.running_thread != -1)
    {
        uthread_t *t = &(schedule.threads[schedule.running_thread]);
        t->state = SUSPEND;
        schedule.running_thread = -1;
        // 上下文切回主线程,相当于挂起协程
        swapcontext(&(t->ctx), &(schedule.main));
    }
}
测试调度方法:
void zhangsan(void * arg)
{
    puts("张三吃饭了");
    //挂起协程
    uthread_yield(*(schedule_t *)arg);
    puts("张三吃完了");
}

void lishi(void *arg)
{
    puts("李四吃饭了");
    //挂起协程
    uthread_yield(*(schedule_t *)arg);
    puts("李四吃完了");
}

int main()
{
    //初始化调度器
    schedule_t schedule;

    //创建协程并挂起
    int zhangsan_id = uthread_create(schedule,zhangsan,&schedule);
    int lisi_id = uthread_create(schedule,lishi,&schedule);

    //恢复协程
    uthread_resume(schedule,zhangsan_id);
    uthread_resume(schedule,lisi_id);

    puts("餐厅营业中");
    return 0;
}
以上程序的输出结果:
张三吃饭了
李四吃饭了
张三吃完了
李四吃完了
餐厅营业中
目前许多语言已经支持协程,比如C#、Golang、Python、Lua、Ruby、C++ 20、Erlang,也有一些 C/C++ 开源的协程库,比如Protothreads、libco。
是不是缺了一个年老色衰的Java?
2 Java协程
目前还没有JDK正式版本支持协程特性,如果想尝试Java的协程,可以使用Open JDK 19的预览特性或者 Alibaba JDK 最新版,以及第三方框架Quasar。
2.1 JDK的VirtualThread
2018年1月,OpenJDK官方提出了协程项目Project Loom。2019年,Loom的首个EA版本问世,此时Java的协程类叫做Fiber。它将使用Fiber轻量级用户模式线程,从JVM层面对多线程技术进行彻底的改变,使轻量级线程的并发也能够适用于高吞吐量的业务场景。2019年10月,官方将Fiber重新实现为Thread的子类VirtualThread,兼容Thread的所有操作。
2021年11月15日,OpenJDK官方宣布 JDK 19中加入虚拟线程的特性 JEP 425: Virtual Threads (Preview)。
Virtual threads are lightweight threads that dramatically reduce the effort of writing, maintaining, and observing high-throughput concurrent applications. (虚拟线程是轻量级线程,可以显著减少编写、维护和观察高吞吐量并发应用程序的工作量)
该特性属于预览版,距离稳定版本还需要一段时间。如要在 JDK 19上尝试该功能,则必须通过 --enable-preview启动,如下所示:
java --release 19 --enable-preview Main.java
简单了解一下VirtualThread的相关API:
// 启动一个简单虚拟线程
Thread thread = Thread.ofVirtual().start(runnable);

// 采用ThreadFactory创建虚拟线程
ThreadFactory factory = Thread.ofVirtual().factory();

// 创建大量虚拟线程
try (var executor = Executors.newVirtualThreadPerTaskExecutor()) {
    IntStream.range(0, 10_000).forEach(i -> {
        executor.submit(() -> {
            Thread.sleep(Duration.ofSeconds(1));
            return i;
        });
    });
}
想了解更多细节可以阅读 https://openjdk.org/jeps/425
2.2 Quasar框架
Quasar是一个开源的Java协程框架,基本原理是修改字节码,使方法挂起后可以保存和恢复JVM栈帧,方法内部已执行到的字节码位置也通过增加状态机的方式记录,在下次恢复后可直接跳转到中断的位置。项目地址是 http://docs.paralleluniverse.co/quasar/ 。
让我们使用线程和协同例程测试10000并发执行的消耗,代码如下:
[En]
Let’s test the consumption of 10000 concurrent execution using threads and co-routines, the code is as follows:
// 使用JDK的线程和线程池
public static void main(String[] args) throws Exception {
    CountDownLatch countDownLatch=new CountDownLatch(10_000);
    long start = System.currentTimeMillis();
    ExecutoarService executor= Executors.newCachedThreadPool();
    for (int i = 0; i < 10_000; i++) {
        executor.submit(() -> {
            try {
                TimeUnit.SECONDS.sleep(1);
            } catch (InterruptedException e) {
                e.printStackTrace();
            }
            countDownLatch.countDown();
        });
    }
    countDownLatch.await();
    long end = System.currentTimeMillis();
    System.out.println("Thread use:"+(end-start)+" ms");
}
接下来使用Quasar框架的协程,maven依赖配置:
    co.paralleluniverse
    quasar-core
    0.7.10
JVM启动参数要配置 --javaagent:C:\Users\Administrator\.m2\repository\co\paralleluniverse\quasar-core\0.7.10\quasar-core-0.7.10.jar。
public static void main(String[] args) throws Exception {
    CountDownLatch countDownLatch=new CountDownLatch(10_000);
    long start = System.currentTimeMillis();

    for (int i = 0; i < 10_000; i++) {
        new Fiber<>(new SuspendableRunnable(){
            @Override
            public Integer run() throws SuspendExecution, InterruptedException {
                Fiber.sleep(1000);
                countDownLatch.countDown();
            }
        }).start();
    }

    countDownLatch.await();
    long end = System.currentTimeMillis();
    System.out.println("Fiber use:"+(end-start)+" ms");
}
以上代码执行结果可以看出协程性能高出一倍,其他方面的比对如内存消耗、GC等,请读者自行研究。
2.3 阿里巴巴JVM
阿里巴巴JVM团队根据自身业务需要,在 Open JDK 的基础上开发了Alibaba Dragonwell,该版本携带的Wisp2组件让JVM支持了协程。阿里巴巴的核心电商应用已经在协程模型上经过两个双十一的考验,性能和稳定性得到了验证。
Wisp协程完全兼容现有多线程的代码写法,仅增加JVM参数来开启协程。我们来尝试一下,先通过地址 https://github.com/alibaba/dragonwell8/releases/tag/dragonwell-standard-8.12.13_jdk8u345-ga 下载dragonwell8,这个版本相当于Oracle JDK 1.8。在JVM启动参数中增加 -XX:+UseWisp2,即开启了协程。
下面的代码演示了在一个线程中交换来自两个阻塞队列的数据100000次。
[En]
The following code demonstrates exchanging data from two blocking queues 100000 times in a thread.
public class Wisp2Demo {

    private static final ExecutorService THREAD_POOL = Executors.newCachedThreadPool();

    public static void main(String[] args) throws Exception {
        BlockingQueue<byte> q1 = new LinkedBlockingQueue<>(), q2 = new LinkedBlockingQueue<>();
        THREAD_POOL.submit(() -> loop(q2, q1));

        Future<?> f = THREAD_POOL.submit(() -> loop(q1, q2));
        q1.put((byte) 1);
        System.out.println(f.get() + " ms");
    }

    private static long loop(BlockingQueue<byte> in, BlockingQueue<byte> out) throws Exception {
        long start = System.currentTimeMillis();
        for (int i = 0; i < 1_000_000; i++) out.put(in.take());
        return System.currentTimeMillis() - start;
    }

}
</byte></byte></byte>
正常启动JVM:
java Wisp2Demo

6778 ms
带参数启动JVM:
// UnlockExperimentalVMOptions 允许使用实验性参数,保证UseWisp2生效
// ActiveProcessorCount 指定JVM可用的CPU数
java -XX:+UnlockExperimentalVMOptions -XX:+UseWisp2 -XX:ActiveProcessorCount=1 Wisp2Demo
690 ms
启用协同程序后,观察耗时情况,性能提升近10倍。
[En]
After the collaborative program is enabled, the time-consuming situation is observed, and the performance is improved nearly 10 times.
参考文档
https://www.codingbrick.com/archives/954.html
Original: https://www.cnblogs.com/xiaoyangjia/p/16640741.html
Author: 编码砖家
Title: 彻底理解协程
原创文章受到原创版权保护。转载请注明出处:https://www.johngo689.com/522781/
转载文章受原作者版权保护。转载请注明原作者出处!