

文章目录
- 前言
- COCO数据集格式
* - 总体组织结构
image对象的主要属性:annotation对象的属性主要:- pycocotools包中的COCO对象及API
* - COCO对象的属性
- COCO对象的方法
- API源码分析
* - mask保存的格式
- mask不同的保存格式如何进行可视化
showAnns函数源码剖析
前言
在前面的文章中我们介绍了如何使用COCO提供的官方API来进行coco格式数据集的可视化,下面我们主要来讲 COCO数据集格式和 官方API实现。
COCO数据集格式
coco数据集格式充分利用了面向对象的思路:整个标注文件是一个 json对象,这个大的json对象包含几个主要的filed: "info", "licenses", "categories", "images", "annotations"。每个filed都是一个数组,里面包含所有的 image对象和 annotation对象。在coco格式中,每一张图片是一个json对象,每一个标注也是一个json对象,所有的对象都用一个 唯一的id进行标识。注意,image对象和annotation对象的id是 分开来标识的。
总体组织结构
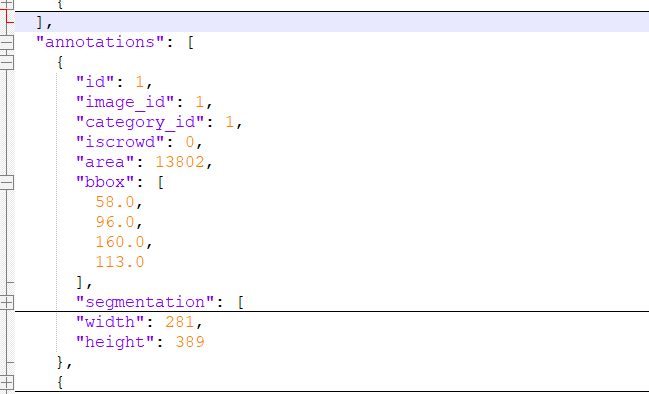
如图所示:


; image对象 的主要属性:
- id:image对象的id
- file_name: 图片的文件名
- width: 图片的宽
- height: 图片的高
annotation对象 的属性主要:
- id: 标注的id
- image_id: 标注所属图片的id
- category_id:此标注所属的类别
- iscrown:是否紧凑,默认为0
- area:标注的面积
- bbox:标注的框,左上角x坐标,左上角y坐标,框的宽,框的高
- segmentation:掩码的标记,有两种格式:多边形格式和RLE格式
- width: 标注所属图片的宽
- height: 标注所属图片的高
; pycocotools包中的COCO对象及API
为了方便可视化COCO格式的对象,官方为我们能提供了 pycocotools这个工具包,下面我们来介绍一下这个包下的 COCO类.
使用前通过 from pycocotools.coco import COCO语句进行导入。
COCO对象的属性
- self.dataset: 所加载的json文件
- self.anns:字典类型,保存所有的annotation对象,key是annotation的id,value是标注对象
- self.cats:字典类型,保存所有的catgory对象,key是catgory的id,value是类别对象
- self.imgs:字典类型,保存所有的image对象,key是image的id,value是图片对象
- self.imgToAnns:字典类型,保存所有的image到anno的对应关系,key是图片的id,value是数组对象,保存标注对象,
图片与标注是一对多的关系 - self.catToImgs:字典类型,保存所有的cat到image的对应关系,key是类别的id,value是数组对象,保存图片对象,
类别与图片是一对多的关系
COCO对象的方法
所有的方法如下图所示:

getAnnoIds:根据图片id或者类id来得到相应的标注idgetCatIds: 得到类别idgetImgIds: 根据类别id得到图片idloadAnns: 根据标注Id得到标注对象loadImgs: 根据图片ID得到图片对象showAnnos: 可视化掩码loadRes: 根据预测结果生成对应的COCO对象
总之,有了上面的这些方法,我们在 img, anno, catgory 之间形成了一个闭环,三者可以互相转换,如下图:

; API源码分析
下面我们主要分析一下 showAnns函数,看一下官方API是如何显示掩码的.
mask保存的格式
再分析源代码之前,我们首先想一下应该如何表示一个mask。mask就是一个不规则的分割结果,那么这个不规则的形状在计算机中应该如何保存呢?
主要有两种格式: 多边形表示法, RLE压缩表示法
多边形表示法就是将 mask边缘的坐标保存下来,类似于图一,COCO数据集中的mask就是以这种形式表示的;RLE是将mask所在的区域进行 二值化后,压缩保存,类似于图二,预测结果中的mask就是以这种格式保存的。

图一

图二
; mask不同的保存格式如何进行可视化
首先来说 多边形表示法如何转化为二值掩膜。
对于多边形表示法,我们的思路是
- 1、先初始化一张和原图大小相等的mask,令所有的初值为零
- 2、取出annos中多边形边缘点的坐标
- 3、调用
cv2.fillPoly()函数进行多边形填充
代码如下:
if 'segmentation' in ann:

   if type(ann['segmentation']) == list:
       polys = []

       for seg in ann['segmentation']:
           poly = np.array(seg, dtype=np.int32).reshape((int(len(seg) / 2), 2))
           polys.append(poly)

       cv2.fillPoly(mask, polys, 1)
再来说 RLE格式如何转换为二值掩膜。
对于RLE格式的转化,我们可以直接借助官方的API maskUtils.decode(rle)函数实现,得到的对象直接就是我们想要的二值掩膜。
代码如下:
else:
    if type(ann['segmentation']['counts']) == list:
        for seg in ann['segmentation']:
            poly = np.array(seg).reshape((int(len(seg) / 2), 2))

    else:
        rle = [ann['segmentation']]
    m = maskUtils.decode(rle)

    m = m[:, :, 0].reshape((m.shape[0], m.shape[1]))
完整的代码如下,这个函数可以根据image_id和category_id生成对应的二值掩膜:
def get_mask(coco: COCO, image_id, category_id):
"""
    根据coco对象,image_id和cat_id生成掩膜
    :param coco:
    :param image_id:
    :param category_id:
    :return:
"""
    image = coco.loadImgs(image_id)
    image = image[0]
    w, h = image["width"], image["height"]

    mask = np.zeros((h, w), dtype="uint8")

    anno_ids = coco.getAnnIds(imgIds=image_id, catIds=category_id, iscrowd=None)
    if len(anno_ids) == 0:
        return mask

    annos = coco.loadAnns(anno_ids)
    for ann in annos:
        if 'segmentation' in ann:

            if type(ann['segmentation']) == list:
                polys = []

                for seg in ann['segmentation']:
                    poly = np.array(seg, dtype=np.int32).reshape((int(len(seg) / 2), 2))
                    polys.append(poly)

                cv2.fillPoly(mask, polys, 1)

            else:
                if type(ann['segmentation']['counts']) == list:
                    for seg in ann['segmentation']:
                        poly = np.array(seg).reshape((int(len(seg) / 2), 2))

                else:
                    rle = [ann['segmentation']]
                m = maskUtils.decode(rle)

                m = m[:, :, 0].reshape((m.shape[0], m.shape[1]))
                idx = np.nonzero(m)
                mask[idx[0], idx[1]] = 1
    return mask
showAnns 函数源码剖析
好了,有了前面知识的铺垫,我们可以来看官方源码了。这里我把注释直接写进了代码中,同学们一定要耐心看完,这样才能有所收获~
def showAnns(self, anns, draw_bbox=False):
"""
    Display the specified annotations.

    :param anns (array of object): annotations to display
    :return: None
"""

    if len(anns) == 0:
        return 0

    if 'segmentation' in anns[0] or 'keypoints' in anns[0]:
        datasetType = 'instances'
    elif 'caption' in anns[0]:
        datasetType = 'captions'
    else:
        raise Exception('datasetType not supported')

    if datasetType == 'instances':

        import matplotlib.pyplot as plt
        from matplotlib.collections import PatchCollection
        from matplotlib.patches import Polygon

        ax = plt.gca()
        ax.set_autoscale_on(False)
        polygons = []
        color = []
        for ann in anns:
            c = (np.random.random((1, 3))*0.6+0.4).tolist()[0]

            if 'segmentation' in ann:

                if type(ann['segmentation']) == list:

                    for seg in ann['segmentation']:

                        poly = np.array(seg).reshape((int(len(seg)/2), 2))

                        polygons.append(Polygon(poly))
                        color.append(c)

                else:

                    t = self.imgs[ann['image_id']]

                    if type(ann['segmentation']['counts']) == list:
                        rle = maskUtils.frPyObjects([ann['segmentation']], t['height'], t['width'])
                    else:
                        rle = [ann['segmentation']]

                    m = maskUtils.decode(rle)
                    img = np.ones( (m.shape[0], m.shape[1], 3) )
                    if ann['iscrowd'] == 1:
                        color_mask = np.array([2.0,166.0,101.0])/255
                    if ann['iscrowd'] == 0:
                        color_mask = np.random.random((1, 3)).tolist()[0]
                    for i in range(3):
                        img[:,:,i] = color_mask[i]

                    ax.imshow(np.dstack( (img, m*0.5) ))
            if 'keypoints' in ann and type(ann['keypoints']) == list:

                sks = np.array(self.loadCats(ann['category_id'])[0]['skeleton'])-1
                kp = np.array(ann['keypoints'])
                x = kp[0::3]
                y = kp[1::3]
                v = kp[2::3]
                for sk in sks:
                    if np.all(v[sk]>0):
                        plt.plot(x[sk],y[sk], linewidth=3, color=c)
                plt.plot(x[v>0], y[v>0],'o',markersize=8, markerfacecolor=c, markeredgecolor='k',markeredgewidth=2)
                plt.plot(x[v>1], y[v>1],'o',markersize=8, markerfacecolor=c, markeredgecolor=c, markeredgewidth=2)

            if draw_bbox:
                [bbox_x, bbox_y, bbox_w, bbox_h] = ann['bbox']
                poly = [[bbox_x, bbox_y], [bbox_x, bbox_y+bbox_h], [bbox_x+bbox_w, bbox_y+bbox_h], [bbox_x+bbox_w, bbox_y]]
                np_poly = np.array(poly).reshape((4,2))
                polygons.append(Polygon(np_poly))
                color.append(c)

        p = PatchCollection(polygons, facecolor=color, linewidths=0, alpha=0.4)

        ax.add_collection(p)

        p = PatchCollection(polygons, facecolor='none', edgecolors=color, linewidths=2)
        ax.add_collection(p)

    elif datasetType == 'captions':
        for ann in anns:
            print(ann['caption'])
Original: https://blog.csdn.net/qq_43705697/article/details/122339511
Author: 遇到坎就得迈过去
Title: COCO数据集格式、mask两种存储格式、官方包API详解
原创文章受到原创版权保护。转载请注明出处:https://www.johngo689.com/519271/
转载文章受原作者版权保护。转载请注明原作者出处!