

文章目录
- 教程
- 环境配置
* - 安装Windows CPU版本tensorflow
- 安装CUDA、cuDNN
- 安装Windows GPU版本tensorflow
- 查看使用的是CPU还是GPU
- 深度学习介绍
* - 1.1 深度学习与机器学习的区别
– - 1.2 深度学习的应用场景
- 1.3 深度学习框架介绍
– - TensorFlow框架的使用
* - 2.0 兼容性问题
- 2.1 TF数据流图
– - 2.2 图与TensorBoard
– - 2.3 会话
– - 2.4 张量Tensor
– - 2.5 变量OP
– - 2.6 API
– - 2.7 案例:实现线性回归
– - TensorFlow框架的使用总结
- 数据读取、神经网络
* - 3.1 文件读取流程
– - 3.2 图片数据
– - 3.3 二进制数据
– - 3.4 TFRecords
– - 3.5 神经网络基础
– - 3.6 神经网络原理
– - 3.7 案例:Mnist手写数字识别
–
教程
环境配置
安装Windows CPU版本tensorflow
参考链接:
打开cmd,运行以下语句:
- pip install tensorflow
- 进入python,运行import tensorflow as tf
错误:
2021-09-06 21:51:38.471339: W tensorflow/stream_executor/platform/default/dso_loader.cc:64] Could not load dynamic library 'cudart64_110.dll'; dlerror: cudart64_110.dll not found
2021-09-06 21:51:38.472290: I tensorflow/stream_executor/cuda/cudart_stub.cc:29] Ignore above cudart dlerror if you do not have a GPU set up on your machine.
- 打开链接下载cudart64_110.dll 下载 CUDART64_110.DLL
- 复制文件dll进路径C:\Windows\System32
- 重新运行import tensorflow as tf不报错
参考链接:
出现Could not load dynamic library ‘cudart64_110.dll’; dlerror: cudart64_110.dll not found解决办法
但复制文件的路径有变化
注意:
运行该程序可以产生结果,但同时:
[En]
Running the program can produce results, but at the same time:
2021-09-07 16:33:57.746978: W tensorflow/stream_executor/platform/default/dso_loader.cc:64] Could not load dynamic library 'cublas64_11.dll'; dlerror: cublas64_11.dll not found
2021-09-07 16:33:57.749512: W tensorflow/stream_executor/platform/default/dso_loader.cc:64] Could not load dynamic library 'cublasLt64_11.dll'; dlerror: cublasLt64_11.dll not found
2021-09-07 16:33:57.751775: W tensorflow/stream_executor/platform/default/dso_loader.cc:64] Could not load dynamic library 'cufft64_10.dll'; dlerror: cufft64_10.dll not found
2021-09-07 16:33:57.753878: W tensorflow/stream_executor/platform/default/dso_loader.cc:64] Could not load dynamic library 'curand64_10.dll'; dlerror: curand64_10.dll not found
2021-09-07 16:33:57.756025: W tensorflow/stream_executor/platform/default/dso_loader.cc:64] Could not load dynamic library 'cusolver64_11.dll'; dlerror: cusolver64_11.dll not found
2021-09-07 16:33:57.758276: W tensorflow/stream_executor/platform/default/dso_loader.cc:64] Could not load dynamic library 'cusparse64_11.dll'; dlerror: cusparse64_11.dll not found
2021-09-07 16:33:57.761254: W tensorflow/stream_executor/platform/default/dso_loader.cc:64] Could not load dynamic library 'cudnn64_8.dll'; dlerror: cudnn64_8.dll not found
2021-09-07 16:33:57.762224: W tensorflow/core/common_runtime/gpu/gpu_device.cc:1835] Cannot dlopen some GPU libraries. Please make sure the missing libraries mentioned above are installed properly if you would like to use GPU. Follow the guide at https://www.tensorflow.org/install/gpu for how to download and setup the required libraries for your platform.

Skipping registering GPU devices...

2021-09-07 16:33:57.763272: I tensorflow/core/platform/cpu_feature_guard.cc:142] This TensorFlow binary is optimized with oneAPI Deep Neural Network Library (oneDNN) to use the following CPU instructions in performance-critical operations:  AVX AVX2
To enable them in other operations, rebuild TensorFlow with the appropriate compiler flags.
原因是没有装上GPU版本的
CUDA
cuDNN
安装CUDA、cuDNN
参考链接:
- 在Windows下安装TensorFlow GPU版本教程(超级详细哦)
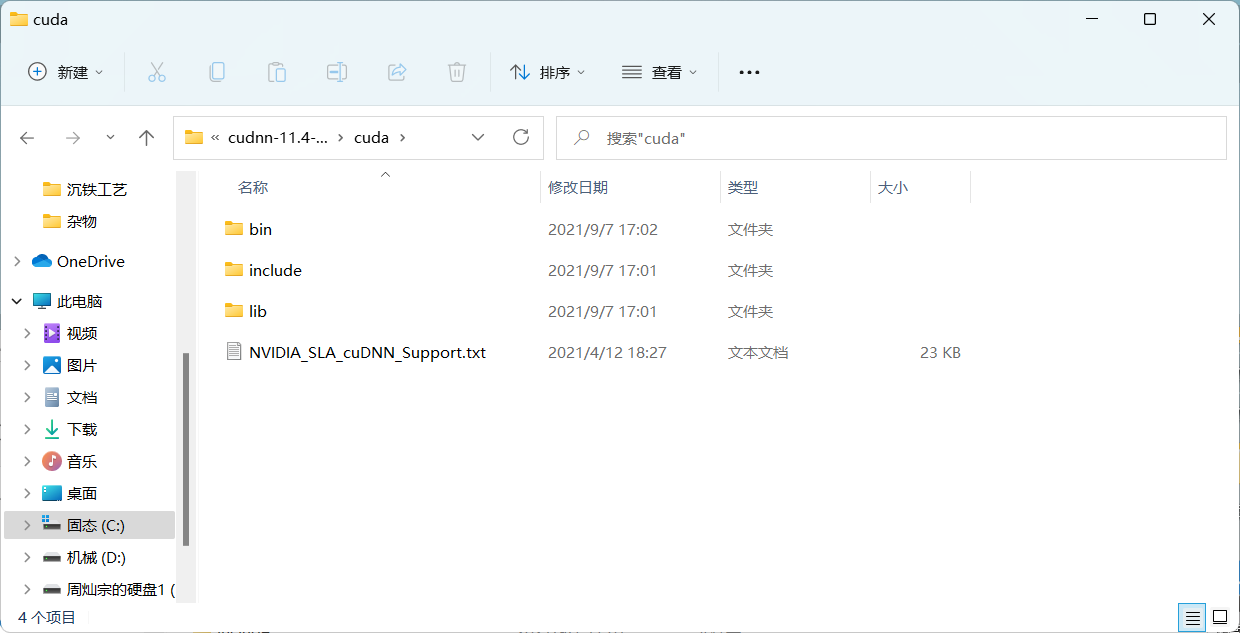
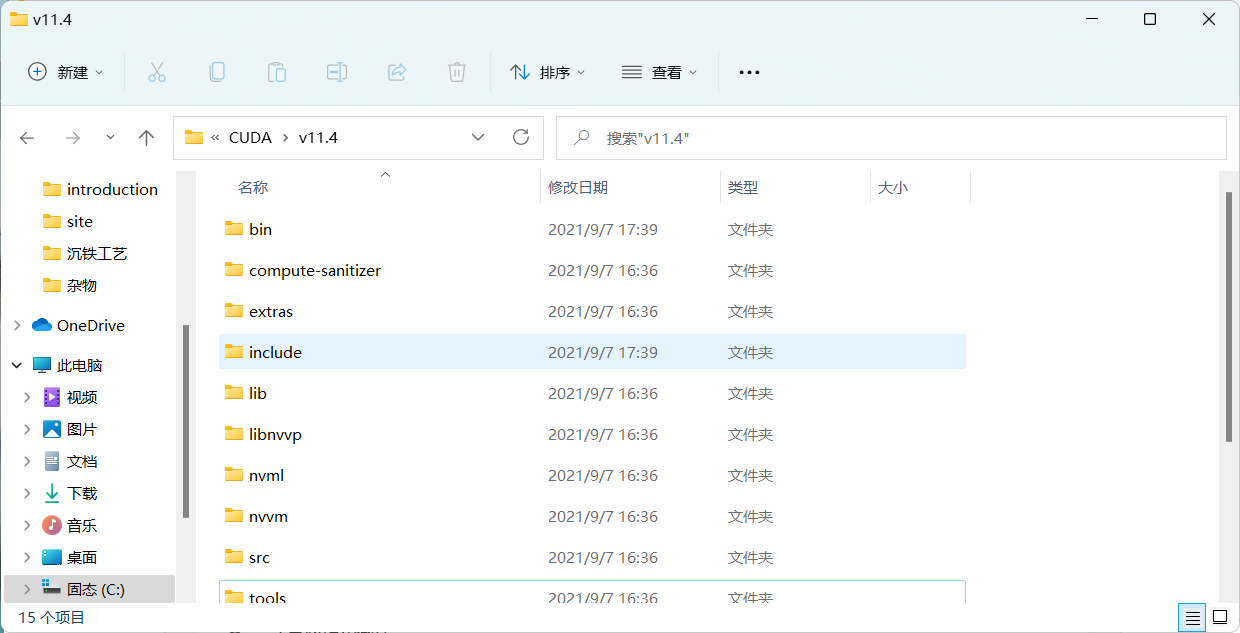
C:\Windows\System32\cuda\bin - 在安装cuDNN时:下载dudnn之后,复制cuDNN里的三个文件夹到C:\Program Files\NVIDIA GPU Computing Toolkit\CUDA\v11.4

; 安装Windows GPU版本tensorflow
- pip install tensorflow-gpu
报错:
ERROR: Could not install packages due to an OSError: [WinError 5] 拒绝访问。: 'c:\\users\\22164\\appdata\\local\\programs\\python\\python39\\Lib\\site-packages\\tensorflow\\lite\\experimental\\microfrontend\\python\\ops\\_audio_microfrontend_op.so'
Consider using the --user option or check the permissions.
- pip install –user tensorflow-gpu
警告:
  WARNING: The scripts estimator_ckpt_converter.exe, import_pb_to_tensorboard.exe, saved_model_cli.exe, tensorboard.exe, tf_upgrade_v2.exe, tflite_convert.exe, toco.exe and toco_from_protos.exe are installed in 'C:\Users\22164\AppData\Roaming\Python\Python39\Scripts' which is not on PATH.

  Consider adding this directory to PATH or, if you prefer to suppress this warning, use --no-warn-script-location.
将C:\Users\22164\AppData\Roaming\Python\Python39\Scripts加入path环境变量
查看使用的是CPU还是GPU
- 使用以下代码:
from tensorflow.python.client import device_lib
print(device_lib.list_local_devices())
您可以检查哪些设备已安装。
[En]
You can check which devices are mounted.
print(tf.config.list_physical_devices('GPU'))
print(tf.config.list_physical_devices('CPU'))
可以查看挂载的CPU/GPU设备有哪些
- 使用以下代码可以启用/禁用GPU
import os
os.environ["CUDA_VISIBLE_DEVICES"] = "-1"
os.environ["CUDA_VISIBLE_DEVICES"] = "0"
- 使用以下代码:
with tf.device('/gpu:0'):
使用指定设备运行代码段
深度学习介绍
1.1 深度学习与机器学习的区别
机器学习是实现人工智能的一种方式,深度学习是机器学习的一个子集,也就是说,深度学习是实现机器学习的一种方法。
[En]
Machine learning is a way to realize artificial intelligence, and deep learning is a subset of machine learning, that is to say, deep learning is a method to realize machine learning.
1.1.1 特征提取方面
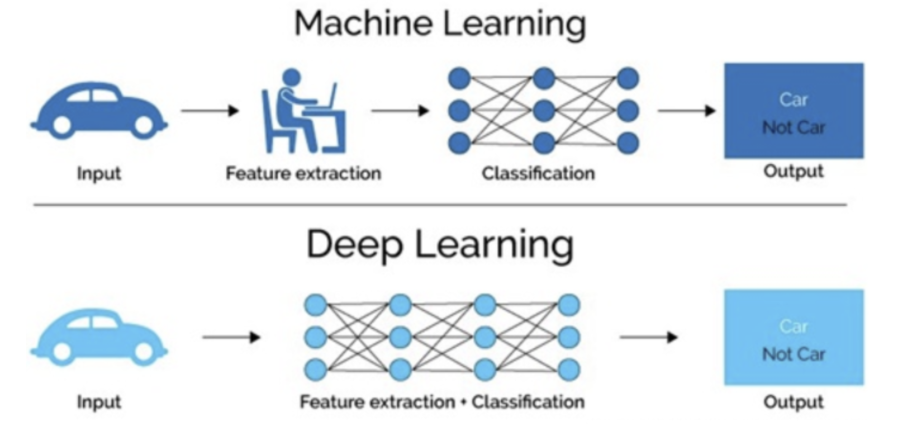
- 机器学习的特色工程步骤是手动完成的,需要大量领域专业知识
[En]
the characteristic engineering steps of machine learning are done manually and require a great deal of domain expertise*
- 深度学习通常由多个层组成,这些层通常组合较简单的模型,层层传递数据以构建更复杂的模型,并通过训练大量数据自动派生模型。不需要手动提取特征。
[En]
Deep learning usually consists of multiple layers, which usually combine simpler models, pass data from layer to layer to build more complex models, and automatically derive the model by training a large amount of data. No manual feature extraction is required.*
深度学习算法试图从数据中学习高级函数,这是深度学习非常独特的部分。因此,为每个问题开发新的特征抽取器的任务减少了。它适用于图像、语音和自然语言等难以提取特征的处理。
[En]
Deep learning algorithms try to learn advanced functions from data, which is a very unique part of deep learning. Therefore, the task of developing a new feature extractor for each problem is reduced. It is suitable for image, speech and natural language processing which are difficult to extract features.
; 1.1.2 数据量和计算性能要求
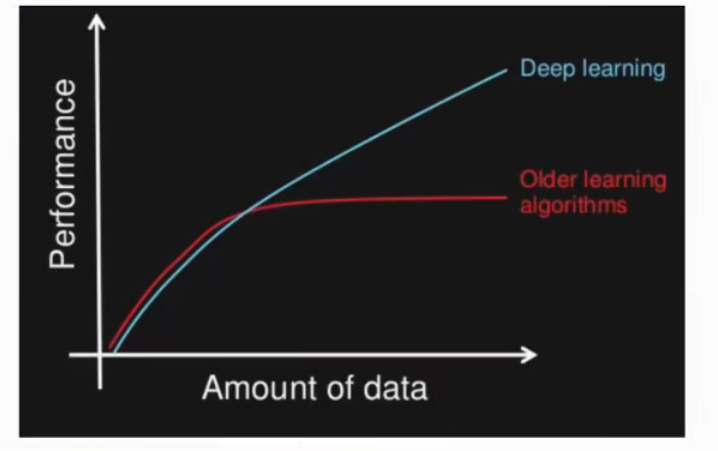
首先,深度学习需要大量的训练数据集。
[En]
First, deep learning requires a large number of training data sets.
其次,训练深度神经网络需要很大的计算能力。
[En]
Second, training depth neural networks requires a lot of computing power.
使用数百万张图像的数据集来训练一个深度网络可能需要几天甚至几周的时间。所以深入学习通常是
[En]
It can take days or even weeks to train a deep network using a dataset of millions of images. So in-depth learning is usually
- 需要强大的GPU服务器来进行计算
- 全面管理的分布式训练与预测服务ー一比如谷歌 Tensorflow云机器学习平台
1.1.3 算法代表
- 机器学习
朴素贝叶斯、决策树等 - 深度学习
神经网络
1.2 深度学习的应用场景
- 图像识别
物体识别
场景识别
车型识别
人脸检测跟踪
人脸关键点定位
人脸身份认证 - 自然语言处理技术
机器翻译
文本识别
聊天对话 - 语音技术
语音识别
1.3 深度学习框架介绍
1.3.1 常见深度学习框架对比
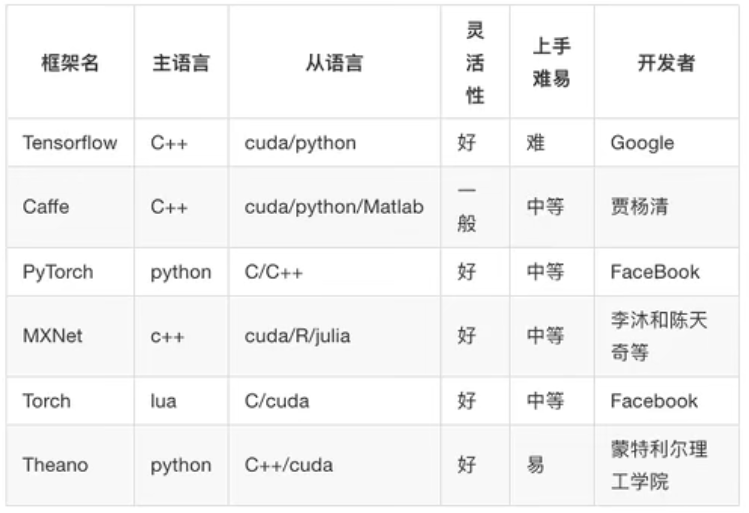
总结
- 最常用的框架当 Tensorflow和 Pytorch,而Cafe和Cafe2次之。
- Pytorch和Toch更适用于学术研究( (research); Tensorflow,Cafe
Cafe2更适用于工业界的生产环境部署( (industrial production) - Caffe适用于处理静态图像( static graph); Torch和 Pytorch更适用于动
态图像( dynamic graph); Tensorflow在两种情况下都很实用。 - Tensorflow和Cafe2可在移动端使用。
; 1.3.2 TensorFlow的特点
- 高度灵活( Deep Flexibility)
它不仅可以用于神经网络算法的研究,也可以用于普通机器学习算法的研究。[En]
It can be used not only for the research of neural network algorithms, but also for ordinary machine learning algorithms.
甚至是只要把计算表示成数据流图,都可以用 Tensorflow
- 语言多样( Language Options)
Tensorflom使用C+实现的,然后用 Python封装。谷歌号召社区通过SWG
开发更多的语言接口来支持 Tensorflow - 设备支持
Tensorflow可以运行在各种硬件上,同时根据计算的需要,合理将运算分配
到相应的设备,比如卷积就分配到GPU上,也允许在CPU和GPU上的计算
分布,甚至支持使用gRPC进行水平扩展 - Tensorboard可视化
Tensorboard是 Tensorflow的一组Web应用,用来监控 Tensorflow运行过程,或可视化 Computation Graph. Tensorboard日前支持5种可视化:标量scalars)、图片( Images)、音频( audio)、直方图( histograms)和计算图( Computation Graph). Tensorboardp的 Events Dashboard可以用来持地监控运行时的关键指标,比如loss、学习速率( ( learning rate)或是验证集上的准确率( accuracy)
1.3.3 TensorFlow的安装
- 1 CPU版本
- 2 GPU版本
注:
- CPU:诸葛亮
综合能力比较强
核芯的数量更少
更适用于处理连续性(sequential)任务。 - GPU:臭皮匠
专做某一个事情很好
核芯的数量更多
更适用于并行(parallel)任务
TensorFlow框架的使用
2.0 兼容性问题
2.0版本的tensorflow与1.8的有很多不一样的地方。当出现模块找不到的情况(大部分情况)可以使用兼容性运行的办法解决。
用法:
指令中间加入compat.v1
例如:
- 1.8版本:tf.disable_eager_execution()
- 2.0版本:tf.compat.v1.disable_eager_execution()
2.1 TF数据流图
2.1.1 案例:TensorFlow实现一个加法运算
import tensorflow as tf

a_t = tf.constant(2)
b_t = tf.constant(3)
c_t = a_t + b_t
print("tensorflow加法运算的结果:\n", c_t)

with tf.Session() as sess
c_t_value = sess.run(c_t)
print("c_t_value:\n", c_t_value)
错误:找不到Session()
原因:2.0版本的tensorflow已经没有Session()模块
方案:改用以下语句
import tensorflow as tf
tf.compat.v1.disable_eager_execution()

a_t = tf.constant(2)
b_t = tf.constant(3)
c_t = a_t + b_t
print("tensorflow加法运算的结果:\n", c_t)

sess = tf.compat.v1.Session()
c_t_value = sess.run(c_t)
sess = tf.compat.v1.Session()
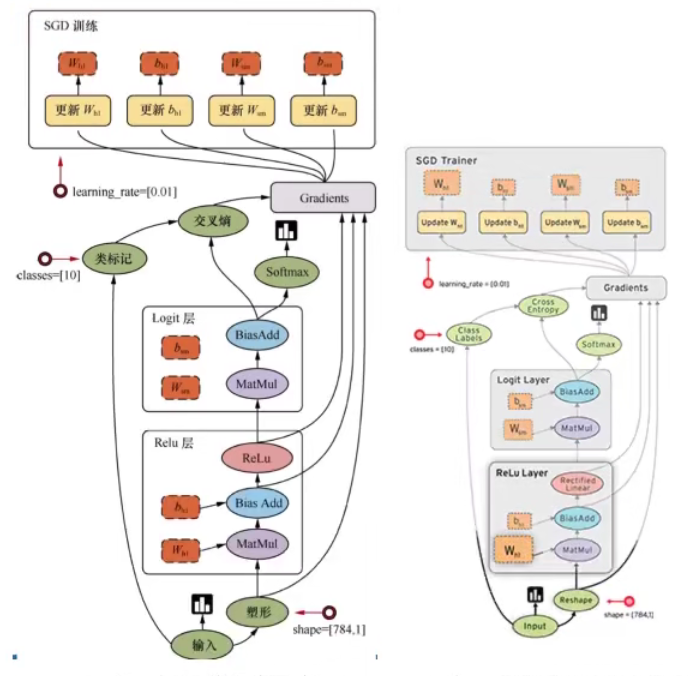
TensorFlow结构分析
- 一个构建图阶段
流程图:定义数据(张量Tensor)和操作(节点Operation) - 一个执行图阶段
调用各方资源运行定义的数据和操作[En]
Call the resources of all parties to run the defined data and operations
- 图和会话:
- 图:这是 Tensorflow将计算表示为指令之间的依赖关系的一种表示法
- 会话: Tensorflow跨一个或多个本地或远程设备运行数据流图的机制
- 张量: Tensorflow中的基本数据对象
- 节点:提供图中执行的操作
[En]
Node: provide the actions performed in the figure*
2.1.2 数据流图介绍
Tensor – 张量 – 数据
Flow – 流动
Tensorflow是一个采用数据流图( data flow graphs),用于数值计算的开源框架。
节点( Operation)在图中表示数学操作,线( edges)则表示在节点间相互联系的多维数据数组,即张量( tensor)
; 2.2 图与TensorBoard
2.2.1 什么是图结构
图包含了一组tf.Operation代表的计算单元对象和tf.Tensor代表的计算单元之间流动的数据。
图结构:
数据(Tensor) + 操作(Operation)
2.2.2 图相关操作
1 默认图
通常 Tensorflow会默认帮我们创建一张图。
查看默认图的方法
- 1)调用方法
用tf.get_default_graph()访问,要将操作添加到默认图形中,直接创建OP即可
2.0版本改用:tf.compat.v1.get_default_graph() - 2)查看属性
op、sess都含有graph属性,默认都在一张图中
.graph
2 创建图
new_g = tf.Graph()
with new_g.as_default():
定义数据和操作
示例
图的演示
def graph_show():
"""
    图的演示
    :return:
"""

    a_t = tf.constant(2)
    b_t = tf.constant(3)
    c_t = a_t + b_t
    print("tensorflow加法运算的结果:\n", c_t)

    default_g = tf.compat.v1.get_default_graph()
    print("default_g:\n", default_g)

    print("a_t的图属性:\n", a_t.graph)
    print("c_t的图属性:\n", c_t.graph)

    new_g = tf.Graph()

    with new_g.as_default():
        a_new = tf.constant(20)
        b_new = tf.constant(30)
        c_new = a_new + b_new
        print("c_new:\n", c_new)

    sess = tf.compat.v1.Session()
    c_t_value = sess.run(c_t)
    print("c_t_value:\n", c_t_value)
    print("sess的图属性:\n", sess.graph)

    new_sess = tf.compat.v1.Session(graph=new_g)
    c_new_value = new_sess.run(c_new)
    print("c_new_value:\n", c_new_value)
    print("new_sess的图属性:\n", new_sess.graph)
结果:
tensorflow加法运算的结果:
Tensor("add:0", shape=(), dtype=int32)
default_g:
<tensorflow.python.framework.ops.graph object at 0x00000143571916a0>
a_t的图属性:
<tensorflow.python.framework.ops.graph object at 0x00000143571916a0>
c_t的图属性:
<tensorflow.python.framework.ops.graph object at 0x00000143571916a0>
c_new:
Tensor("add:0", shape=(), dtype=int32)
2021-09-08 10:25:14.248406: I tensorflow/core/platform/cpu_feature_guard.cc:142] This TensorFlow binary is optimized with oneAPI Deep Neural Network Library (oneDNN) to use the following CPU instructions in performance-critical operations: AVX AVX2
To enable them in other operations, rebuild TensorFlow with the appropriate compiler flags.
2021-09-08 10:25:14.896050: I tensorflow/core/common_runtime/gpu/gpu_device.cc:1510] Created device /job:localhost/replica:0/task:0/device:GPU:0 with 2778 MB memory: -> device: 0, name: NVIDIA GeForce GTX 1050 Ti, pci bus id: 0000:01:00.0, compute capability: 6.1
c_t_value:
5
sess的图属性:
<tensorflow.python.framework.ops.graph object at 0x00000143571916a0>
c_new_value:
50
new_sess的图属性:
<tensorflow.python.framework.ops.graph object at 0x000001436be9bc40>
2021-09-08 10:25:14.944687: I tensorflow/core/common_runtime/gpu/gpu_device.cc:1510] Created device /job:localhost/replica:0/task:0/device:GPU:0 with 2778 MB memory: -> device: 0, name: NVIDIA GeForce GTX 1050 Ti, pci bus id: 0000:01:00.0, compute capability: 6.1
</tensorflow.python.framework.ops.graph></tensorflow.python.framework.ops.graph></tensorflow.python.framework.ops.graph></tensorflow.python.framework.ops.graph></tensorflow.python.framework.ops.graph>
2.2.3 TensorBoard:可视化学习
- 1 数据序列化-events文件
tf.summary.FileWriter(path, graph=sess.graph)
2.0版本改用:tf.compat.v1.summary.FileWriter(“…/events”, graph=sess.graph) - 2 启动tensorboard
tensorboard –logdir=”./events”
注意: - 引号里的路径到events文件所在的文件夹
- =前后不要有空格
示例
(接前面代码)
将图写入本地生成events文件
    sess = tf.compat.v1.Session()
    c_t_value = sess.run(c_t)
    print("c_t_value:\n", c_t_value)
    print("sess的图属性:\n", sess.graph)

    tf.compat.v1.summary.FileWriter("../events", graph=sess.graph)
结果:
会生成一个文件:events.out.tfevents.{timestamp} . {hostname}
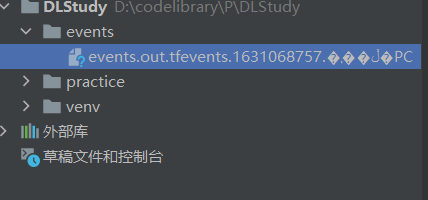
在终端输入命令:tensorboard –logdir=”./events”
D:\codelibrary\P\DLStudy> tensorboard --logdir="./events"
结果:
出现一个网页,Ctrl+鼠标左键点击可以访问

进入网页后可以看到
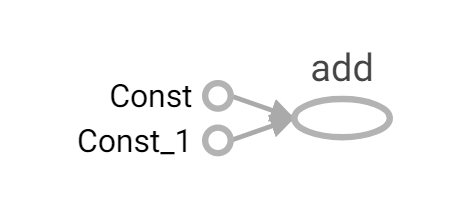
注意:
- 不知道是不是版本的问题,一开始显示的图箭头很大,需要点击add,点击add to main graph才能显示正常。
- 定义变量时可以重命名,例如:a_t = tf.constant(2, name=”a_t”)。方便看张量图。
2.2.4 OP
数据:Tensor对象
操作:Operation对象 – Op
1 常见OP
类型实例标量运算add,sub, mul, div, exp, log, greater, less, equal向量运算concat, slice, splot, constant, rank, shape, shuffle矩阵运算matmul,matrixinverse, matrixdateminant带状态的运算Variable, assgin, assginadd神经网络组件softmax,sigmoid, relu,convolution,max_pool存储,恢复Save, Restroe队列及同步运算Enqueue, Dequeue,MutexAcquire,MutexRelease控制流Merge,Switch, Enter,Leave,Nextlteration
tf.constant()就是一个 操作函数,传入参数运行以后会产生一个张量Const,就是 操作对象。
操作函数操作对象tf.constant(Tensor对象)输入Tensor对象 – Const-输出 Tensor对象tf.add(Tensor对象1, Tensor对象2)输入Tensor对象1, Tensor对象2 – Add对象 – 输出 Tensor对象3
一个操作对象(Operation)是 Tensorflow图中的一个节点,可以接收0个或者多个输入Tensor,并且可以输出0个或者多个Tensor, Operation对象是通过op构造函数(如tf.matui())创建的。
例如:c= tf.matmul(a,b)创建了ー个 Operation对象,类型为Matmul类型,它将张量a,b作为输入,c作为输出,并且输出数据,打印的时候也是打印的数
据。其中计tf.matmul()是函数,在执行matmul函数的过程中会通过Matmul类创建一个与之对应的对象。
打印con_a
Tensor("Const: 0", shape=(), dtype=float32)
打印con_b:
Tensor("Const_1: 0, shape=(), dtype=f Loat32
打印sum_C:
Tensor("Add: 0, shape=(), dtype=float32)
注意:
- 打印出来的是张量值,可以理解成OP当中包含了这个值。并且每一个OP指令都对应一个唯一的名称,如上面的 Const:0,这个在 Tensor Board上面也可以显示
- tf Tensor对象以输出该张量的tf.Operation明确命名。张量名称的形式为
“< OP NAME >:< i >”, 其中: - “< OP NAME>”是生成该张量的指令的名称
- “< i >”是一个整数它表示该张量在指令的输出中的索引
2 指令名称
一张图一个命名空间
tf.Graph对象为其包含的 tf.Operation对象定义的一个命名空间。TensorFlow 会自动为图中的每个指令选择一个 唯一名称,用户也可以指定描述性名称,使程序阅读起来更轻松。我们可以以以下方式改写指令名称:
- 每个创建新的tf.Operation或返回新的tf.Tensor的 API函数可以接受可选的name 参数。
例如,tf.constant(42.0, name=”answer”)创建了一个名为””answer”的新tf.Operation并返回一个名为”answer:O”的tf.Tensor。如果默认图已包含名为”answer”的指令,则TensorFlow 会在名称上附加”1″、””2″等字符,以便让名称具有唯一性。
- 当修改好之后,我们在Tensorboard显示的名字也会被修改。
2.3 会话
2.3.1 创建会话
一个运行TensorFlow operation的类。会话包含以下两种开启方式
- tf.Session:用于完整的程序当中
-
tf.InteractiveSession:用于交互式上下文中的TensorFlow ,例如shell
-
TensorFlow使用tf.Session类来表示客户端程序(通常为Python程序,但也提供了使用其他语言的类似接口)与C++运行时之间的连接
- tf.Session对象使用分布式TensorFlow运行时提供对本地计算机中的设备和远程设备的访问权限
示例
tf.InteractiveSession的使用
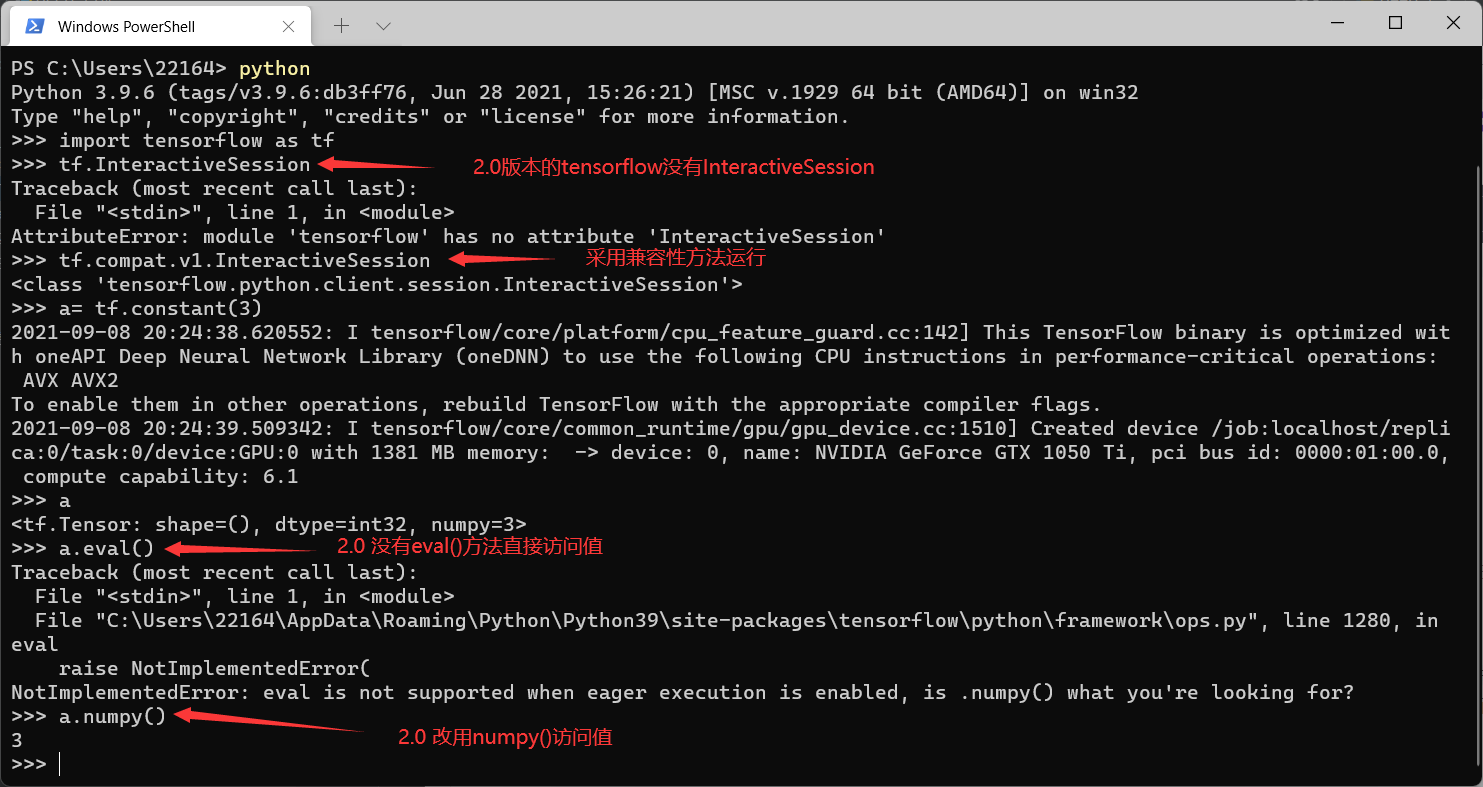
注意: 2.0版本的InteractiveSession里的eval()改用numpy()
; 2.3.1.1 会话掌握资源,用完要回收 – 上下文管理器
init (target=”, graph=None, config=None)
会话可能拥有的资源,如tf.Variable,tf.QueueBase和tf.ReaderBase。当这些资源不再需要时,释放这些资源非常重要。因此,需要调tf.Sessioh.close会话中的方法,或 将会话用作上下文管理器。以下两个例子作用是一样的(直白一点就是打开会话用完必须要关闭,就像文件读写那样):
def session_demo():
"""
    会话演示
    :return:
"""
    a_t = tf.constant(10)
    b_t = tf.constant(20)

    c_t = tf.add(a_t, b_t)
    print("tensorflow实现加法运算:\n", c_t)

    sess = tf.Session()
    sum_t = sess.run(c_t)
    print("sum_t:\n", sum_t)
    sess.close()

    with tf.Session() as sess:

        print(sess.run([a_t, b_t, c_t]))

        print('用eval查看计算的值', a_t.eval())
        print('会话的属性:\n', sess.graph)
2.3.1.2 初始化会话对象时的参数
- target:如果将此参数留空(默认设置),会话将仅使用本地计算机中的设备。可以指定grpc:/l网址,以便指定TensorFlow服务器的地址,这使得会话可以访问该服务器控制的计算机上的所有设备。
- graph:默认情况下,新的tf.Session将绑定到当前的默认图。
- config:此参数允许您指定一个tf.ConfigProto 以便控制会话的行为。例如,ConfigProto协议用于打印设备使用信息
示例
创建会话时使用config参数,用ConfigProto协议用于打印设备使用信息
def tensorflow_test():
"""
    Tensorflow的基本结构
    :return:
"""

    a_t = tf.constant(2)
    b_t = tf.constant(3)
    c_t = a_t + b_t
    print("a_t:\n", a_t)
    print("tensorflow加法运算的结果:\n", c_t)

    with tf.compat.v1.Session(config=tf.compat.v1.ConfigProto(allow_soft_placement=True,
                                                              log_device_placement=True)) as sess:
        c_t_value = sess.run(c_t)
        print("c_t_value:\n", c_t_value)
a_t:
 Tensor("Const:0", shape=(), dtype=int32)
tensorflow加法运算的结果:
 Tensor("add:0", shape=(), dtype=int32)
2021-09-08 20:58:45.944506: I tensorflow/core/platform/cpu_feature_guard.cc:142] This TensorFlow binary is optimized with oneAPI Deep Neural Network Library (oneDNN) to use the following CPU instructions in performance-critical operations:  AVX AVX2
To enable them in other operations, rebuild TensorFlow with the appropriate compiler flags.

2021-09-08 20:58:46.743283: I tensorflow/core/common_runtime/gpu/gpu_device.cc:1510] Created device /job:localhost/replica:0/task:0/device:GPU:0 with 2778 MB memory:  -> device: 0, name: NVIDIA GeForce GTX 1050 Ti, pci bus id: 0000:01:00.0, compute capability: 6.1
2021-09-08 20:58:46.745709: I tensorflow/core/common_runtime/direct_session.cc:361] Device mapping:
/job:localhost/replica:0/task:0/device:GPU:0 -> device: 0, name: NVIDIA GeForce GTX 1050 Ti, pci bus id: 0000:01:00.0, compute capability: 6.1
2021-09-08 20:58:46.748970: I tensorflow/core/common_runtime/placer.cc:114] add: (AddV2): /job:localhost/replica:0/task:0/device:GPU:0
2021-09-08 20:58:46.749642: I tensorflow/core/common_runtime/placer.cc:114] Const: (Const): /job:localhost/replica:0/task:0/device:GPU:0
2021-09-08 20:58:46.750346: I tensorflow/core/common_runtime/placer.cc:114] Const_1: (Const): /job:localhost/replica:0/task:0/device:GPU:0
add: (AddV2): /job:localhost/replica:0/task:0/device:GPU:0
Const: (Const): /job:localhost/replica:0/task:0/device:GPU:0
Const_1: (Const): /job:localhost/replica:0/task:0/device:GPU:0
c_t_value:
 5
2.3.2 会话的run()
run(fetches, feed_dict=None, options=None, run_metadata=None)
- 通过使用 sess. run()来运行 operation
- fetches:单一的 operation,或者列表、元组(其它不属于tensorflow的类型不行)
- feed_dict:参数允许调用者覆盖图中张量的值,运行时赋值
- 与 tf.placeholder搭配使用,则会检查值的形状是否与占位符兼容。
使用tf.operation.eval()也可运行operation,但要在会话中运行
示例
同时打印a_t,b_t,c_t
def tensorflow_test():
"""
    Tensorflow的基本结构
    :return:
"""

    a_t = tf.constant(2)
    b_t = tf.constant(3)
    c_t = a_t + b_t
    print("a_t:\n", a_t)
    print("tensorflow加法运算的结果:\n", c_t)

    with tf.compat.v1.Session(config=tf.compat.v1.ConfigProto(allow_soft_placement=True,
                                                              log_device_placement=True)) as sess:

        abc = sess.run([a_t, b_t, c_t])
        print("abc:\n", abc)
结果:
a_t:
 Tensor("Const:0", shape=(), dtype=int32)
tensorflow加法运算的结果:
 Tensor("add:0", shape=(), dtype=int32)
2021-09-08 21:09:55.825888: I tensorflow/core/platform/cpu_feature_guard.cc:142] This TensorFlow binary is optimized with oneAPI Deep Neural Network Library (oneDNN) to use the following CPU instructions in performance-critical operations:  AVX AVX2
To enable them in other operations, rebuild TensorFlow with the appropriate compiler flags.

2021-09-08 21:09:56.792615: I tensorflow/core/common_runtime/gpu/gpu_device.cc:1510] Created device /job:localhost/replica:0/task:0/device:GPU:0 with 1467 MB memory:  -> device: 0, name: NVIDIA GeForce GTX 1050 Ti, pci bus id: 0000:01:00.0, compute capability: 6.1
2021-09-08 21:09:56.795448: I tensorflow/core/common_runtime/direct_session.cc:361] Device mapping:
/job:localhost/replica:0/task:0/device:GPU:0 -> device: 0, name: NVIDIA GeForce GTX 1050 Ti, pci bus id: 0000:01:00.0, compute capability: 6.1
2021-09-08 21:09:56.798106: I tensorflow/core/common_runtime/placer.cc:114] add: (AddV2): /job:localhost/replica:0/task:0/device:GPU:0
2021-09-08 21:09:56.798696: I tensorflow/core/common_runtime/placer.cc:114] Const: (Const): /job:localhost/replica:0/task:0/device:GPU:0
2021-09-08 21:09:56.799291: I tensorflow/core/common_runtime/placer.cc:114] Const_1: (Const): /job:localhost/replica:0/task:0/device:GPU:0
add: (AddV2): /job:localhost/replica:0/task:0/device:GPU:0
Const: (Const): /job:localhost/replica:0/task:0/device:GPU:0
Const_1: (Const): /job:localhost/replica:0/task:0/device:GPU:0
abc:
 [2, 3, 5]
2.3.3 feed操作
placeholder提供占位符,run时候通过feed_dict指定参数
它可以理解为首先声明一个变量,然后再赋值。
[En]
It can be understood as declaring a variable first and then assigning a value later.
placeholder提供占位符,run时候通过feed_dict指定参数
示例
feed操作
def session_run_demo():
    a = tf.placeholder(tf.float32)
    b = tf.placeholder(tf.float32)

    sum_ab = tf.add(a, b)
    print("sum_ab:", sum_ab)

    with tf.Session() as sess:
        print('占位符结果:', sess.run(sum_ab, feed_dict={a: 3.0, b: 4.0}))
注意: 请注意运行时候报的错误eror
- Runtimeerror:如果这 Session是无效状态(例如已关闭)
- Typeerror:如果 fetches或者feed_d1ct键的类型不合适
- Valueerror:如果 fetches或feed_dict键无效或引用 Tensor不存在的键
2.4 张量Tensor
print()
ndarray
2.4.1 张量(Tensor)
标量:一个数字 0阶张量
向量:一维数组 [2, 3, 4] 1阶张量
矩阵:二维数组 [[2, 3, 4], [2, 3, 4]] 2阶张量
……
张量:n维数组 n阶张量
2.4.1.1 张量的类型
数据类型Python 类型描述DT_FLOATtf.float3232 位浮点数.DT_DOUBLEtf.float6464 位浮点数.DT_INT64tf.int6464 位有符号整型.DT_INT32tf.int3232 位有符号整型.DT_INT16tf.int1616 位有符号整型.DT_INT8tf.int88 位有符号整型.DT_UINT8tf.uint88 位无符号整型.DT_STRINGtf.string可变长度的字节数组.每一个张量元素都是一个字节数组.DT_BOOLtf.bool布尔型.DT_COMPLEX64tf.complex64由两个32位浮点数组成的复数:实数和虚数.DT_QINT32tf.qint32用于量化Ops的32位有符号整型.DT_QINT8tf.qint8用于量化Ops的8位有符号整型.DT_QUINT8tf.quint8用于量化Ops的8位无符号整型.
2.4.1.2 张量的阶
阶数学实例python例子0纯量只有大小s=1231向量大小和方向v = [1,2]2矩阵数据表m= [[1,2],[3,4],[5,6]]33阶张量数据立体…nn阶示例
def tensor_demo():
"""
    张量的演示
    :return:
"""
    tensor1 = tf.compat.v1.constant(4.0)
    tensor2 = tf.compat.v1.constant([1, 2, 3, 4])
    linear_squares = tf.constant([[4], [9], [16], [25]], dtype=tf.int32)

    print("tensor1:\n", tensor1)
    print("tensor2:\n", tensor2)
    print("linear_squares_before:\n", linear_squares)
结果;
tensor1:
 Tensor("Const:0", shape=(), dtype=float32)
tensor2:
 Tensor("Const_1:0", shape=(4,), dtype=int32)
linear_squares_before:
 Tensor("Const_2:0", shape=(4, 1), dtype=int32)
创建张量的时候
- 如果不指定类型,默认 tf.float32
- 整型 tf.int32
- 浮点型 tf.float32
2.4.2 创建张量的指令
2.4.2.1. 固定值张量
tf.zeros(shape, dtype=tf.float32, name=None)
创建所有元素设置为零的张量。此操作返回一个dtype具有形状shape和所有元素设置为零的类型的张量。
tf.zeros_like(tensor, dtype=None, name=None)
给tensor定单张量(),此操作返回tensor与所有元素设置为零相同的类型和形状的张量。
tf.ones(shape, dtype=tf.float32, name=None)
创建一个所有元素设置为1的张量。此操作返回一个类型的张量,dtype形状shape和所有元素设置为1。
tf.ones_like(tensor, dtype=None, name=None)
给tensor定单张量(),此操作返回tensor与所有元素设置为1相同的类型和形状的张量。
tf.fill(dims, value, name=None)
创建一个填充了标量值的张量。此操作创建一个张量的形状dims并填充它value。
tf.constant(value, dtype=None, shape=None, name=’Const’)
创建一个常数张量。
2.4.2.2. 随机值张量
一般我们经常使用的随机数函数Math.random() 产生的是服从均匀分布的随机数,能够模拟等概率出现的况,例如扔一个骰子,1到6点的概率应该相等,但现实生活中更多的随机现象是符合正态分布的,例如20岁成年人的体重分布等。
假如我们在制作一个游戏,要随机设定许许多多NPC的身高,如果还用Math.random(),生成从140到22之间的数字,就会发现每个身高段的人数是一样多的,这是比较无趣的,这样的世界也与我们习惯不同,玛实应该是特别高和特别矮的都很少,处于中间的人数最多,这就要求随机函数符合正态分布。
tf.truncated_normal[shape, mean=0.0, stddev=1.0, ctype=tf.float32, seed=None, name=None)
从截断的正态分布中输出随机值,和 tf.random_normal)一样,但是所有数字都不超过两个标准差
tf.random_normal(shape, mean=0.0, stddev=1.0, dtype=tf.float32,seed=None, name=None)
从正态分布输出随机值的矩阵,由来自随机正态分布的数字组成。
[En]
A matrix that outputs random values from a normal distribution and consists of numbers from a random normal distribution.
其它特殊的创建张量的op
- tf.Variable
- tf.placeholder
2.4.3 张量的变换
- ndarray属性的修改
类型的修改 - 1)ndarray.astype(type)
tf.cast(tensor, dtype)
不会改变原始的tensor
返回新的改变类型后的tensor - 2)ndarray.tostring()
- 形状的修改
- 1)ndarray.reshape(shape)
- -1 自动计算形状
- 2)ndarray.resize(shape)
2.4.3.1 类型改变
更改张量中的数值类型的函数:
[En]
A function that changes the numerical type in a tensor:
- tf.string_to_number(string_tensor, out_type=None, name=None)
- tf.to_double(x, name=’ToDouble’)
- tf.to_float(x, name=’ToFloat’)
- tf.to_bfloat16(x, name=’ToBFloat16′)
- tf.to_int32(x, name=’Tolnt32′)
- tf.to_int64(x, name=’Tolnt64′)
- tf.cast(x, dtype, name=None)
2.4.3.2 形状改变
TensorFlow的张量具有两种形状变换,动态形状和静态形状
- tf.reshape
- tf.set_shape
静态形状-最初创建张量时的形状
[En]
Static shape-the shape when the tensor is initially created
对于动态和静态形状,必须满足以下规则
[En]
For dynamic and static shapes, the following rules must be met
- 静态形状
转换静态形状的时候,1-D到1-D,2-D到2-D,不能跨阶数改变形状(比如原来形状是[None,None],可以改成[3,4],不能改成[2,2,2])
对于已经固定的静态形状的张量,不能再次设置该静态形状[En]
For the tensor of a static shape that has been fixed, the static shape cannot be set again
- 动态形状
tf.reshape()动态创建新张量时,张量的元素个数必须匹配 - 1)如何改变静态形状
tensor.set_shape(shape)
仅当形状未完全固定时,才能更改/更新静态形状。[En]
Static shapes can be changed / updated only if the shape is not completely fixed.
- 2)如何改变动态形状
tf.reshape(tensor, shape)
不会改变原始的tensor
返回新的改变形状后的tensor
动态创建新张量时,张量的元素数量必须匹配。[En]
When creating a new tensor dynamically, the number of elements of the tensor must match.
示例
- 修改张量静态形状
def tensor_demo():""" 张量的演示 :return:""" tensor1 = tf.compat.v1.constant(4.0) tensor2 = tf.compat.v1.constant([1, 2, 3, 4]) linear_squares = tf.constant([[4], [9], [16], [25]], dtype=tf.int32) l_cast = tf.cast(linear_squares, dtype=tf.float32) print("linear_squares:\n", linear_squares) print("l_cast:\n", l_cast) a_p = tf.compat.v1.placeholder(dtype=tf.float32, shape=[None, None]) b_p = tf.compat.v1.placeholder(dtype=tf.float32, shape=[None, 10]) c_p = tf.compat.v1.placeholder(dtype=tf.float32, shape=[3, 2]) print('a_p静态形状:', a_p.get_shape()) print('b_p静态形状:', b_p.get_shape()) print('c_p静态形状:', c_p.get_shape()) a_p.set_shape([2, 3]) b_p.set_shape([3, 10]) print('a_p修改后的静态形状:', a_p.get_shape()) print('b_p修改后的静态形状:', b_p.get_shape())- 修改张量动态形状
c_p = tf.compat.v1.placeholder(dtype=tf.float32, shape=[3, 2, 3])print('c_p静态形状:', c_p.get_shape())new_c_p = tf.reshape(c_p, shape=[3, 3, 2])print('c_p更新后的静态形状:', c_p.get_shape())print('new_c_p的静态形状:', new_c_p.get_shape())2.4.4 张量的数学运算
- 算术运算符
- 基本数学函数
- 矩阵运算
- reduce操作
- 序列索引操作
详细请参考: TensorFlow Core v2.6.0
这些API使用,我们在使用的时候介绍,具体参考文档
2.5 变量OP
TensorFlow变量是表示程序处理的共享持久状态的最佳方法。变量通过tf.VariableOP类进行操作。变量的特点∶
- 存储持久化
- 可修改值
- 可指定被训练
变量用于存储用于深度学习的模型参数。
[En]
Variables are used to store model parameters for deep learning.
2.5.1 创建变量
tf.Variable(initial_value=None,trainable=True,collections=None,name=None)
- initial_value:初始化的值
- trainable:是否被训练
- collections:新变量将添加到列出的图的集合中collections,默认为[GraphKeys.GLOBAL_VARIABLES],如果trainable是True变量也被添加到图形集合GraphKeys.TRA INABLE_VARIABLES
- 需要显式初始化变量才能运行值
[En]
variables need to be explicitly initialized to run values*
示例
def varibal_demo():""" 变量的演示 :return:""" a = tf.Variable(initial_value=50) b = tf.Variable(initial_value=40) c = tf.add(a, b) print("a:\n", a) print("b:\n", b) print("c:\n", c) init = tf.compat.v1.global_variables_initializer() with tf.compat.v1.Session() as sess: sess.run(init) a_value, b_value, c_value = sess.run([a, b, c]) print("a_value:\n", a_value) print("b_value:\n", b_value) print("c_value:\n", c_value)2.5.2 使用tf.variable_scope()修改变量的命名空间
会在OP的名字前面增加命名空间的指定名字,使得结构更加清晰
示例
创建一个命名空间
    with tf.compat.v1.variable_scope("my_scope"):
        a = tf.Variable(initial_value=50)
        b = tf.Variable(initial_value=40)
        c = tf.add(a, b)
    print("a:\n", a)
    print("b:\n", b)
    print("c:\n", c)
结果:
原来

现在

2.6 API
关于 Tensorflow的API图示
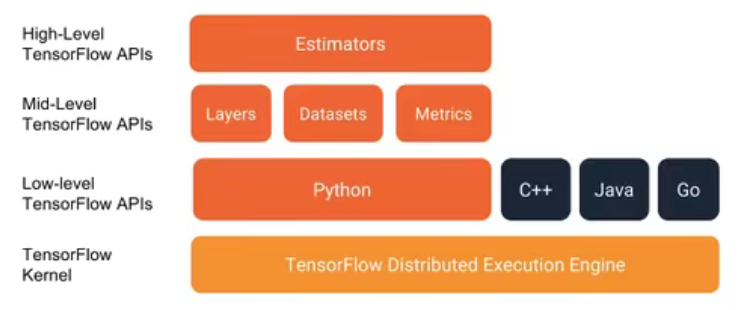
; 2.6.1 基础API
tf.app
这个模块相当于为TensorFlow进行的脚本提供一个main 函数入口,可以定义脚本运行的 flags。
tf.image
TensorFlow的图像处理操作。主要是一些颜色变换、变形和图像的编码和解码。
tf.gfile
提供文件操作模块
tf.summary
用来生成TensorBoard可用的统计日志,目前Summary主要提供了4种类型;audio、image、histogram.scalar
tf.python_io
用来读写TFRecords文件
tf.train
这个模块提供了一些训练器,与tf.nn组合起来,实现一些网络的优化计算。 tf.nn
这个模块提供了一些构建神经网络的底层函数。TensorFlow构建网络的核心模块。其中包含了添加各种层的函数,比如添加卷积层、池化层等。
2.6.2 高级API
tf.keras
Keras本来是一个独立的深度学习库,tensorflow将其学习过来,增加这部分模块在于快速构建模型。
tf.layers
高级API,以更高级的概念层来定义一个模型。尖似tf.Keras
tf.contrib
tf.contrib.layers提供够将计算图中的网络层、正则化、摘要操作、是构建计算图的高级操作,但是tf.contrib包含不稳定和实验代码,有可能以后API会改变。
tf.estimator
一个Estimator相当于Model + Training + Evaluate 的合体。在模块中,已经实现了几种简单的分类器和回归器,包括:Baseline,Learning 和 DNN。这里的 DNN的网络,只是全连接网络,没有提供卷积之类的。
2.7 案例:实现线性回归
2.7.1 线性回归原理复习
- 1)构建模型
y = w 1 x 1 + w 2 x 2 + … … + w n x n + b y = w_1x_1 + w_2x_2 + …… + w_nx_n + b y =w 1 x 1 +w 2 x 2 +……+w n x n +b - 2)构造损失函数
均方误差 - 3)优化损失
梯度下降
2.7.2 案例:实现线性回归的训练
案例确定
- 准备真实数据
100样本
x 特征值 形状 (100, 1)
y_true 目标值 (100, 1)
y_true = 0.8x + 0.7 - 假定x 和 y 之间的关系 满足
y = kx + b
k ≈ 0.8 b ≈ 0.7
API
运算
- 矩阵运算
tf.matmul(x, w) - 平方
tf.square(error) - 均值
tf.reduce_mean(error)
梯度下降优化
- tf.train.GradientDescentOptimizer(learning_rate)
梯度下降优化 - learning_rate:学习率,一般为0~1之间比较小的值
- method:
- minimize(loss)
- return:梯度下降op
流程分析
( 100 , 1 ) ∗ ( 1 , 1 ) = ( 100 , 1 ) (100, 1) * (1, 1) = (100, 1)(1 0 0 ,1 )∗(1 ,1 )=(1 0 0 ,1 )
y _ p r e d i c t = x ∗ w e i g h t s ( 1 , 1 ) + b i a s ( 1 , 1 ) y_predict = x * weights(1, 1) + bias(1, 1)y _p r e d i c t =x ∗w e i g h t s (1 ,1 )+b i a s (1 ,1 )
– 1)构建模型
y_predict = tf.matmul(x, weights) + bias
– 2)构造损失函数
error = tf.reduce_mean(tf.square(y_predict – y_true))
– 3)优化损失
optimizer = tf.train.GradientDescentOptimizer(learning_rate=0.01).minimize(error)
5 学习率的设置、步数的设置与梯度爆炸
示例
自实现一个线性回归
def linear_regression():
"""
    自实现一个线性回归
    :return:
"""

    x = tf.compat.v1.random_normal(shape=[100, 1])
    y_true = tf.matmul(x, [[0.8]]) + 0.7

    weight = tf.Variable(initial_value=tf.compat.v1.random_normal(shape=[1, 1]))
    bias = tf.Variable(initial_value=tf.compat.v1.random_normal(shape=[1, 1]))
    y_predict = tf.matmul(x, weight) + bias

    error = tf.reduce_mean(tf.square(y_predict - y_true))

    optimizer = tf.compat.v1.train.GradientDescentOptimizer(learning_rate=0.01).minimize(error)

    init = tf.compat.v1.global_variables_initializer()

    with tf.compat.v1.Session() as sess:

        sess.run(init)

        print("训练前模型参数为:权重%f,偏置%f,损失%f" % (weight.eval(), bias.eval(), error.eval()))

        for i in range(1000):
            sess.run(fetches=optimizer)
            print("第%d次训练后模型参数为:权重%f,偏置%f,损失%f" % (i+1, weight.eval(), bias.eval(), error.eval()))

        print("训练后模型参数为:权重%f,偏置%f,损失%f" % (weight.eval(), bias.eval(), error.eval()))
结果:
训练前模型参数为:权重-1.970245,偏置-1.167298,损失12.787583
第1次训练后模型参数为:权重-1.900054,偏置-1.120071,损失8.568954
第2次训练后模型参数为:权重-1.845930,偏置-1.085134,损失10.069593
第3次训练后模型参数为:权重-1.801681,偏置-1.054058,损失8.939274
第4次训练后模型参数为:权重-1.734405,偏置-1.007101,损失11.473066
第5次训练后模型参数为:权重-1.679682,偏置-0.980237,损失9.313668
第6次训练后模型参数为:权重-1.619766,偏置-0.943636,损失8.337710
第7次训练后模型参数为:权重-1.570481,偏置-0.905890,损失9.915030
第8次训练后模型参数为:权重-1.524673,偏置-0.874753,损失8.296886
第9次训练后模型参数为:权重-1.477295,偏置-0.834806,损失7.259823
第10次训练后模型参数为:权重-1.422785,偏置-0.804612,损失7.320126
......

第1000次训练后模型参数为:权重0.799999,偏置0.699999,损失0.000000
训练后模型参数为:权重0.799999,偏置0.699999,损失0.000000
学习率的设置、步数的设置与梯度爆炸
学习率越大,得到更好结果的步数越少;学习率越小,得到更好结果的步数越多。
[En]
The greater the learning rate, the smaller the number of steps to better results; the smaller the learning rate, the greater the number of steps to better results.
但我了解到,这次会议将出现梯度爆炸。关于梯度爆炸/梯度消失?
[En]
But I have learned that there will be a gradient explosion at the conference. About gradient explosion / gradient disappearance?
在极情况下,权重的值变得非常大,以至于滋出,导致NaN值
如何解决梯度爆炸问题(在深度神经网络中更容易发生)
[En]
How to solve the problem of gradient explosion (it is more likely to occur in deep neural networks)
- 重新设计网络
- 调整学习率
- 使用梯度載断(在训练过程中检查和限制度的大小
- 使用激活函数
变量的 trainable设置观察
trainable的参数作用,指定是否训练
weights = tf.Variable(initial_value=tf.random_normal(shape=[1, 1]), name='weight',trainable=False)
2.7.3 增加其他功能
- 变量Tensorboard显示
- 增加命名空间
- 模型保存和加载
- 命令行参数设置
2.7.3.1 增加变量显示
目的:在TensorBoard当中观察模型的参数、损失值等变量值的变化。
-
收集变量
-
tf.summary.scalar(name=”,tensor)收集对于损失函数和准确率等单值变量,name为变量的名字,tensor为值
-
tf.summary.histogram(name=”,tensor)收集高维度的变量参数
tf.summary.image(name=”,tensor)收集输入的图片张量能显示图片 -
合并变量写入事件文件
-
merged = tf.summary.merge_all()
- 运行合并: summary = sess.run(merged),每次迭代都需运行
- 添加:FileWriter.add_summary(summary,i),i表示第几次的值
增加变量显示具体步骤:
1)创建事件文件
2)收集变量
3)合并变量
4)每次送代运行一次合并变量
5)每次送代将 summary:对象写入事件文件
示例
增加了变量显示
def linear_regression():
"""
    自实现一个线性回归
    :return:
"""

    x = tf.compat.v1.random_normal(shape=[100, 1])
    y_true = tf.matmul(x, [[0.8]]) + 0.7

    weight = tf.Variable(initial_value=tf.compat.v1.random_normal(shape=[1, 1]))
    bias = tf.Variable(initial_value=tf.compat.v1.random_normal(shape=[1, 1]))
    y_predict = tf.matmul(x, weight) + bias

    error = tf.reduce_mean(tf.square(y_predict - y_true))

    optimizer = tf.compat.v1.train.GradientDescentOptimizer(learning_rate=0.01).minimize(error)

    tf.compat.v1.summary.scalar("error", error)
    tf.compat.v1.summary.histogram("weight", weight)
    tf.compat.v1.summary.histogram("bias", bias)

    merged = tf.compat.v1.summary.merge_all()

    init = tf.compat.v1.global_variables_initializer()

    with tf.compat.v1.Session() as sess:

        sess.run(init)

        file_writer = tf.compat.v1.summary.FileWriter("../linear", graph=sess.graph)

        print("训练前模型参数为:权重%f,偏置%f,损失%f" % (weight.eval(), bias.eval(), error.eval()))

        for i in range(1000):
            sess.run(fetches=optimizer)
            print("第%d次训练后模型参数为:权重%f,偏置%f,损失%f" % (i+1, weight.eval(), bias.eval(), error.eval()))

            summary = sess.run(merged)

            file_writer.add_summary(summary, i)

        print("训练后模型参数为:权重%f,偏置%f,损失%f" % (weight.eval(), bias.eval(), error.eval()))
结果:
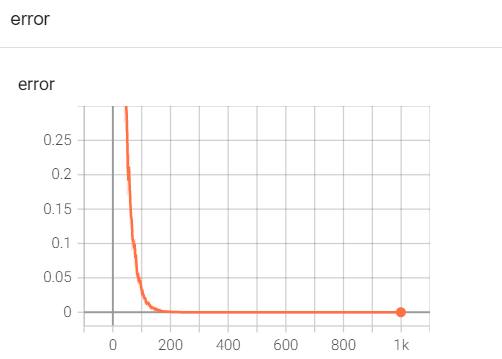
注意:
- 2.0版本的虽然tf有summar.scalar方法,但是与tf.compat.v1.summary.scalar(“error”, error)的参数类型不一样。按照上面示例来写会出现TypeError: Fetch argument None has invalid type
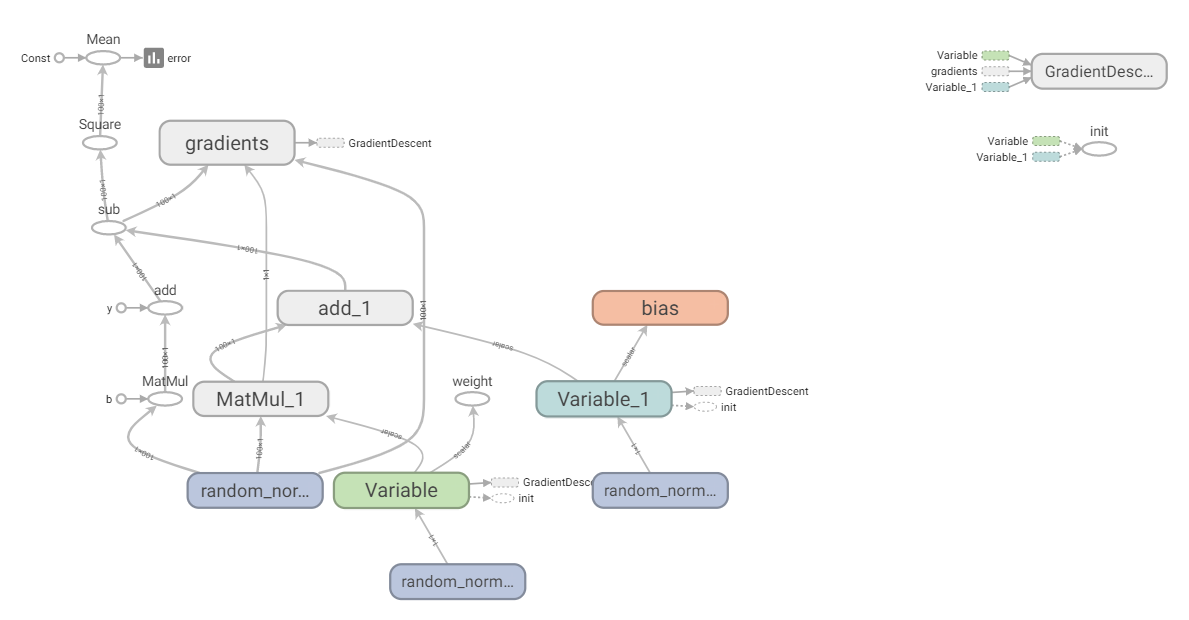
2.7.3.2 增加命名空间
使代码结构更加清晰,Tensorboard图结构清楚
例如:with tf.variable_scope( “lr_model”” ):
增加命名空间具体步骤:
1)实例化Saver
2)保存
saver.save(sess, path)
3)加载
saver.restore(sess, path)
示例
增加命名空间
def linear_regression():
"""
自实现一个线性回归
:return:
"""
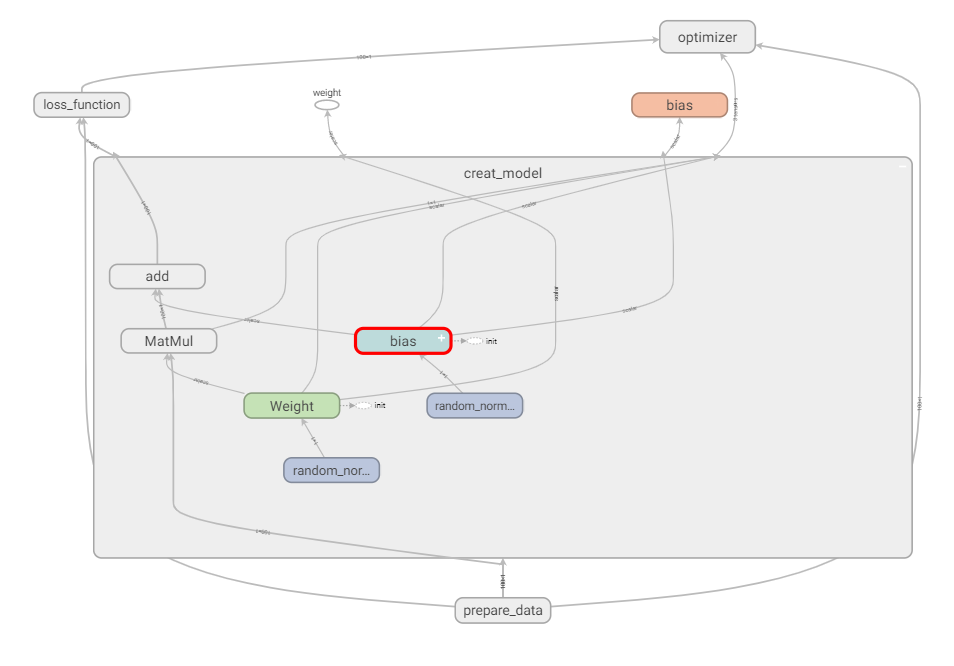
with tf.compat.v1.variable_scope("prepare_data"):
x = tf.compat.v1.random_normal(shape=[100, 1])
y_true = tf.matmul(x, [[0.8]]) + 0.7
with tf.compat.v1.variable_scope("creat_model"):
weight = tf.Variable(initial_value=tf.compat.v1.random_normal(shape=[1, 1]))
bias = tf.Variable(initial_value=tf.compat.v1.random_normal(shape=[1, 1]))
y_predict = tf.matmul(x, weight) + bias
with tf.compat.v1.variable_scope("loss_function"):
error = tf.reduce_mean(tf.square(y_predict - y_true))
with tf.compat.v1.variable_scope("optimizer"):
optimizer = tf.compat.v1.train.GradientDescentOptimizer(learning_rate=0.01).minimize(error)
tf.compat.v1.summary.scalar("error", error)
tf.compat.v1.summary.histogram("weight", weight)
tf.compat.v1.summary.histogram("bias", bias)
merged = tf.compat.v1.summary.merge_all()
init = tf.compat.v1.global_variables_initializer()
with tf.compat.v1.Session() as sess:
sess.run(init)
file_writer = tf.compat.v1.summary.FileWriter("../linear", graph=sess.graph)
print("训练前模型参数为:权重%f,偏置%f,损失%f" % (weight.eval(), bias.eval(), error.eval()))
for i in range(1000):
sess.run(fetches=optimizer)
print("第%d次训练后模型参数为:权重%f,偏置%f,损失%f" % (i+1, weight.eval(), bias.eval(), error.eval()))
summary = sess.run(merged)
file_writer.add_summary(summary, i)
print("训练后模型参数为:权重%f,偏置%f,损失%f" % (weight.eval(), bias.eval(), error.eval()))
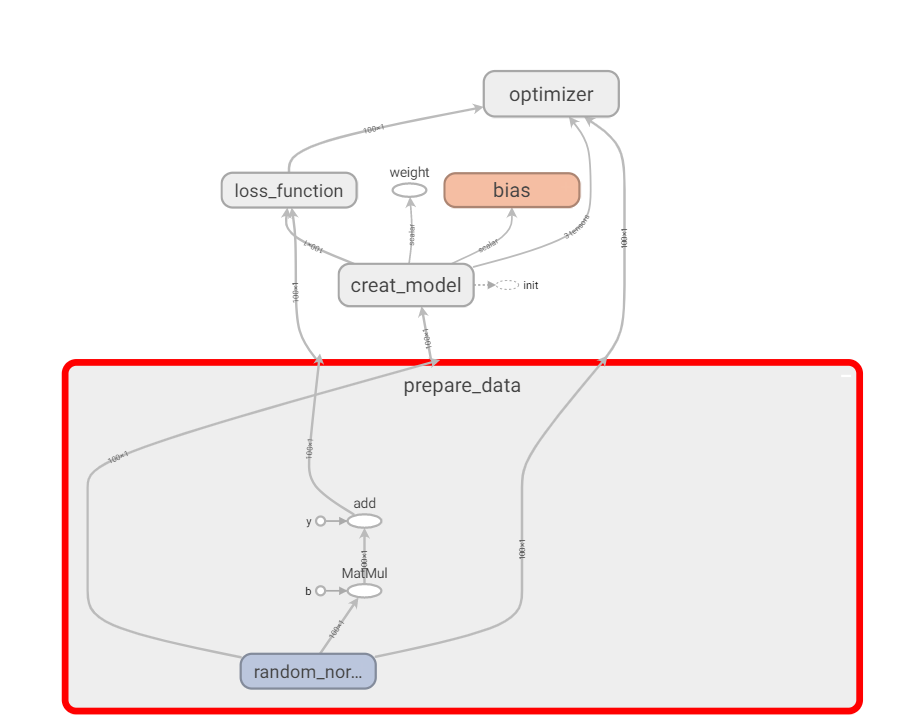
修改指令名称
    with tf.compat.v1.variable_scope("prepare_data"):

        x = tf.compat.v1.random_normal(shape=[100, 1], name="feature")
        y_true = tf.matmul(x, [[0.8]]) + 0.7
    with tf.compat.v1.variable_scope("creat_model"):

        weight = tf.Variable(initial_value=tf.compat.v1.random_normal(shape=[1, 1]), name="Weight")
        bias = tf.Variable(initial_value=tf.compat.v1.random_normal(shape=[1, 1]), name="bias")
        y_predict = tf.matmul(x, weight) + bias
图结构变得更清晰
2.7.3.3 模型的保存与加载
tf.train.Saver(var_list=None,max_to_keep=5)
保存和加载模型(保存文件格式: checkpoint文件)
-
var_list:指定将要保存和还原的变量。它可以作为一个dict或一个列表传递.
-
max_to_keep:指示要保留的最近检查点文件的最大数量。创建新文件时,会删除较旧的文件。如果无或0,则保留所有检查点文件。默认为 5(即保留最新的5个检查点文件。)
例如:
保存与加载(指定目录+模型名字)
saver.save(sess,' /tmp/ckpt/test/myregression.ckpt ')
saver.restore(sess,'/tmp/ckpt/test/myregression.ckpt ' )
要确定模型是否存在,请直接指定目录
[En]
To determine whether the model exists, specify the directory directly
checkpoint =tf.train.latest_checkpoint("/tmp/model/")
saver.restore(sess, checkpoint)
保存和加载模型的具体步骤如下:
[En]
The specific steps of saving and loading the model:
1)实例化Saver
2)保存
saver.save(sess, path)
3)加载
saver.restore(sess, path)
示例
在会话中保存模型
       if i % 10 == 0:
           saver.save(sess, "../model/my_linear.ckpt")
加载模型
        if os.path.exists("../model/checkpoint"):
            saver.restore(sess, "../model/my_linear.ckpt")
2.7.3.4 命令行参数使用
- tf.app.flags,它支持应用从命令行接受参数,可以用来指定集群配置等。在tf.app.flags下面有各种定义参数的类型
- DEFINE_string(flag_name, default_value, docstring)
- DEFINE_integer(flag_name, default_value, docstring)
- DEFINE_boolean(flag_name, default_value, docstring)
- DEFINE_float(flag_name, default_value,docstring)
- tf.app.flags,在flags有一个FLAGS标志,它在程序中可以调用到我们前面定义的flag_name
- 通过 tf.app.run() 启动main 函数。
示例
import tensorflow as tf

tf.app.flags.DEFINE_integer("max_step", 100, "训练模型的步数")
tf.app.flags.DEFINE_string("model_dir", "Unknown", "模型保存的路径+模型名字")

FLAGS = tf.app.flags.FLAGS

def command_demo():
"""
    命令行参数演示
    :return:
"""
    print("max_step:\n", FLAGS.max_step)
    print("model_dir:\n", FLAGS.model_dir)

    return None

def main(argv):
    print(argv)

if __name__ == '__main__':
    command_demo()
    tf.app.run()
命令行里执行
python 03-命令行参数.py –max_step=3 –model-dir=hello
结果:
max_step:
 3
model_dir:
 hello
['03-命令行参数.py']
注意:
- 通过tf.app.run()*启动main 函数时,main函数里要写参数argv。argv实际上就是.py文件的路径。
TensorFlow框架的使用总结
; 数据读取、神经网络
有三种获取数据到TensorFlow程序的方法:
- QueueRunner:基于队列的输入管道从TensorFlow图形开头的文件中读取数据。
- Feeding:运行每一步时,Python代码提供数据。
- 预加载数据:TensorFlow图中的张量包含所有数据(对于小数据集)。
3.1 文件读取流程
多线程 + 队列
3.1.1 文件读取流程

- 阶段1:构建文件名队列
[En]
Phase 1: construct a queue of file names*
- 第二阶段:读取与解码
- 第三阶段:批处理
- 注:这些操作需要 启动运行这些队列操作的线程,以便我们在进行文件读取的过程中能够顺利进行入队出队操作。
; 3.1.1.1 构造文件名队列
tf.train.string_input_producer(string_tensor,shuffle=True)
将需要读取的文件的文件名放入文件名队列。
[En]
Put the file name of the file that needs to be read into the file name queue.
- string_tensor:含有文件名+路径的1阶张量 [这里传一个文件路径列表就可以]
- num_epochs:过几遍数据,默认无限过数据 [一直过道训练出你满意的结果,无线循环,结果会越来越拟合]
- return文件队列
file_queue = tf.train.string_input_producer(string_tensor,shuffle=True)
3.1.1.2 读取与解码
1)读取文件内容
默认情况下,读取器一次只采集一个样本
[En]
The reader only takes one sample at a time by default
具体来说
- 默认情况下,文本文件一次读取一行
[En]
text files are read one line at a time by default*
- 默认情况下,图像文件每次读取一张图片
[En]
Image file reads one picture at a time by default*
- 二进制文件一次读取指定的字节数(最好是样本的字节数)
[En]
the binary file reads the specified number of bytes at a time (preferably the number of bytes of a sample)*
- TFRecords默认一次读取一个example
不同的文件有不同的方法。
[En]
There are different methods for different files.
- tf. TextLineReader
阅读文本文件逗号分隔值(cSV)格式,默认按行读取
return:读取器实例 - tf.WholeFileReader
用于读取图片文件
return:读取器实例 - tf.FixedLengthRecordReader(record_bytes)
读取其中每个记录都是固定字节数的二进制文件[En]
To read binary files in which each record is a fixed number of bytes
record_bytes:整型,指定每次读取(一个样本)的字节数
return:读取器实例 tf.TFRecordReader
读取TFRecords文件
return:读取器实例-
它们有共同的读取方法:read(file_queue),并且都会返回一个Tensors元组(key文件名字,value默认的内容(一个样本)
- 由于默认只会读取一个样本,所以如果想要进行批处理,需要使用 tf.train.batch或tf.train.shuffle_batch进行批处理操作,便于之后指定每批次多个样本的训练。
2)内容解码
读取不同类型的文件,也应该对读取到的不同类型的内容进行相对应的解码操作,解码成统一的Tensor格式
- tf.decode_csv
解码文本文件内容 - tf.image.decode _jpeg(contents)
将JPEG编码的图像解码为uint8张量
return:uint8张量,3-D形状[height, width, channels] - tf.image.decode_png(contents)
将PNG编码的图像解码为uint8张量
return:张量类型,3-D形状[height, width, channels] - tf.decode_raw
解码二进制文件内容
与tf.FixedLengthRecordReader搭配使用,二进制读取为uint8类型
解码阶段,默认所有的内容都解码成tf.uint8类型,如果之后需要转换成指定类型则可使用tf.cast()进行相应转换。
3.1.1.3 批处理队列
解码后,可以直接获取一个样例的默认内容,但如果要获取多个样例,则需要加入新的队列进行批处理。
[En]
After decoding, you can directly get the default content of a sample, but if you want to get multiple samples, you need to join a new queue for batch processing.
tf.train.batch(tensors, batch_size,num_threads = 1, capacity = 32,name=None)
读取指定大小(个数)的张量
- tensors:可以是包含张量的列表,批处理的内容放到列表当中
- batch_size:从队列中读取的批处理大小
- num_threads:进入队列的线程数
- capacity:整数,队列中元素的最大数量
- return:tensors
tf.train.shuffle_batch
这种方法是为了打乱样品的秩序。其余内容同上。
[En]
This method is to disrupt the order of the samples. the rest is the same as above.
tf.train.batch(tensors, batch_size, num_threads = 1, capacity = 32, name=None)
手动开启线程
tf.train.QueueRunner()
开启会话:
tf.train.start_queue_runners(sess=None, coord=None)
3.1.2 线程操作
以上用到的队列都是tf.train.QueueRunner对象。
每个QueueRunner都负责一个阶段,tf.train.start_queue_runners函数会要求图中的每个QueueRunner启动它的运行队列操作的线程。(这些操作需要在会话中开启)
tf.train.start_queue_runners(sess=None, coord=None)
收集图表中的所有队列线程,默认情况下同时启动线程
[En]
Collect all queue threads in the diagram, and start threads at the same time by default
- sess:所在的会话
- coord:线程协调器
- return:返回所有线程
tf.train.Coordinator()
管理和协调线程的线程协调器
[En]
Thread coordinator to manage and coordinate threads
- request_stop():请求停止
- should_stop(:询问是否结束
- join(threads=None, stop_grace_period_secs=120):回收线程
- return:线程协调员实例
3.2 图片数据
3.2.1 图像基本知识
文本 特征词 -> 二维数组
字典 one-hot -> 二维数组
图片 像素值
1 图片三要素
组成一张图片特征值是所有的像素值,有这么几个要素。图片长度、图片宽度、图片通道数。什么是图片的通道数呢,描述一个像素点,如果是灰度,那么只需要一个数值来描述它,就是单通道。如果一个像素点,有RGB三种颜色来描述它,就是三通道。
灰度图片:单通道
彩色图片:三通道
2 TensorFlow中表示图片
一张图片就是一个3D张量,[height, width, channel],height就表示高,width表示宽,channel表示通道数。我们会经常遇到3D和4D的表示
单个图片:[height, width, channel]
多个图片(4D):[batch, height, width, channel],batch表示批数量
3 图片特征值处理
[samples, features]
在图像识别中,每个图像样本的特征数目应该保持相同(以便于神经网络的训练)。因此,有必要对所有图片的张量大小进行统一转换。另一方面,如果图像中的像素数太大,也可以通过这种方式减少像素数,降低训练的计算成本。
[En]
In image recognition, the number of features of each image sample should be kept the same (to facilitate the training of neural networks). Therefore, it is necessary to uniformly convert the tensor size of all pictures. On the other hand, if the number of pixels in the picture is too large, we can also reduce the number of pixels in this way and reduce the computational cost of training.
tf.image.resize_images(images, size)
缩小放大图片
- images:4-D形状[batch, height, width, channels],或3-D形状的张量
- [height, width, channels]的图片数据
- size:1-D int32张量:new_height, new_width,图像的新尺寸
- 返回4-D格式或者3-D格式图片
4 数据格式
存储:uint8(节约空间)
矩阵计算:float32(提高精度)
3.2.4 案例:狗图片读取
- 1)构造文件名队列
file_queue = tf.train.string_input_producer(string_tensor,shuffle=True) - 2)读取与解码
读取:
reader = tf.WholeFileReader()
key, value = reader.read(file_queue)
解码:
image_decoded = tf.image.decode_jpeg(value) - 3)批处理队列
image_decoded = tf.train.batch([image_decoded], 100, num_threads = 2, capacity=100)
手动开启线程
示例
狗图片提取(tensorflow 1.8)
import tensorflow as tf
import os

def picture_read(filename_list):

    file_queue = tf.train.string_input_producer(filename_list)

    reader = tf.WholeFileReader()

    key, value = reader.read(file_queue)

    image = tf.image.decode_jpeg(value)

    image_resized = tf.image.resize_images(image, [200, 200])

    image_resized.set_shape(shape=[200, 200, 3])
    image_batch = tf.train.batch([image_resized], batch_size=10, num_threads=1, capacity=100)
    print(image_batch)
    with tf.Session() as sess:

        coord = tf.train.Coordinator()
        threads = tf.train.start_queue_runners(sess=sess, coord=coord)
        print(image_resized.shape)
        print(image_resized.eval())

        coord.request_stop()
        coord.join(threads)

if __name__ == "__main__":

    filename = os.listdir("dog")

    filename_list = [os.path.join('dog', i) for i in filename]
    picture_read(filename_list)
注意:
1.8的这个方法即将被舍弃。
示例
狗图片提取(tensorflow 2.6)
import tensorflow as tf
import os

batch_size = 100

def read_and_process_image(image_full_path):
    image = tf.io.read_file(image_full_path)
    image = tf.image.decode_jpeg(image, channels=3)
    image = tf.image.resize(image, [256, 256])
    return image

def picture_read(filepath_list: list[str]):
"""
    狗图片读取案例
    :return:
"""
    train_dataset = tf.data.Dataset.from_tensor_slices(filepath_list)
    train_dataset = train_dataset.map(map_func=read_and_process_image)
    train_dataset = train_dataset.shuffle(buffer_size=1000)
    train_dataset = train_dataset.batch(batch_size)
    train_dataset = train_dataset.prefetch(tf.data.experimental.AUTOTUNE)
    for img in train_dataset:
        print(img)

if __name__ == '__main__':

    file_name = os.listdir("../dog")

    file_list = [os.path.join("../dog", file) for file in file_name]

    picture_read(filepath_list=file_list)
结果:
tf.Tensor(
[[[[ 31.        29.        32.      ]
   [ 29.058594  27.058594  30.058594]
   [ 29.        27.        30.      ]
   ...

   [243.       243.       243.      ]
   [243.       243.       243.      ]
   [243.       243.       243.      ]]
  .......

  [[100.93945   95.93945   92.93945 ]
   [105.50391   99.50391   99.50391 ]
   [109.978516 103.978516 105.978516]
   ...

   [159.       142.       148.      ]
   [159.       142.       148.      ]
   [159.       142.       148.      ]]]], shape=(100, 256, 256, 3), dtype=float32)
3.3 二进制数据
3.3.1 CIFAR10二进制数据集介绍
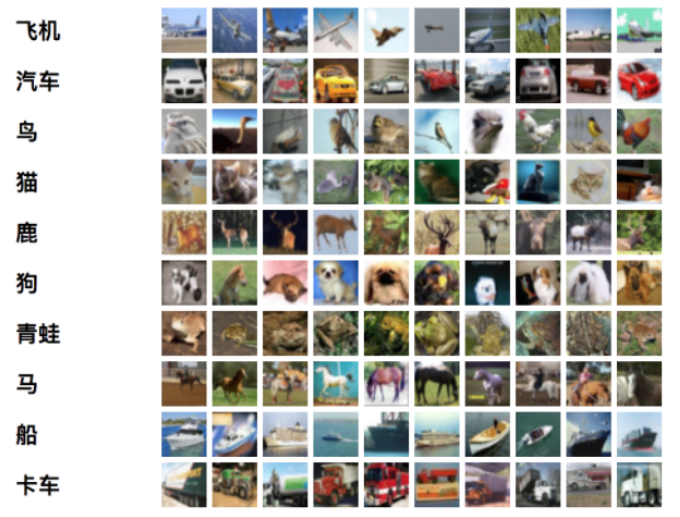
CIFAR-10数据集由10个类的60000个32×32彩色图像组成,每个类有6000个图像。
有50000个训练图像和10000个测试图像。
数据集分为五个训练批次和一个测试批次,每个批次包含10000幅图像。测试批次正好包含从每个类别中随机选择的1000张图像。类比另一个类具有更多的图像。在它们之间,训练批次恰好包含每个班级的5000张图像。以下是数据集中的类和每个类中的10个随机图像:
[En]
The dataset is divided into five training batches and one test batch, each with 10000 images. The test batch contains exactly 1000 randomly selected images from each class. Class has more images than the other one. Between them, the training batch contains exactly 5000 images from each class. Here are the classes in the dataset and 10 random images from each class:
二进制版本数据文件
二进制版本包含文件data_batch_1.bin,data_batch_2.bin,…,data_batch_5.bin以及test_batch.bin。

这些文件中的每个文件都采用以下格式,数据中的每个样本都包含目标和特征值:
[En]
Each of these files is in the following format, and each sample in the data contains target and eigenvalues:
<1×标签> <3072×像素>
...

<1×标签> <3072×像素>
</3072×像素></1×标签></3072×像素></1×标签>
第一个字节是第一个图像的标签,它是一个介于0-9之间的数字。接下来的3072个字节是图像像素的值。前1024个字节是红色通道值,接下来的1024个字节是绿色的,最后1024个字节是蓝色的。值按行优先级存储,因此前32个字节是图像第一行的红色通道值。每个文件包含10000个这样的3073字节的“行”图像,但对行的分隔没有限制。因此,每个文件的长度应该正好是30730000个字节。
[En]
The first byte is the label of the first image, which is a number in the range of 0-9. The next 3072 bytes are the values of the image pixels. The first 1024 bytes are red channel values, the next 1024 are green, and the last 1024 are blue. Values are stored in row priority, so the first 32 bytes are the red channel values for the first row of the image. Each file contains 10000 such 3073-byte “line” images, but there is no restriction on delimiting lines. So each file should be exactly 30730000 bytes long.
tensor对象
shape:[height, width, channel] -> [32, 32, 3] [0, 1, 2] -> []
[[32 * 32的二维数组],
[32 * 32的二维数组],
[32 * 32的二维数组]]
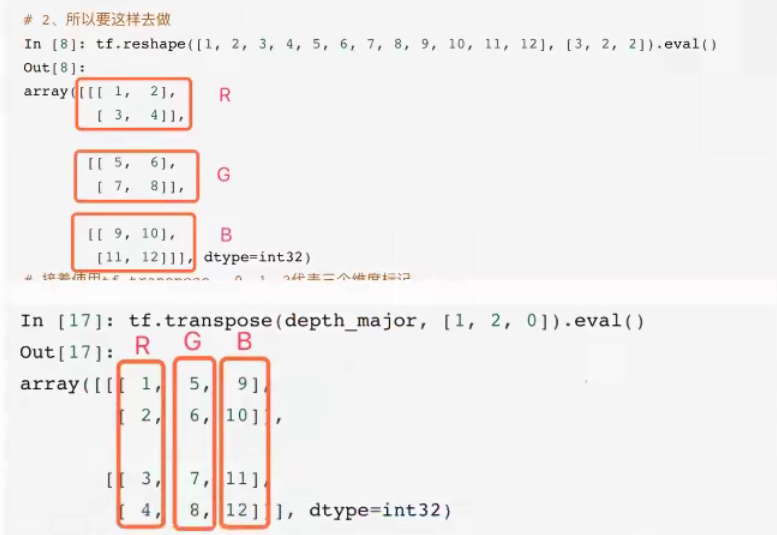
–> [3, 32, 32] [channel, height, width] 三维数组的转置 [0, 1, 2] -> [1, 2, 0]
[3, 2] -转置-> [2, 3]
这里的图片形状设置从1维的排列到3维数据的时候,涉及到NHWC与NCHV的概念
T = transpose 转置
1)NHWC与NCHW
读取和设置图片的形状时有两种格式
[En]
There are two formats when reading and setting the shape of a picture
- 设置为”NHWC”时,排列顺序为[batch, height, width, channels];
- 设置为”NCHW”时,排列顺序为[batch, channels, height, width]。
其中N表示这批图像有几张,H表示图像在竖直方向有多少像素,W表示水平方向像素数,C表示通道数。
- Tensorflow默认的 theight, width, channe]
假设RGB三通道两种格式的区别如下图所示:

1理解
假设1,2,3,4-红色5,6,7,8-绿色9,10,11,12-蓝色
- 如果通道在最低维度0[channel, height, width],RGB三颜色分成三组,在第一维度上找到三个RGB顾色
- 如果通道在最高维度2[height, width, channel],在第三维度上找到RGB三个颜色
3.3.2 CIFAR10 二进制数据读取
流程分析:
1)构造文件名队列
2)读取与解码
3)批处理队列
开启会话
手动开启线程
示例
CIFAR10 二进制数据读取(TensorFlow 1.8)
    def __init__(self):

        self.height = 32
        self.width = 32
        self.channel = 3

        self.image = self.height * self.width * self.channel
        self.label = 1
        self.sample = self.image + self.label

    def read_binary(self):
"""
        读取二进制文件
        :return:
"""

        filename_list = os.listdir("./cifar-10-batches-bin")

        file_list = [os.path.join("./cifar-10-batches-bin/", i) for i in filename_list if i[-3:]=="bin"]

        file_queue = tf.train.string_input_producer(file_list)

        reader = tf.FixedLengthRecordReader(self.sample)

        key, value = reader.read(file_queue)

        image_decoded = tf.decode_raw(value, tf.uint8)
        print("image_decoded:\n", image_decoded)

        label = tf.slice(image_decoded, [0], [self.label])
        image = tf.slice(image_decoded, [self.label], [self.image])
        print("label:\n", label)
        print("image:\n", image)

        image_reshaped = tf.reshape(image, [self.channel, self.height, self.width])
        print("image_reshaped:\n", image_reshaped)

        image_transposed = tf.transpose(image_reshaped, [1, 2, 0])
        print("image_transposed:\n", image_transposed)

        image_batch, label_batch = tf.train.batch([image_transposed, label], batch_size=100, num_threads=2, capacity=100)

        with tf.Session() as sess:

            coord = tf.train.Coordinator()
            threads = tf.train.start_queue_runners(sess=sess, coord=coord)

            label_value, image_value = sess.run([label_batch, image_batch])
            print("label_value:\n", label_value)
            print("image:\n", image_value)

            coord.request_stop()
            coord.join(threads)

        return image_value, label_value
示例
CIFAR10 二进制数据读取(TensorFlow 2.6)
更正
    def read_and_decode(self, file_list: list[str]):
"""
        读取和解码
        :return:
"""
        train_dataset = tf.data.Dataset.from_tensor_slices(file_list)
        dataset = train_dataset.enumerate(start=0)

        for element in dataset.as_numpy_iterator():
            print(element)
        train_dataset = train_dataset.map(map_func=self.process)
        print(train_dataset)
        train_dataset = train_dataset.batch(batch_size=100, num_parallel_calls=tf.data.AUTOTUNE)
        train_dataset = train_dataset.prefetch(tf.data.experimental.AUTOTUNE)
        for label, image in train_dataset:
            print(label)
            print(image)
结果
tf.Tensor(
[[[6]
  [9]
  [9]
  ...

  [1]
  [3]
  [5]]
  ........

   [8]]], shape=(6, 1000, 1), dtype=uint8)
tf.Tensor(
[[[[[ 59  62  63]
    [ 43  46  45]
    [ 50  48  43
    ......

    [ 57  68  85]
    [ 71  85 103]
    [ 93 110 131]]]]], shape=(6, 1000, 32, 32, 3), dtype=uint8)
错误版本
import tensorflow as tf
import os

class Cifar(object):

    def __init__(self):
"""
        初始化
"""

        self.height = 32
        self.width = 32
        self.channels = 3

        self.image_bytes = self.height * self.width * self.channels
        self.label_bytes = 1
        self.all_bytes = self.label_bytes + self.image_bytes

    def process(self, file_path):
"""
        对数据集元素进行处理
        :return:
"""
        cifar_img = tf.io.read_file(file_path)
        cifar_img = tf.compat.v1.decode_raw(cifar_img, tf.uint8)
        label = tf.slice(cifar_img, [0], [self.label_bytes])
        image = tf.slice(cifar_img, [self.label_bytes], [self.image_bytes])

        image_reshaped = tf.reshape(image, [self.channels, self.height, self.width])

        image_transposed = tf.transpose(image_reshaped, [1, 2, 0])
        return  label, image_transposed

    def read_and_decode(self, file_list: list[str]):
"""
        读取和解码
        :return:
"""
        train_dataset = tf.data.Dataset.from_tensor_slices(file_list)

        train_dataset = train_dataset.map(map_func=self.process)
        print(train_dataset)
        train_dataset = train_dataset.batch(batch_size=100, num_parallel_calls=tf.data.AUTOTUNE)
        train_dataset = train_dataset.prefetch(tf.data.experimental.AUTOTUNE)
        for label, image in train_dataset:
            print(label)
            print(image)

if __name__ == '__main__':
    file_name = os.listdir("../usingFiles/cifar-10-batches-bin")

    file_list = [os.path.join("../usingFiles/cifar-10-batches-bin", file) for file in file_name if file[-3:] == "bin"]

    cifar = Cifar()
    cifar.read_and_decode(file_list)
结果
tf.Tensor(
[[6]
 [1]
 [8]
 [0]
 [1]
 [3]], shape=(6, 1), dtype=uint8)
tf.Tensor(
[[[[ 59  62  63]
   [ 43  46  45]
   [ 50  48  43]
   ...

   [158 132 108]
   [152 125 102]
   [148 124 103]]
  [[ 16  20  20]
   [  0   0   0]
   [ 18   8   0]
   ...

......

   [[ 54 107 160]
   [ 56 105 149]
   [ 45  89 132]
   ...

   [ 24  77 124]
   [ 34  84 129]
   [ 21  67 110]]]], shape=(6, 32, 32, 3), dtype=uint8)
注意:
当分割错误的版本时,每个文件只有第一部分被剪切,而不是完全被剪切。
[En]
When slicing the wrong version, only the first piece of each file is cut out, not completely.
3.4 TFRecords
3.4.1 什么是TFRecords文件
TFRecords其实是一种二进制文件,虽然它不如其他格式好理解,但是它能更好的利用内存,更方便复制和移动,并且不需要单独的标签文件。
使用步骤︰
- 1)获取数据
- 2)将数据填入到 Example协议内存块(protocol buffer)
- 3)将协议内存块序列化为字符串,并且通过 tf.python_io.TFRecordwriter写入到TFRecords文件。
- 文件格式 *.tfrecords
3.4.2 Example结构解析
以刚才的cifar10 数据集举例
Example:
    features {
        feature {
            key: "image"
            value {
                bytes_list {
                    value: "\377\374\375\3721356\351\365\361\350\356\352\350'
            }
    }
}
        feature {
            key: "label"
            value {
                int64_list {
                value: 9
                }
        }
    }
}
这是一个样本,样本里有两个feature,每个feature都有key 和value
- tf.train.Example 协议内存块(protocol buffer)(协议内存块包含了字段Features)
- Features包含了一个feature字段
- feature中包含要写入的数据、并指明数据类型。
- 这是一个样本的结构,批数据需要循环存入这样的结构
 cifar10
 特征值 - image - 3072个字节
 目标值 - label - 1个字节

example = tf.train.Example(features=tf.train.Features(feature={
    "image": tf.train.Feature(bytes_list=tf.train.BytesList(value=[image])),
    "label": tf.train.Feature(int64_list=tf.train.Int64List(value=[label]))
                }))

example.SerializeToString()
- tf.train.Example(features=None)
写入tfrecords文件 - features:tf.train.Features类型的特征实例
- return:example格式协议块
- tf.train.Features(feature=None)
为每个样本构建信息键-值对[En]
Build information key-value pairs for each sample
- feature: 字典数据, key为要保存的名字
- value为tf.train.Feature实例
- return:Features类型
- tf.train.Feature(options)
- options:例如
- bytes_list=tf.train. BytesList(value=[Bytes])
- int64_list=tf.train. Int64List(value=[Value])
- 支持存入的类型如下
tf.train.Int64List(value=[Value])
tf.train.BytesList(value=[Bytes])
tf.train.FloatList(value=[value])
3.4.3 案例:CIFAR10数据存入TFRecords文件
分析
- 构造存储实例,tf.python_io.TFRecordWriter(path)
- 写入tfrecords文件
- path: TFRecords文件的路径 + 文件名字
- return:写文件
- method方法
- write(record): 向文件中写入一个example
- close(): 关闭文件写入器
- 循环将数据填入到Example协议内存块(protocol buffer)
示例
CIFAR10数据存入TFRecords文件(tensorflow 2.6)
    def write_to_tfrecords(self, label_batch, image_batch):
"""
        将样本的特征值和目标值一起写入tfrecords文件
        :param label_batch:
        :param image_batch:
        :return:
"""
        with tf.io.TFRecordWriter("../usingFiles/tfrFiles/cifar10.tfrecords") as writer:

            for i in range(6):
                for j in range(1000):
                    label = label_batch[i][j][0]
                    image = image_batch[i][j]

                    image = image.numpy().tostring()
                    print("tfrecords_image:\n", image)
                    print("tfrecords_label:\n", label)

                    feature = {"image": tf.train.Feature(bytes_list=tf.train.BytesList(value=[image])),
                               "label": tf.train.Feature(int64_list=tf.train.Int64List(value=[label]))}
                    example = tf.train.Example(features=tf.train.Features(feature=feature))
                    writer.write(example.SerializeToString())
错误记录
- with tf.io.TFRecordWriter’utf-8′ codec can’t decode byte 0xd5 in position 87
错误原因:with tf.io.TFRecordWriter处的路径错误
解决方案:检查修改路径
3.4.4 读取TFRecords文件API
1)构造文件名队列
2)读取和解码
读取
解析example
feature = tf.parse_single_example(value, features={
“image”:tf.FixedLenFeature([], tf.string),
“label”:tf.FixedLenFeature([], tf.int64)
})
image = feature[“image”]
label = feature[“label”]
解码
tf.decode_raw()
3)构造批处理队列
3.5 神经网络基础
3.5.1 神经网络
人工神经网络( Artificial Neural Network,简写为ANN)也简称为神经网络(NN).
是一种模仿生物神经网络(动物的中枢神经系统,特别是大脑)结构和功能的计算模型
经典的神经网络结构由三层神经网络组成。它们是输入层、输出层和隐藏层。
[En]
The classical neural network structure consists of three levels of neural networks. They are input layer, output layer and hidden layer.
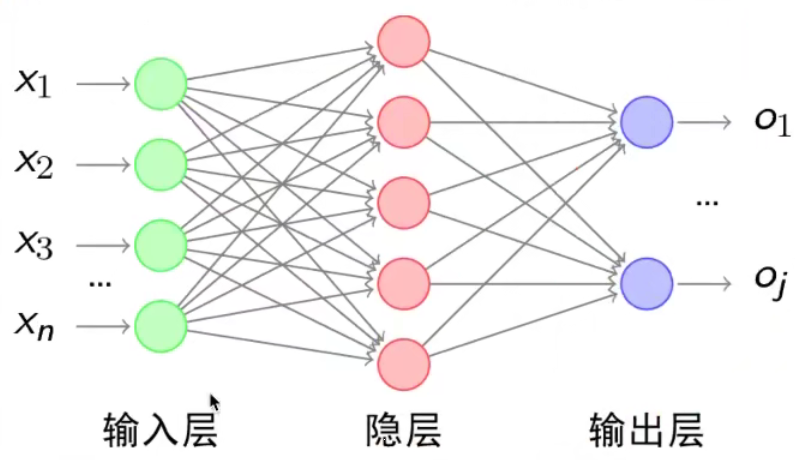
每层的圆圈代表一个神经元,隐层和输出层的神经元有输入数据进行计算和输出,输入层的神经元只是输入。
[En]
The circle of each layer represents a neuron, the neurons in the hidden layer and the output layer have the input data to calculate and output, and the neurons in the input layer are just input.
- 神经网络的特点
- 每个连接都有个权值
- 同一层神经元之间没有连接
- 最后的输出结果对应的层也称之为全连接层
- 神经网络是深度学习的重要算法,在图像(如图像的分类、检测)和自然语言处理
(如文本分类、聊天等)有很多应用。
那么,为什么要设计这样的结构呢?让我们从最基本的结构之一–神经元开始。它曾经被称为感知器。神经元旨在模拟人类神经元的结构。
[En]
So why design such a structure? Let’s start with one of the most basic structures, neurons. It used to be called a perceptron. Neurons are meant to simulate the structure of human neurons.
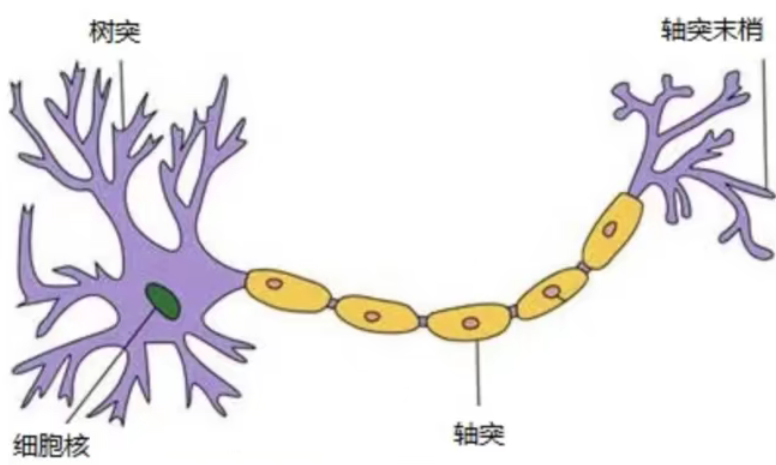
每个神经元通常有多个树突,主要用于接收传入信息;只有一个面神经轴突,轴突的尾端
[En]
Each neuron usually has multiple dendrites, which are mainly used to receive incoming information; there is only one facial axon, and the caudal end of the axon
有许多轴突末端可以将信息传递给许多其他神经元。轴突末端产生来自其他神经元的树突
[En]
There are many axon endings that can transmit information to many other neurons. Axon endings produce dendrites from other neurons
连接以传输信号。这种连接的位置在生物学上被称为“突触”。
[En]
Connect to transmit a signal. The location of this connection is biologically called a “synapse”.
感知机(PLA: Perceptron Learning Algorithm)
感知器模拟了这样一个大脑神经网络处理数据的过程。感知器模型如下所示:
[En]
The perceptron simulates the process of processing data by such a brain neural network. The perceptron model is shown below:
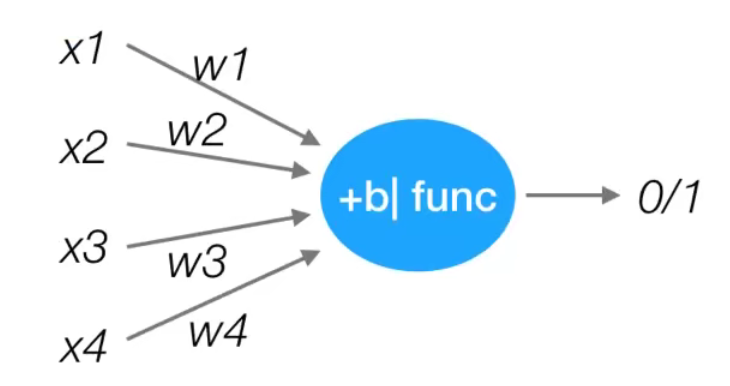
感知机是一种最基础的分类模型,类似于逻辑回归,不同的是,感知机的激活函数用的sign,而逻辑回归用的是sigmoid。感知机也具有权重和偏置:
u = ∑ i = 1 n w i x i + b y = sign ( u ) = { + 1 , u > 0 − 1 , u ≤ 0 \begin{gathered} u=\sum_{i=1}^{n} w_{i} x_{i}+b \ y=\operatorname{sign}(u)= \begin{cases}+1, & u>0 \ -1, & u \leq 0\end{cases} \end{gathered}u =i =1 ∑n w i x i +b y =s i g n (u )={+1 ,−1 ,u >0 u ≤0
我们通过一个平台去演示,就是 tensorflow playground
; 3.5.2 playground使用
网址http://playground.tensorflow.org
感知器只能解决简单的问题。
[En]
Perceptron can only solve simple problems.
单个神经元不能解决一些复杂的问题。解决方案:
[En]
A single neuron cannot solve some complex problems. Solutions:
- 多层神经元
- 增加激活函数
3.6 神经网络原理
3.6.1 softmax回归
softmax回归将神经网络转换成概率结果
softmax ( y ) i = e y i ∑ j = 1 n e y j \operatorname{softmax}(y){i}=\frac{e^{y{i}}}{\sum_{j=1}^{n} e^{y_{j}}}s o f t m a x (y )i =∑j =1 n e y j e y i

这样,神经网络的输出被改变为概率输出。
[En]
In this way, the output of the neural network is changed into a probabilistic output.
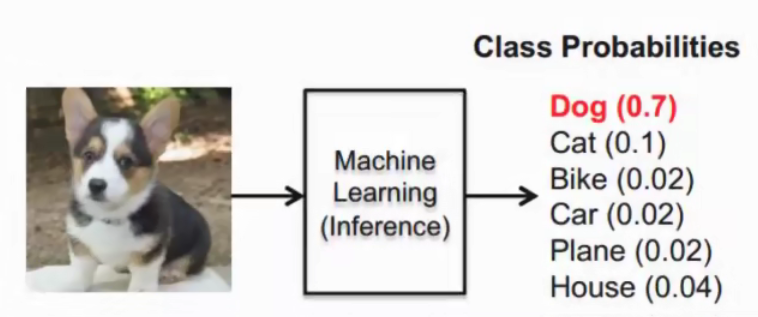
类似于逻辑回归当中的 sigmoid函数, sigmoid输出的是某个类别的概率
损失函数:
线性回归——均方误差
逻辑回归–对数似然损失
[En]
Logical regression-logarithmic likelihood loss
; 3.6.2 交叉熵损失
H y ′ ( y ) = − ∑ i y i ′ log ( y i ) H_{y^{\prime}}(y)=-\sum_{i} y_{i}^{\prime} \log \left(y_{i}\right)H y ′(y )=−i ∑y i ′lo g (y i )
为了能够衡量距离,目标值需要进行one-hot编码,能与根率值一一对应,如下图
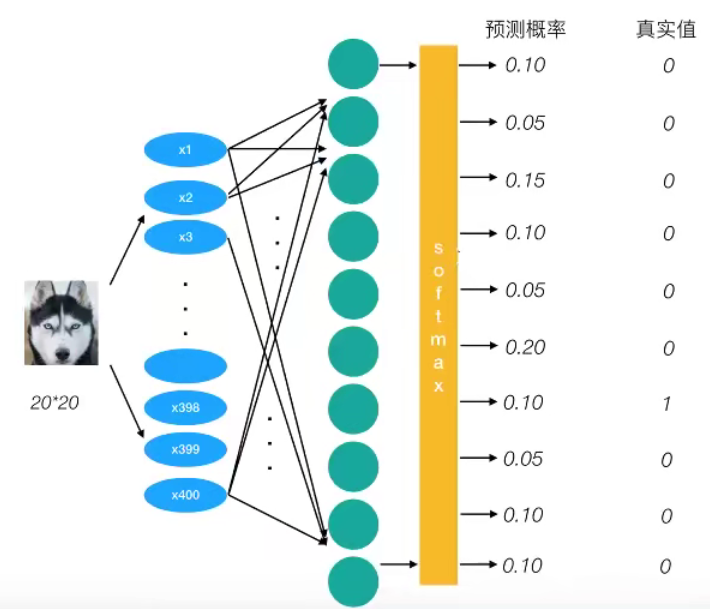
上述的结果为1log(0.10),那么为了少这一个样本的损失。神经网络应该怎么做?
所以会提高对应目标值为1的位置输出概率大小,由于 softmax公式影响,其它的概率必定会减少。只要进行这样的调整就可以预测成功了。
- 提高对应目标值为1的位置输出概率大小
总损失大小
神经网络的最终损失是每个样本的平均损失。
[En]
The final loss of the neural network is the average loss of each sample.
- 平均所有样本的损失
[En]
average the loss of all samples*
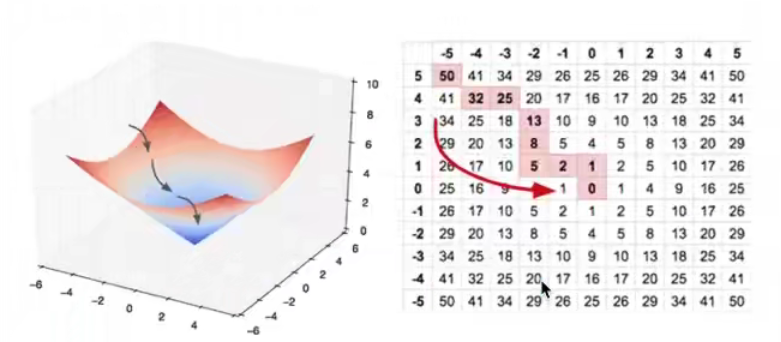
优化损失
- 梯度下降
3.6.4 softmax、交叉熵损失APl
- tf.nn. softmax cross_entropy with logits(labels=None, logits=None, name=None
计算 logits和 abels.之间的交叉损失爝 - labels:标签值(真实值)
- logits:样本加权之后的值
- return:返回损失值列表
- tf reduce_mean(input_tensor)
计算张量大小的元素平均值[En]
Calculate the element average of the size of the tensor
3.7 案例:Mnist手写数字识别
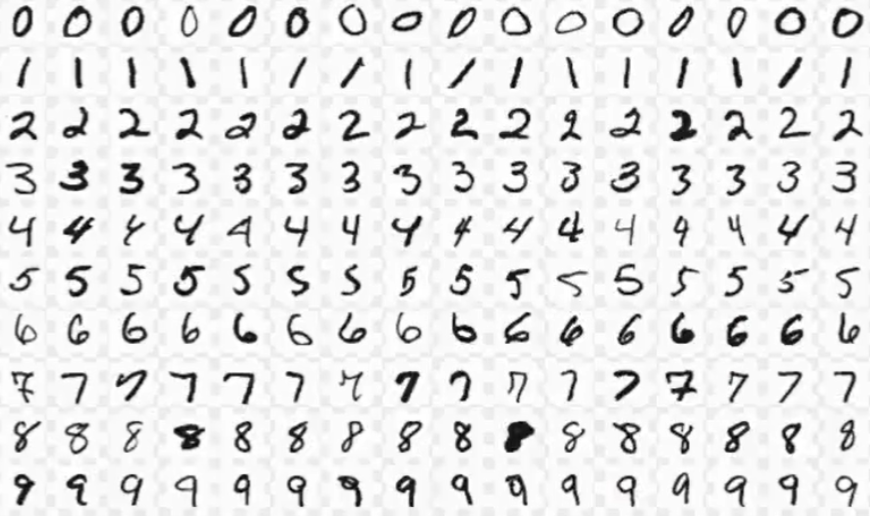
3.7.1 数据集介绍
文件说明
- train-images-idx3-ubyte. gz: training set images(9912422 bytes
- train-labels-idx1-ubyte.gz: training set labels (28881 bytes)
- t10k-images-idx3-ubyte.gz: test set images(1648877 bytes)
- t10k-labels-idx1-ubyte.gz: test set labels(4542 bytes)
网址:http://yann.lecun.com/exdb/mnist/
文件名称大小内容train-images-idx3-ubyte.gz9,681 kb55000张训练集,5000张验证集train-labels-idx1-ubyte.gz29 kb训练集图片对应的标签t10k-images-idx3-ubyte.gz1,611 kb10000张测试集t10k-labels-idx1-ubyte.gz5 kb测试集图片对应的标签
; 特征值
下载下来的数据集被分成两部分:55000行的训练数据集( mnist train)和10000行的测试数据集( mnist test)。
每一个 MNIST数据单元有两部分组成:一张包含手写数字的图片和一个对应的标签。我们把这些图片设为”xs”,把这些标签设为”ys。训练数据集和测试据集都包含xs和ys,比如训练数据集的图片是 mnist.train.images,训练数据集的标签是 mnist.train.labels
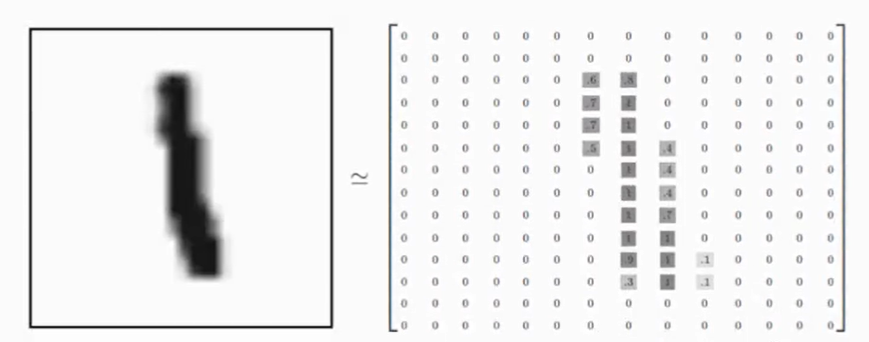
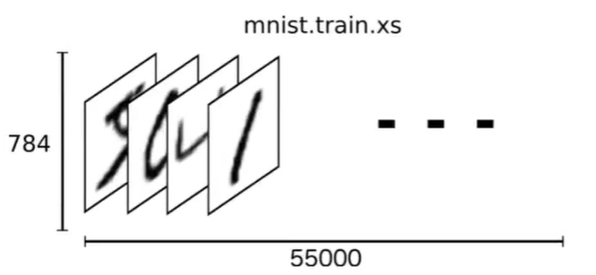
我们可以知道图片是黑白图片,每一张图片包含28像素×28像素。我们把这个数组展开成一个向量,长度是28×28=784。因此,在 MNISTT训练数据集中,mnist train. images是一个形状为[60000,784]的张量。
目标值
MNIST中的每个图像都具有相应的标签,0到9之间的数字表示图像中绘制的数字。用的是 one-hot编码nn[0,0,0, 1,0,0,0,0,0, 0] ,共有5500行,10列(mnist.train.labels [55000, 10])。

; 3.7.2 Mnist数据获取API
Tensorflow框架自帯了获取这个数据集的接口,所以不需要自行读取
from tensorflowexamples tutorials. mnist import input data
- mnist=input_ data read data sets(path, one hot=True)
- mnist. train. next batch(100(提供批量获取功能)
- mnist train images. labels
- mnist test images, labels
注: TensorFlow 2.0 去掉了mnist.train,使用方式上有区别
3.7.3实战:Mnist手写数字识别
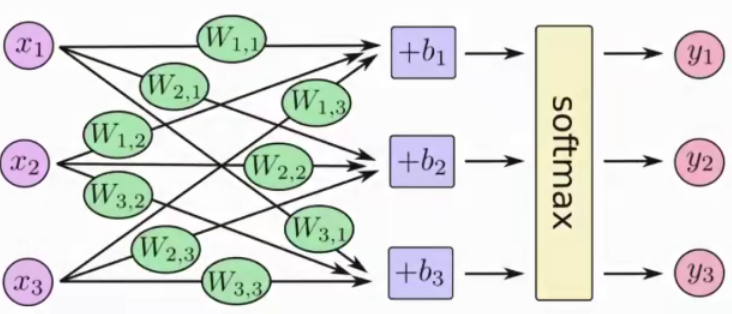
1网络设计
我们采用只有一层,即最后一个输出层的神经网络,也称之为全连接( full connected)层神经网络。
    1 特征值
        [None, 784] * W[784, 10] + Bias = [None, 10]
        构建全连接层:
        y_predict = tf.matmul(x, W) + Bias
        构造损失:
        loss = tf.nn.softmax_cross_entropy_with_logits(labels=y_true, logits=y_predict,name=None)
        如何计算准确率?

        np.argmax(y_predict, axis=1)
        tf.argmax(y_true, axis=1)
            y_predict [None, 10]
            y_true [None, 10]
        tf.equal()
        如何提高准确率?
            1)增加训练次数
            2)调节学习率
            3)调节权重系数的初始化值
            4)改变优化器
Original: https://blog.csdn.net/qq_43951094/article/details/120143993
Author: 咬着棒棒糖闯天下
Title: TensorFlow-深度学习笔记
原创文章受到原创版权保护。转载请注明出处:https://www.johngo689.com/514882/
转载文章受原作者版权保护。转载请注明原作者出处!