

1.格式化SD卡 (大于等于32G)
2.balenaEtcher-Setup-1.7.0.exe 写卡
3.连接HDMI , 进行初始设置(选择语言,时区,用户名,密码,登录方式,选择X windows 管理器)
4.连接ssh (putty,Xshell或者 electerm)
****不知道IP的 局域网扫描一下,或者路由查看一下。 最好记下mac地址,下次方便找到,当然也可以设置固定IP
登录后,先设置代理服务器,当然也可以设置国内源(国内源自查设置)
[En]
After logging in, first set up the proxy server, of course, you can also set the domestic source (domestic source self-search setting)
#设置代理服务器
  #vi The file:  ~/.bashrc
  #最后加入
  ALL_PROXY="socks5://192.168.1.9:10808"
  #保存,
  source ~/.bashrc

#Adding following line to /etc/apt/apt.conf has solved the problem:
#if file does not exist, create it. Do not confuse it with apt.conf.d directory.

vi /etc/apt/apt.conf
#Acquire::http::proxy "<http: 10.1.3.1:8080>";
Acquire::http::proxy "socks5h://192.168.1.9:10808/";

#The reason your manual export failed to affect apt-get is because sudo ignores
that environment variable by default (i.e. it doesn't pass it on to the command).

#For one-off runs, you could do
#sudo env http_proxy=http://10.1.3.1:8080 apt-get update
#Otherwise, you could configure sudo to allow http_proxy to fall through.

#also if proxy using authentication then provide the details as
#sudo env http_proxy=http://<userid>:<password>@10.1.3.1:8080 apt-get update

</password></userid></http:>
5.安装vnc
1). Open a terminal window (putty,Xshell或者 electerm)
2). Update the list of available software
如果未设置代理,请在命令行上使用代理格式,如下所示
[En]
If you do not set up a proxy, use the proxy format on the command line as follows
sudo apt -o Acquire::http::proxy="socks5h://192.168.1.9:10808/" update
#如果配置文件中设置了代理,命令行不用代理
#把  -o Acquire::http::proxy="socks5h://192.168.1.9:10808/"  去掉
sudo apt update
sudo apt-get update
3). 安装2个
 1-  VNC SERVER  系统自带VINO(比较卡),端口5900

 2 -  TightVNCServer  端口 5901 比较快
a. 设置系统自带Vino Server
#Enable the VNC server to start each time you log inIf you have a Jetson Nano 2GB Developer Kit (running LXDE)
#FOR LXDE桌面环境
mkdir -p ~/.config/autostart
cp /usr/share/applications/vino-server.desktop ~/.config/autostart/.

#For all other Jetson developer kits (running GNOME)
#FOR GNOME 桌面环境
cd /usr/lib/systemd/user/graphical-session.target.wants
sudo ln -s ../vino-server.service ./.

#Configure the VNC server
gsettings set org.gnome.Vino prompt-enabled false
gsettings set org.gnome.Vino require-encryption false
#Set a password to access the VNC server# Replace thepassword with your desired password
gsettings set org.gnome.Vino authentication-methods "['vnc']"
gsettings set org.gnome.Vino vnc-password $(echo -n 'yourpassword'|base64)
#Reboot the system so that the settings take effect
sudo reboot

#以上服务监听在5900端口
b.安装tightvncserver
sudo apt-get -o Acquire::http::proxy="socks5h://192.168.1.9:10808/" install tightvncserver

#更改 .vnc/xstartup 脚本(不确定是否是这个起作用)。 等下次重装验证
#保存退出

#终端输入
/usr/bin/tightvncserver -geometry 1920x1080 -depth 24
#会提示输入密码
#注意depth 放24
#Edit crontab via a Terminal to start tightvncserver on boot

sudo crontab -e

Add this line to the bottom of crontab.

@reboot su - fox -c '/usr/bin/tightvncserver -geometry 1920x1080 -depth 24'

#有问题自己查看log  在家目录 .vnc 目录下, 自己搜索解决
#会自己打开端口5901

#以上,重启一下看看端口5900   5901 是否都打开,如果都开那就拔显示器,键盘,鼠标, 以后用NVC和终端登录就可以了。

netstat -an | grep 590
6.接VNC server, 这里使用VNC Viewer
7.VNC下更新软件 (preferences – software updater)
- 终端下安装python3-dev pip3 pip setuptools testresources
sudo apt-get install python3-pip python3-dev
#先安装socks support 要不然代理安装要出错
git clone <https: github.com anorov pysocks>
cd PySocks/
sudo python3 setup.py install
sudo apt-get install libhdf5-serial-dev hdf5-tools libhdf5-dev zlib1g-dev zip libjpeg8-dev liblapack-dev libblas-dev gfortran
sudo pip3 install -U pip testresources setuptools==49.6.0 --proxy=socks5://192.168.1.9:10808 (参照Nvidia 安装tensorflow文档)
#sudo pip3 install -U pip testresources setuptools --proxy=socks5://192.168.1.9:10808
#安装jetson-stats 查看信息
sudo pip3 install jetson-stats --proxy=socks5://192.168.1.9:10808
sudo reboot
jtop
sudo jetson_release
</https:>
【 安装python3后使用pip和pip3的区别是什么?
1、其实这两个命令效果是一样的,没有区别:
(1)比如安装库numpy,pip3 install numpy或者pip install numpy:只是当一台电脑同时有多个版本的Python的时候,用pip3就可以自动区分用Python3来安装库。是为了避免和Python2发生冲突的。
(2)如果你的电脑只安装了Python3,那么不管用pip还是pip3都一样的。
2、安装了python3之后,会有pip3
(1)使用pip install XXX :
新安装的库会放在这个目录下面:python2.7/site-packages;
(2)使用pip3 install XXX :
新安装的库会放在这个目录下面:python3.6/site-packages;
(3)如果使用python3执行程序,那么就不能import python2.7/site-packages中的库。
】
9.Install the Python package dependencies.
$ sudo pip3 install -U --no-deps numpy==1.19.4 future==0.18.2 mock==3.0.5 keras_preprocessing==1.1.2 keras_applications==1.0.8 gast==0.4.0 futures protobuf pybind11 cython pkgconfig    --proxy=socks5://192.168.1.9:10808
$ sudo env H5PY_SETUP_REQUIRES=0 pip3 install -U --no-build-isolation h5py==3.1.0  --proxy=socks5://192.168.1.9:10808

 --no-build-isolation
#Successfully installed cached-property-1.5.2 h5py-3.1.0  真不容易
10.安装tensorflow
Note: As of the 20.02 TensorFlow release, the package name has changed from tensorflow-gpu to tensorflow. See the section on Upgrading TensorFlow for more information.
Install TensorFlow using the pip3 command. This command will install the latest version of TensorFlow compatible with JetPack 4.6.
sudo pip3 install --pre --extra-index-url <https: developer.download.nvidia.com compute redist jp v46> tensorflow   --proxy=socks5://192.168.1.9:10808

#Successfully installed absl-py-0.12.0 astunparse-1.6.3 cachetools-4.2.4 charset-normalizer-2.0.7 clang-5.0 dataclasses-0.8 flatbuffers-1.12 google-auth-2.3.3 google-auth-oauthlib-0.4.6 google-pasta-0.2.0 grpcio-1.42.0 importlib-metadata-4.8.2 keras-2.7.0 markdown-3.3.6 oauthlib-3.1.1 opt-einsum-3.3.0 pyasn1-0.4.8 pyasn1-modules-0.2.8 requests-2.26.0 requests-oauthlib-1.3.0 rsa-4.7.2 six-1.15.0 tensorboard-2.7.0 tensorboard-data-server-0.6.1 tensorboard-plugin-wit-1.8.0 tensorflow-2.6.0+nv21.11 tensorflow-estimator-2.7.0 termcolor-1.1.0 typing-extensions-3.7.4.3 werkzeug-2.0.2 wheel-0.37.0 wrapt-1.12.1 zipp-3.6.0

</https:>
测试
python3
import tensorflow

#If TensorFlow was installed correctly, this command should execute without error.
- 设置CUda库路径
etson Nano官方镜像安装后,系统自带JetPack,cuda,cudaa,OpenCV等组件,但是需要修改下环境变量才可以使用。
利用nano打开 ~ 路径下.bashrc文件
sudo nano ~/.bashrc
在文件的末尾添加以下三行
[En]
Add the following three lines at the end of the file
export CUBA_HOME=/usr/local/cuda
export LD_LIBRARY_PATH=/usr/local/cuda/lib64:$LD_LIBRARY_PATH
export PATH=/usr/local/cuda/bin:$PATH
直接生效.bashrc文件
source ~/.bashrc
输入nvcc -V命令进行查看版本并测试
- 检查cuDNN
sudo apt-get install libfreeimage3 libfreeimage-dev
cd /usr/src/cudnn_samples_v8/mnistCUDNN/
sudo make clean
sudo make
./mnistCUDNN
- 检查openCV
pkg-config opencv4 --modversion

#version 4.1.1
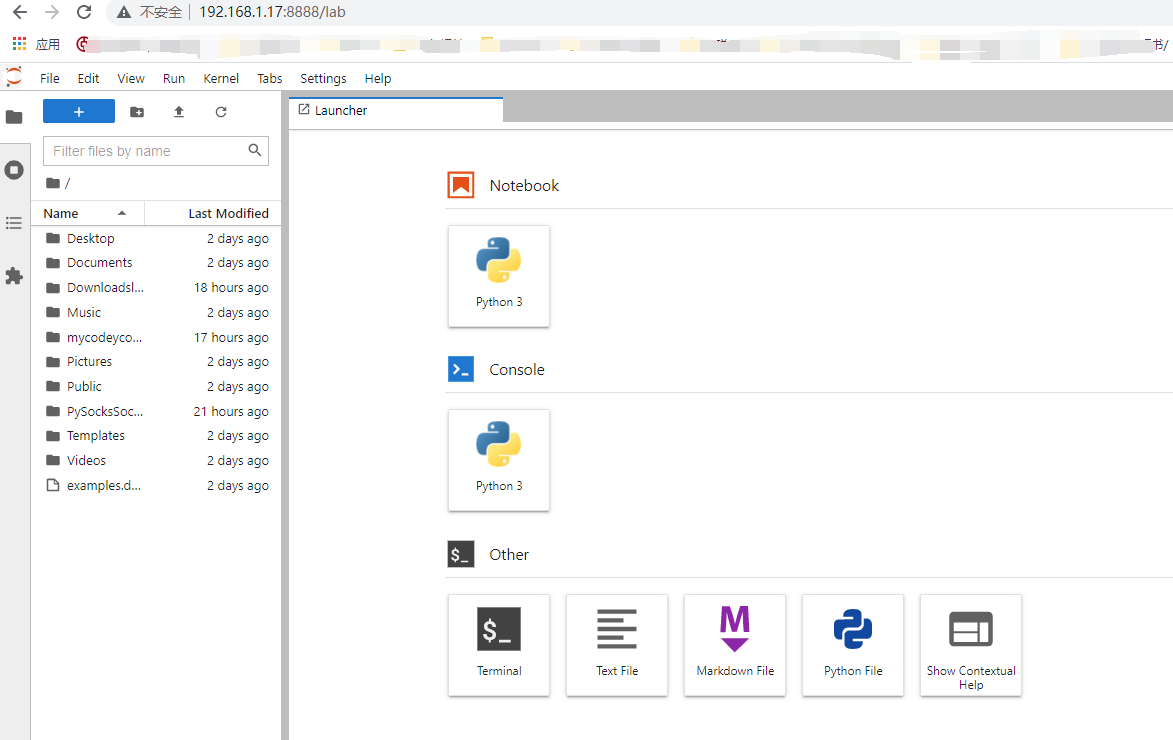
- 远程登录jupyter notebook
Jetson Nano上安装jupyter notebook ,然后再开启远程登录。
wget <https: nodejs.org dist v12.13.0 node-v12.13.0-linux-arm64.tar.xz>
tar -xJf node-v12.13.0-linux-arm64.tar.xz
cd node-v12.13.0-linux-arm64
sudo cp -R * /usr/local/
node -v

sudo apt install  npm
npm -v

sudo pip3 install jupyter jupyterlab --proxy=socks5://192.168.1.9:10808

#sudo npm cache clean --force

sudo jupyter labextension install @jupyter-widgets/jupyterlab-manager
#sudo jupyter labextension install @jupyterlab/statusbar
</https:>
在服务器上配置jupyter设置远程登录
1)生成配置文件(~/.jupyter/jupyter_notebook_config.py)
jupyter notebook --generate-config

#jupyter server --generate-config  没测试
2)生成密钥
先进入python环境,执行
Type "help", "copyright", "credits" or "license" for more information.

>>> from notebook.auth import passwd
>>> passwd()
Enter password:
Verify password:
'argon2:$argon2i$v**********************************'
>>>
from notebook.auth import passwd
passwd()
此时会让你两次输入密码(该密码作为客户端登录jupyter用),然后就会生成秘钥 (秘钥作为配置文件用)
3)编辑配置文件 (好像server和notebook配置分开了,整天瞎折腾)
vim ~/.jupyter/jupyter_notebook_config.py
c.NotebookApp.open_browser = False # 禁止自动打开浏览器
cp ~/.jupyter/jupyter_notebook_config.py ~/.jupyter/jupyter_server_config.py
vim ~/.jupyter/jupyter_server_config.py
c.ServerApp.ip = '0.0.0.0'     # 就是设置所有ip皆可访问。(这句是关键)
c.ServerApp.password = u'argon2:$argon2i$v=19$m=10240,t=10,p=8$S9CG7OsSurSChOcHorxCgA$f6SDSnwcmXfQbGWLH7A+YA'  # 刚才复制的那个密文
c.ServerApp.root_dir = u'/home/fox'  #配置默认目录
c.ServerApp.port = 8888    #指定端口
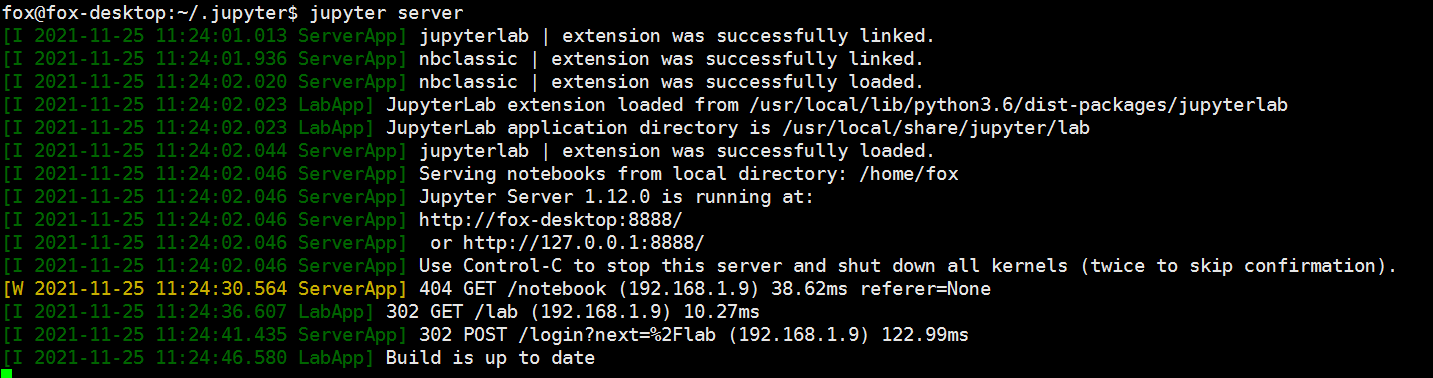
4) 在服务器端启动 jupyter server

四、pycharm远程连接 Jetson Nano
下图无法点开的,请安装pycharm专业版
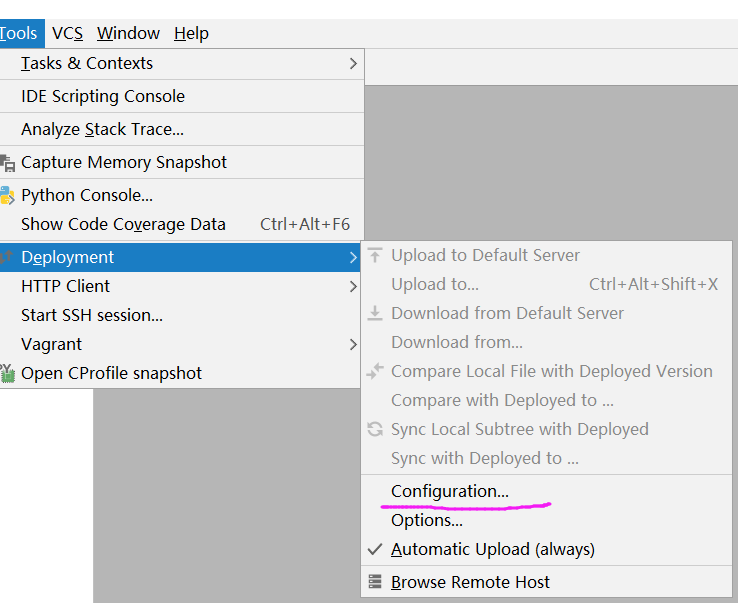
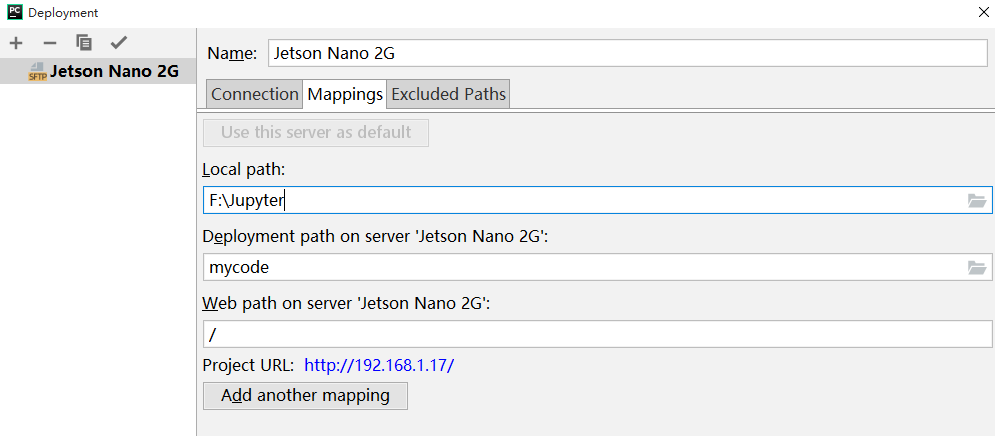
新建sftp远程连接到 Jetson Nano,输入用户名密码测试一下。
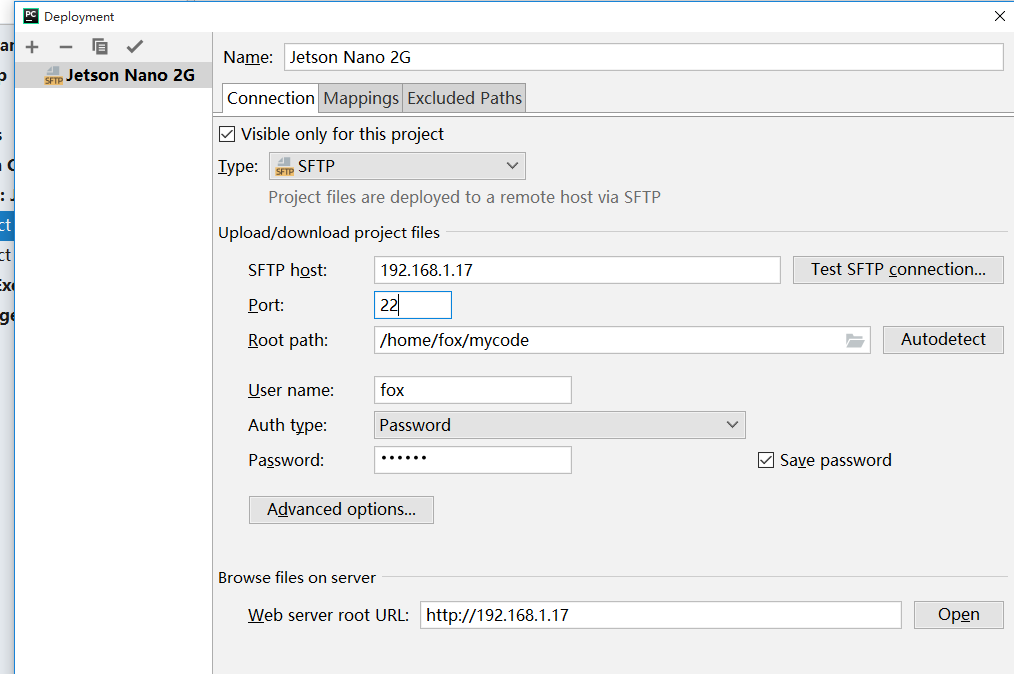
设置开发路径mappings
File -> Setting -> Project Interpreter 点击齿轮添加解析器
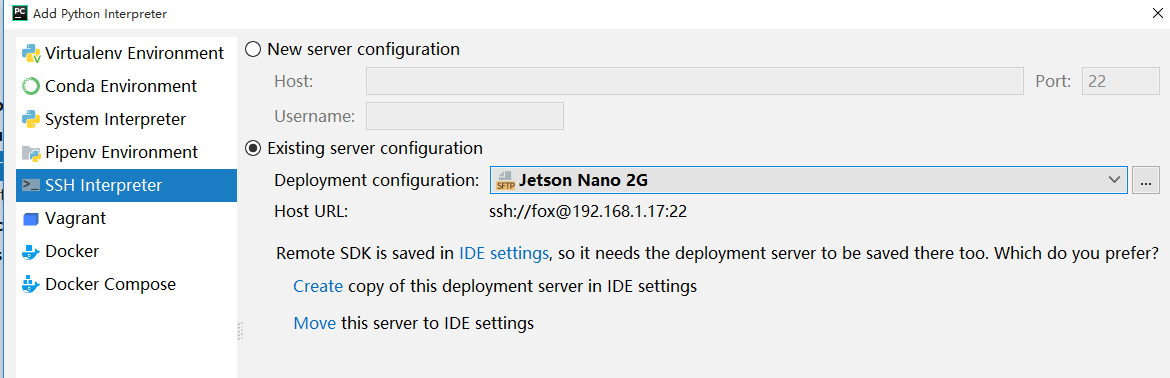
设置远程python包环境,这个具体要在nano里查。
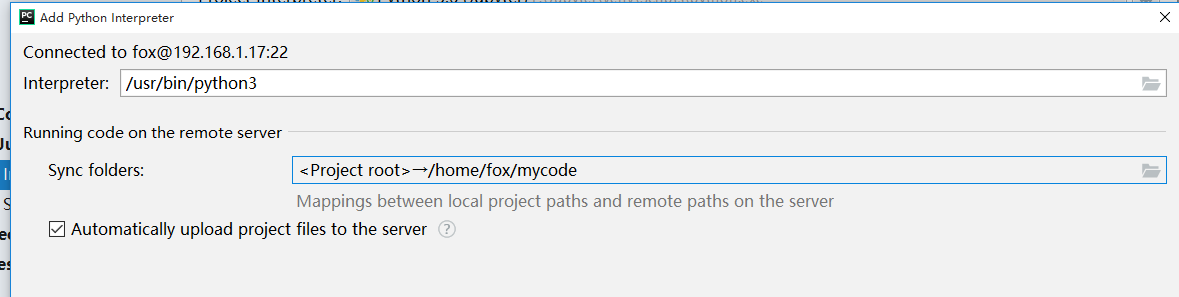
pip3 –version 就会输出路径位置
pip 21.3.1 from /usr/local/lib/python3.6/dist-packages/pip (python 3.6)
用的python3.6
which python3
/usr/bin/python3
将路径设置成 /usr/bin/python3 。
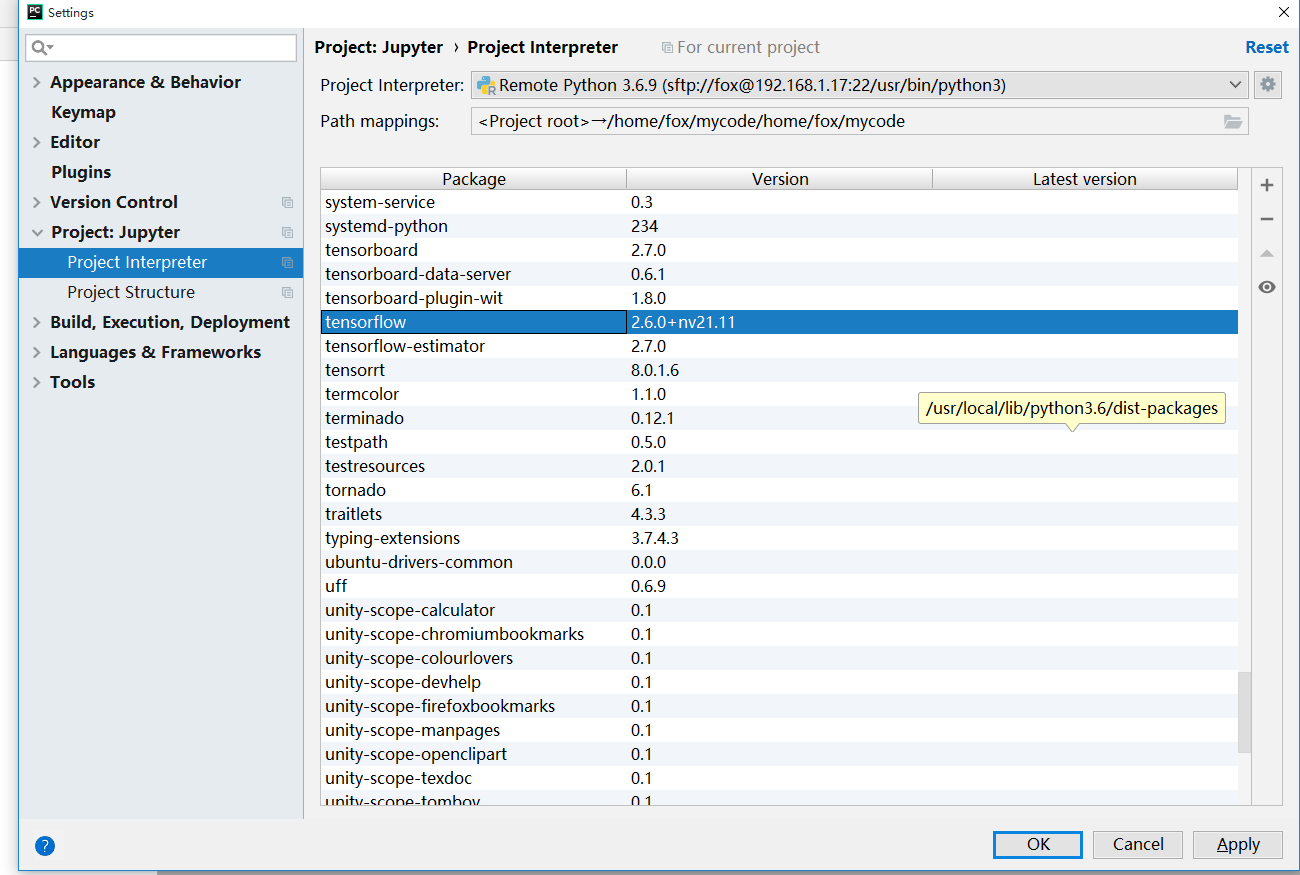
可以看到有在nano里安装的tensorflow-gpu
直接运行示例代码,文件会自动上传到Jeson Nano 里指定的目录,并直接运行。
Original: https://blog.csdn.net/chengweifox/article/details/121534104
Author: chengweifox
Title: JETSON NANO 2G 安装 TensorFlow 2.6 & Jupyter Server
原创文章受到原创版权保护。转载请注明出处:https://www.johngo689.com/514388/
转载文章受原作者版权保护。转载请注明原作者出处!