

Python3+Dlib实现简单人脸识别案例
写在前边
很早很早之前,当我还是一个傻了吧唧的专科生的时候,我就听说过人脸识别,听说过算法,听说过人工智能,并且也出生牛犊不怕虎般的学习过TensorFlow,结果嘞,被虎啃得连渣都不剩!从此再也不敢接触算法和人工智能了、、、
但是!BUT!在自己经历的事情多了之后,在受打击到习以为常了之后, 在努力半天仍旧一事无成之后,你就会悟出一个道理 —— 老子从未成功过,又怕哪门子失败!
于是,对数学一无所知的我毅然走上了一条不归路。
[En]
So, knowing nothing about mathematics, I resolutely embarked on a road of no return again.
—— 来自一只一事无成的小菜鸡
项目介绍
我想做的是一个类似于人脸识别的东西。看到网上也是有很多的开源库提供使用,为开发提供了很大的方便。我选择目前用的比较多的dlib库进行人脸识别与特征标定。使用python也缩短了开发周期。
官网对于dlib的介绍是:Dlib包含广泛的机器学习算法。所有的设计都是高度模块化的,快速执行,并且通过一个干净而现代的C ++ API,使用起来非常简单。它用于各种应用,包括机器人技术,嵌入式设备,手机和大型高性能计算环境。
尽管解释都很高大上,但是呢,对于我这种小菜鸡而言,利用他的九牛一毛做一些小的demo也很不错。
开发环境的搭建
因为我的操作系统是Linux的,所以我使用Linux来记录,windows需要安装的东西都是一样的,只不过有个别包安装起来有点麻烦,不过不是问题。
1、安装 Python 。
如果是Linux系统自带Python2和Python3,可以根据自己的需要设置Python默认版本。
2、安装 opencv。
3、安装 dlib。
4、安装 python-skimage。
5、如果想要使用人脸模型特征标定的话,还需要一个人脸面部形状预测器。
这可以通过你自己的照片来训练,或者你可以从互联网上下载一些上帝训练的照片。点击下载:
[En]
This can be trained through your own photos, or you can download some God-trained ones from the Internet. Click to download:
http://dlib.net/files/shape_predictor_68_face_landmarks.dat.bz2
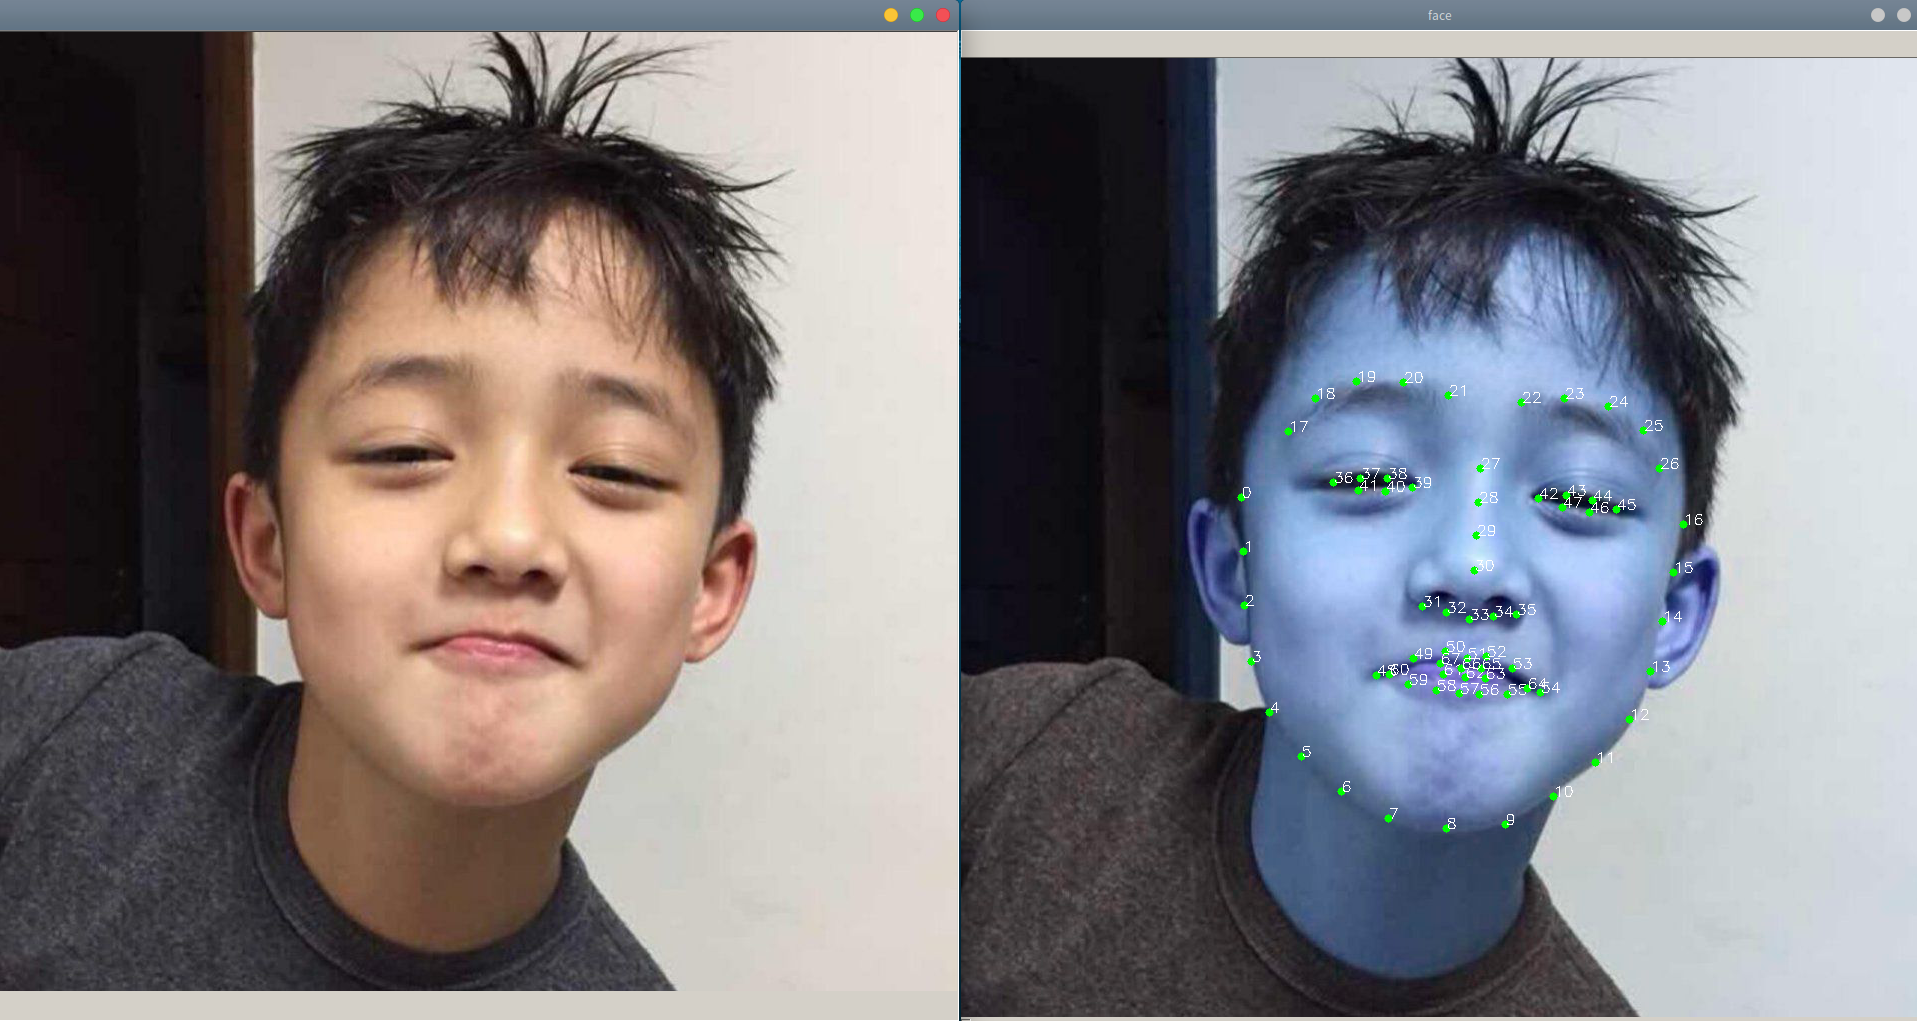
实现图片的人脸检测
import cv2import dlibfrom skimage import io# 使用特征提取器get_frontal_face_detectordetector = dlib.get_frontal_face_detector()# dlib的68点模型,使用作者训练好的特征预测器predictor = dlib.shape_predictor("shape_predictor_68_face_landmarks.dat")# 图片所在路径img = io.imread("2.jpg")# 生成dlib的图像窗口win = dlib.image_window()win.clear_overlay()win.set_image(img)# 特征提取器的实例化dets = detector(img, 1)print("人脸数:", len(dets))for k, d in enumerate(dets): print("第", k + 1, "个人脸d的坐标:", "left:", d.left(), "right:", d.right(), "top:", d.top(), "bottom:", d.bottom()) width = d.right() - d.left() heigth = d.bottom() - d.top() print('人脸面积为:', (width * heigth)) # 利用预测器预测 shape = predictor(img, d) # 标出68个点的位置 for i in range(68): cv2.circle(img, (shape.part(i).x, shape.part(i).y), 4, (0, 255, 0), -1, 8) cv2.putText(img, str(i), (shape.part(i).x, shape.part(i).y), cv2.FONT_HERSHEY_SIMPLEX, 0.5, (255, 255, 255)) # 显示一下处理的图片,然后销毁窗口 cv2.imshow('face', img) cv2.waitKey(0)


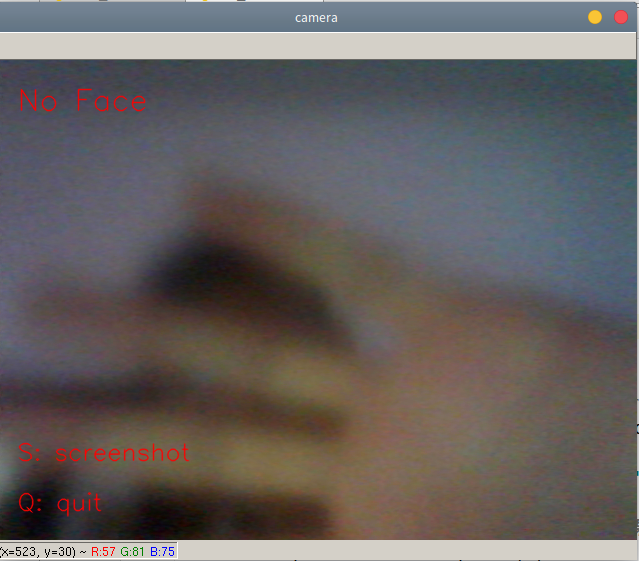
利用摄像头实现人脸识别情绪检测
#!Anaconda/anaconda/python# coding: utf-8"""从视屏中识别人脸,并实时标出面部特征点"""import dlib # 人脸识别的库dlibimport numpy as np # 数据处理的库numpyimport cv2 # 图像处理的库OpenCvclass face_emotion(): def __init__(self): # 使用特征提取器get_frontal_face_detector self.detector = dlib.get_frontal_face_detector() # dlib的68点模型,使用作者训练好的特征预测器 self.predictor = dlib.shape_predictor("shape_predictor_68_face_landmarks.dat") # 建cv2摄像头对象,这里使用电脑自带摄像头,如果接了外部摄像头,则自动切换到外部摄像头 self.cap = cv2.VideoCapture(0) # 设置视频参数,propId设置的视频参数,value设置的参数值 self.cap.set(3, 480) # 截图screenshoot的计数器 self.cnt = 0 def learning_face(self): # 眉毛直线拟合数据缓冲 line_brow_x = [] line_brow_y = [] # cap.isOpened() 返回true/false 检查初始化是否成功 while (self.cap.isOpened()): # cap.read() # 返回两个值: # 一个布尔值true/false,用来判断读取视频是否成功/是否到视频末尾 # 图像对象,图像的三维矩阵 flag, im_rd = self.cap.read() # 每帧数据延时1ms,延时为0读取的是静态帧 k = cv2.waitKey(1) # 取灰度 img_gray = cv2.cvtColor(im_rd, cv2.COLOR_RGB2GRAY) # 使用人脸检测器检测每一帧图像中的人脸。并返回人脸数rects faces = self.detector(img_gray, 0) # 待会要显示在屏幕上的字体 font = cv2.FONT_HERSHEY_SIMPLEX # 如果检测到人脸 if (len(faces) != 0): # 对每个人脸都标出68个特征点 for i in range(len(faces)): # enumerate方法同时返回数据对象的索引和数据,k为索引,d为faces中的对象 for k, d in enumerate(faces): # 用红色矩形框出人脸 cv2.rectangle(im_rd, (d.left(), d.top()), (d.right(), d.bottom()), (0, 0, 255)) # 计算人脸热别框边长 self.face_width = d.right() - d.left() # 使用预测器得到68点数据的坐标 shape = self.predictor(im_rd, d) # 圆圈显示每个特征点 for i in range(68): cv2.circle(im_rd, (shape.part(i).x, shape.part(i).y), 2, (0, 255, 0), -1, 8) # cv2.putText(im_rd, str(i), (shape.part(i).x, shape.part(i).y), cv2.FONT_HERSHEY_SIMPLEX, 0.5, # (255, 255, 255)) # 分析任意n点的位置关系来作为表情识别的依据 mouth_width = (shape.part(54).x - shape.part(48).x) / self.face_width # 嘴巴咧开程度 mouth_higth = (shape.part(66).y - shape.part(62).y) / self.face_width # 嘴巴张开程度 # print("嘴巴宽度与识别框宽度之比:",mouth_width_arv) # print("嘴巴高度与识别框高度之比:",mouth_higth_arv) # 通过两个眉毛上的10个特征点,分析挑眉程度和皱眉程度 brow_sum = 0 # 高度之和 frown_sum = 0 # 两边眉毛距离之和 for j in range(17, 21): brow_sum += (shape.part(j).y - d.top()) + (shape.part(j + 5).y - d.top()) frown_sum += shape.part(j + 5).x - shape.part(j).x line_brow_x.append(shape.part(j).x) line_brow_y.append(shape.part(j).y) # self.brow_k, self.brow_d = self.fit_slr(line_brow_x, line_brow_y) # 计算眉毛的倾斜程度 tempx = np.array(line_brow_x) tempy = np.array(line_brow_y) z1 = np.polyfit(tempx, tempy, 1) # 拟合成一次直线 self.brow_k = -round(z1[0], 3) # 拟合出曲线的斜率和实际眉毛的倾斜方向是相反的 brow_hight = (brow_sum / 10) / self.face_width # 眉毛高度占比 brow_width = (frown_sum / 5) / self.face_width # 眉毛距离占比 # print("眉毛高度与识别框高度之比:",round(brow_arv/self.face_width,3)) # print("眉毛间距与识别框高度之比:",round(frown_arv/self.face_width,3)) # 眼睛睁开程度 eye_sum = (shape.part(41).y - shape.part(37).y + shape.part(40).y - shape.part(38).y + shape.part(47).y - shape.part(43).y + shape.part(46).y - shape.part(44).y) eye_hight = (eye_sum / 4) / self.face_width # print("眼睛睁开距离与识别框高度之比:",round(eye_open/self.face_width,3)) # 分情况讨论 # 张嘴,可能是开心或者惊讶 if round(mouth_higth >= 0.03): if eye_hight >= 0.056: cv2.putText(im_rd, "amazing", (d.left(), d.bottom() + 20), cv2.FONT_HERSHEY_SIMPLEX, 0.8, (0, 0, 255), 2, 4) else: cv2.putText(im_rd, "happy", (d.left(), d.bottom() + 20), cv2.FONT_HERSHEY_SIMPLEX, 0.8, (0, 0, 255), 2, 4) # 没有张嘴,可能是正常和生气 else: if self.brow_k cv2.putText(im_rd, "angry", (d.left(), d.bottom() + 20), cv2.FONT_HERSHEY_SIMPLEX, 0.8, (0, 0, 255), 2, 4) else: cv2.putText(im_rd, "nature", (d.left(), d.bottom() + 20), cv2.FONT_HERSHEY_SIMPLEX, 0.8, (0, 0, 255), 2, 4) # 标出人脸数 cv2.putText(im_rd, "Faces: " + str(len(faces)), (20, 50), font, 1, (0, 0, 255), 1, cv2.LINE_AA) else: # 没有检测到人脸 cv2.putText(im_rd, "No Face", (20, 50), font, 1, (0, 0, 255), 1, cv2.LINE_AA) # 添加说明 im_rd = cv2.putText(im_rd, "S: screenshot", (20, 400), font, 0.8, (0, 0, 255), 1, cv2.LINE_AA) im_rd = cv2.putText(im_rd, "Q: quit", (20, 450), font, 0.8, (0, 0, 255), 1, cv2.LINE_AA) # 按下s键截图保存 if (k == ord('s')): self.cnt += 1 cv2.imwrite("screenshoot" + str(self.cnt) + ".jpg", im_rd) # 按下q键退出 if (k == ord('q')): break # 窗口显示 cv2.imshow("camera", im_rd) # 释放摄像头 self.cap.release() # 删除建立的窗口 cv2.destroyAllWindows()if __name__ == "__main__": my_face = face_emotion() my_face.learning_face()
写在后面
OK,我承认,这不是我写的,我很菜,写不出来,站在巨人的脚指甲盖上做出来的,好的,其实是把人家代码拷贝下来自己改的,也没改多少。
[版权声明]本博客版权归作者所有,任何形式的转载,请联系作者授权并注明出处!
[En]
[copyright notice] the copyright of this blog belongs to the author, any form of reprint, please contact the author for authorization and indicate the source!
[重要提示]这篇文章是我的学习记录。争论和意见只代表个人,并不代表当时技术的真相。目的是为了自学,有幸成为可以与他人分享的经验,所以如果有错误,他们会虚心接受改正。但这并不意味着现在的博客帖子是正确的!
[En]
[important note] this article is my learning record. Arguments and opinions only represent individuals and do not represent the truth of technology at that time. The purpose is to self-study and be lucky enough to become experiences that can be shared with others, so if there are mistakes, they will accept correction modestly. But it does not mean that the blog posts are correct at this moment!
【Gitee地址】秦浩铖:https://gitee.com/wjw1014
Original: https://blog.51cto.com/wjw1014/5412223
Author: 我是ed同学
Title: Python3+Dlib实现简单人脸识别案例
原创文章受到原创版权保护。转载请注明出处:https://www.johngo689.com/513886/
转载文章受原作者版权保护。转载请注明原作者出处!