

环境如下:
tensorflow2.5.0 /
tensorrt8.0/
cuda11.0/
pycuda2021/
bazel3.7.2/
python3.8/
cudatoolkit11.02
感觉现在的tensorflow 好难用,就连安装也没个配置选择,直接就是pip install tensorflow 。。直接晕菜!
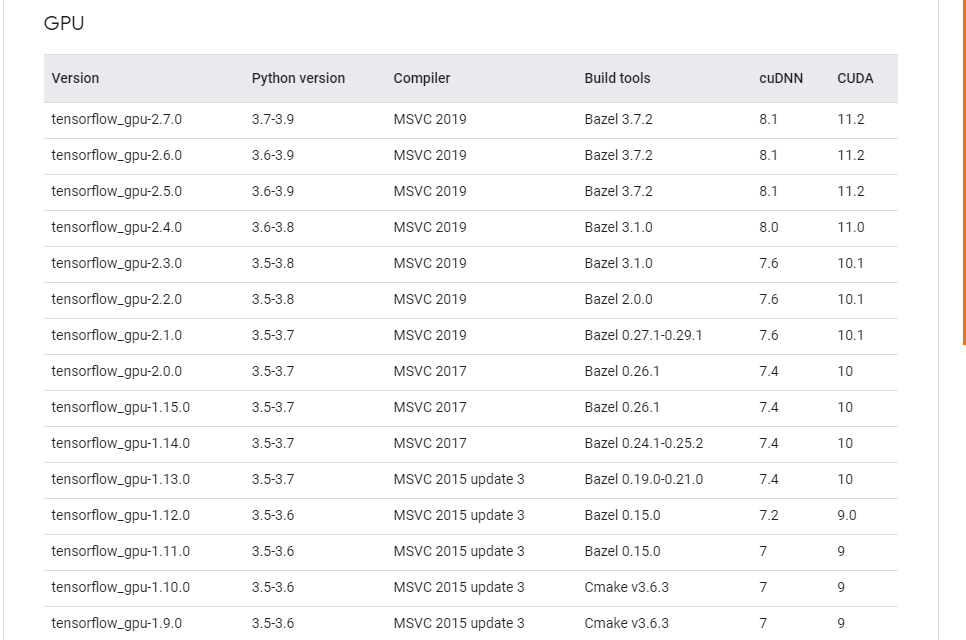
先在anaconda 中创建环境python3.8 以及安装cudatoolkit11.0.2,. anaconda会默认安装cudatoolkit10.1, 所以要先安装11.0。然后在终端安装tensorflow 2.5.0: pip install tensorflow-gpu==2.5.0 , anaconda 只能装2.4.1,更系anaconda 也不行。
tensorrt8.0 下载:cuda11.0
https://developer.nvidia.com/nvidia-tensorrt-8x-download
TensorRT 8.0 EA for Linux x86_64 and CUDA 11.0 TAR package
解压后,进入TensorRT-8.0.0.3/python:根据python版本选择要安装的包:
pip install tensorrt-8.0.0.3-cp38-none-linux_x86_64.whl
进入uff 文件夹:pip install uff-0.6.9-py2.py3-none-any.whl
进入graphsurgeon 文件夹: pip install graphsurgeon-0.4.5-py2.py3-none-any.whl
配置环境变量:
vi ~/.bashrc:
export LD_LIBRARY_PATH=$LD_LIBRARY_PATH:/home/yao/TensorRT-8.0.0.3/lib
更新一下: source ~/.bashrc
测试一下tensorrt, 在终端或者pycharm 中import tensorrt
如果报错:
libnvrtc.so.11.0: cannot open shared object file: No such file or directory
就在pycharm 中添加环境变量:LD_LIBRARY_PATH=/home/yao/TensorRT-8.0.0.3/lib
可以查询一下 libnvrtc.so.11.0 文件是否存在:sudo find -name libnvrtc.so.11* ,
这个文件就是cudatoolkit11.02 产生的,所以一开始就强调安装。
接着安装bazel3.7.2:
Releases · bazelbuild/bazel · GitHub
选择 bazel-3.7.2-installer-linux-x86_64.sh ,下载后解压。
安装:
chmod +x bazel-3.7.2-installer-linux-x86_64.sh
./bazel-3.7.2-installer-linux-x86_64.sh –user
添加环境变量:
export PATH=”$PATH:$HOME/bin”
测试一下:
终端输入:bazel 有信息,没报错就ok.
查看tensorflow2.0 pb 模型的输入输出:
方法一:
from tensorflow.python.framework import tensor_util
from google.protobuf import text_format
import tensorflow as tf
from tensorflow.python.platform import gfile
from tensorflow.python.framework import tensor_util

GRAPH_PB_PATH = 'models/middlebury_d400.pb'  # path to your .pb file
with tf.compat.v1.Session() as sess:
    print("load graph")
    with gfile.FastGFile(GRAPH_PB_PATH, 'rb') as f:
        graph_def = tf.compat.v1.GraphDef()
        # Note: one of the following two lines work if required libraries are available
        # text_format.Merge(f.read(), graph_def)
        graph_def.ParseFromString(f.read())
        tf.import_graph_def(graph_def, name='')
        for i, n in enumerate(graph_def.node):
            print("Name of the node - %s" % n.name)
方法2:先github 上下载tensorflow2.5.0 源码,然后编译执行:
bazel build tensorflow/tools/graph_transforms:summarize_graph
bazel-bin/tensorflow/tools/graph_transforms/summarize_graph
–in_graph=tensorflow_inception_graph.pb
方法3:
with tf.io.gfile.GFile(MODEL_DIR, "rb") as f:
    graph_def = tf.compat.v1.GraphDef()
    graph_def.ParseFromString(f.read())
with tf.Graph().as_default() as graph:  #
    tf.import_graph_def(graph_def, name="")
    for op in graph.get_operations():  #
        print(op.name, op.values())
tensorflow pb模型转onnx:
安装tf2onnx: pip install -m tf2onnx
https://github.com/onnx/tensorflow-onnx
执行:
python -m tf2onnx.convert
–input Documents/HITNET-tf/models/middlebury_d400.pb
–inputs input:0
–outputs reference_output_disparity:0
–output Documents/HITNET-tf/models/model.onnx
–verbose
–opset 12
opset 要 改为12版本,不然报错: ERROR – tf2onnx.tfonnx: Failed to convert node……
执行成功:
……
2022-02-16 14:47:56,156 – VERBOSE – tf2onnx.optimizer: Apply merge_duplication
2022-02-16 14:47:56,493 – VERBOSE – tf2onnx.optimizer.MergeDuplicatedNodesOptimizer: no change
2022-02-16 14:47:56,493 – VERBOSE – tf2onnx.optimizer: Apply reshape_optimizer
2022-02-16 14:47:56,726 – VERBOSE – tf2onnx.optimizer.ReshapeOptimizer: no change
2022-02-16 14:47:56,726 – VERBOSE – tf2onnx.optimizer: Apply global_pool_optimizer
2022-02-16 14:47:57,047 – VERBOSE – tf2onnx.optimizer.GlobalPoolOptimizer: no change
2022-02-16 14:47:57,047 – VERBOSE – tf2onnx.optimizer: Apply q_dq_optimizer
2022-02-16 14:47:57,270 – VERBOSE – tf2onnx.optimizer.QDQOptimizer: no change
2022-02-16 14:47:57,270 – VERBOSE – tf2onnx.optimizer: Apply remove_identity
2022-02-16 14:47:57,594 – VERBOSE – tf2onnx.optimizer.IdentityOptimizer: no change
2022-02-16 14:47:57,594 – VERBOSE – tf2onnx.optimizer: Apply remove_back_to_back
2022-02-16 14:47:57,810 – VERBOSE – tf2onnx.optimizer.BackToBackOptimizer: no change
2022-02-16 14:47:57,810 – VERBOSE – tf2onnx.optimizer: Apply einsum_optimizer
2022-02-16 14:47:58,112 – VERBOSE – tf2onnx.optimizer.EinsumOptimizer: no change
2022-02-16 14:47:58,180 – INFO – tf2onnx.optimizer: After optimization: Add -7 (237->230), Cast -65 (470->405), Concat +56 (435->491), Const -4209 (4603->394), Div -6 (77->71), Gather +52 (0->52), Identity -129 (129->0), Less -10 (11->1), Mul -60 (277->217), Reshape +7 (135->142), Shape -15 (103->88), Slice -136 (590->454), Split +65 (48->113), Squeeze -347 (447->100), Sub -14 (189->175), Tile -1 (39->38), Transpose -293 (465->172), Unsqueeze -703 (961->258)
2022-02-16 14:47:58,376 – INFO – tf2onnx:
2022-02-16 14:47:58,376 – INFO – tf2onnx: Successfully converted TensorFlow model Documents/HITNET-tf/models/middlebury_d400.pb to ONNX
2022-02-16 14:47:58,376 – INFO – tf2onnx: Model inputs: [‘input:0’]
2022-02-16 14:47:58,376 – INFO – tf2onnx: Model outputs: [‘reference_output_disparity:0’]
2022-02-16 14:47:58,376 – INFO – tf2onnx: ONNX model is saved at Documents/HITNET-tf/models/model.onnx
tensorflow 2.0 转 tensorrt 路径:
- tf – uff – trt :
在tensorrt8.0 文件夹下uff 安装,pip install uff-0.6.9-py2.py3-none-any.whl
执行:
python ./anaconda3/envs/yolov5/lib/python3.8/site-packages/uff/bin/convert_to_uff.py models/middlebury_d400.pb
报错:
AttributeError: module ‘tensorflow’ has no attribute ‘gfile’
这个问题可能是版本问题,uff 可能不再更新了。。。
2 .tf – onnx -trt

下载onnx-tensorrt-release-6.0,以及tonnx source code 1.8,并将onnx1.8 放入onnx-tensorrt-release-8.0/third_party/onnx 中。
然后执行:
cd onnx-tensorrt
mkdir build && cd build
cmake .. -DTENSORRT_ROOT=<path_to_trt> && make -j</path_to_trt>
sudo make install
在onnx-tensorrt-release-8.0文件下,运行在onnx2trt my_model.onnx -o my_engine.trt
即可生成转换好的trt
Original: https://blog.csdn.net/xingtianyao/article/details/122947005
Author: 苏三福
Title: tensorflow2.5.0 pb模型转tensorrt
原创文章受到原创版权保护。转载请注明出处:https://www.johngo689.com/511472/
转载文章受原作者版权保护。转载请注明原作者出处!