

使用机器学习算法进行预测分析并进行网上部署
- 9.1.2 探究延误航班有多少数据量
- 9.1.3 探究出发延期到达提前的数据量
- 9.1.4 探究延误的平均时间
- 9.3.2 数据随机采样与标签数据处理
- 9.3.3 数据集中字段处理
- 9.3.4 数据集划分
- 9.3.5 模型创建与评估
- 9.4.2 网页中加载模型进行预测
作者:Be_melting
9 使用机器学习算法进行预测分析
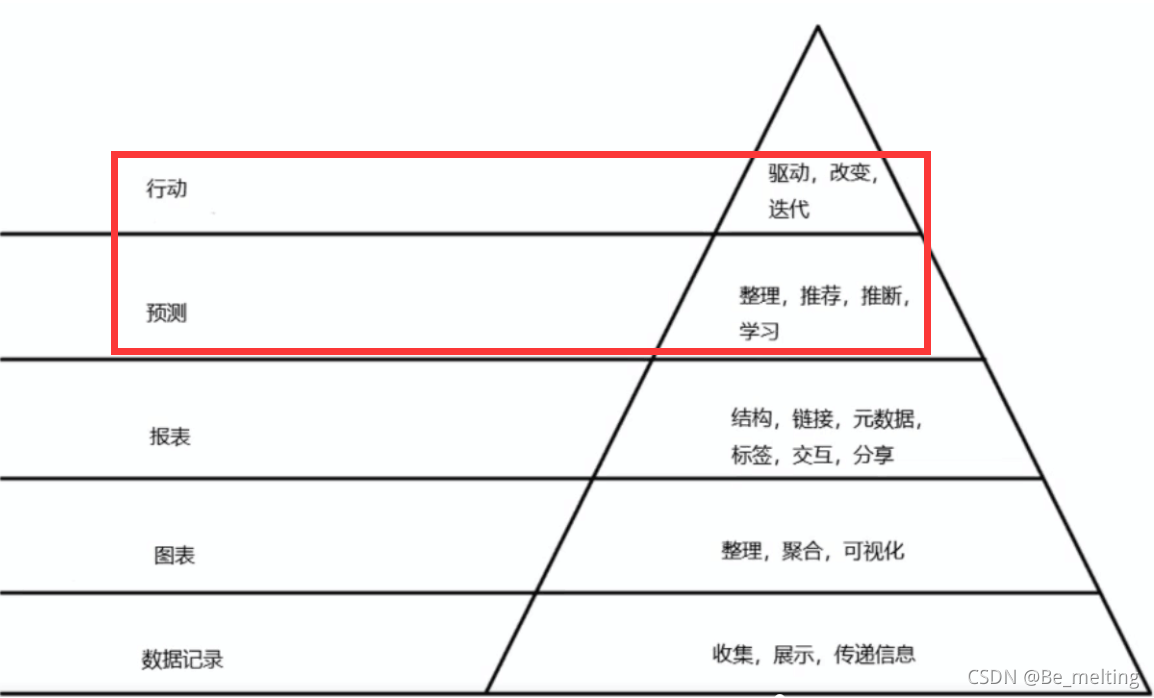
在这一章中,我们到达了数据分析金字塔的顶端,包括数据的预测和最终模型创建后的应用。
[En]
In this chapter, we come to the top of the data analysis pyramid, including the prediction of the data and the application after the final model is created.

9.1 数据探索式分析
在第八章进行了数据探索,但主要工作是在于数据的补充和完善,并没有进行数据详细的分析工作,接下来就是要通过Jupyter Notebook环境对数据进行探索式分析,首先在创建项目的地方打开Jupyter Notebook。
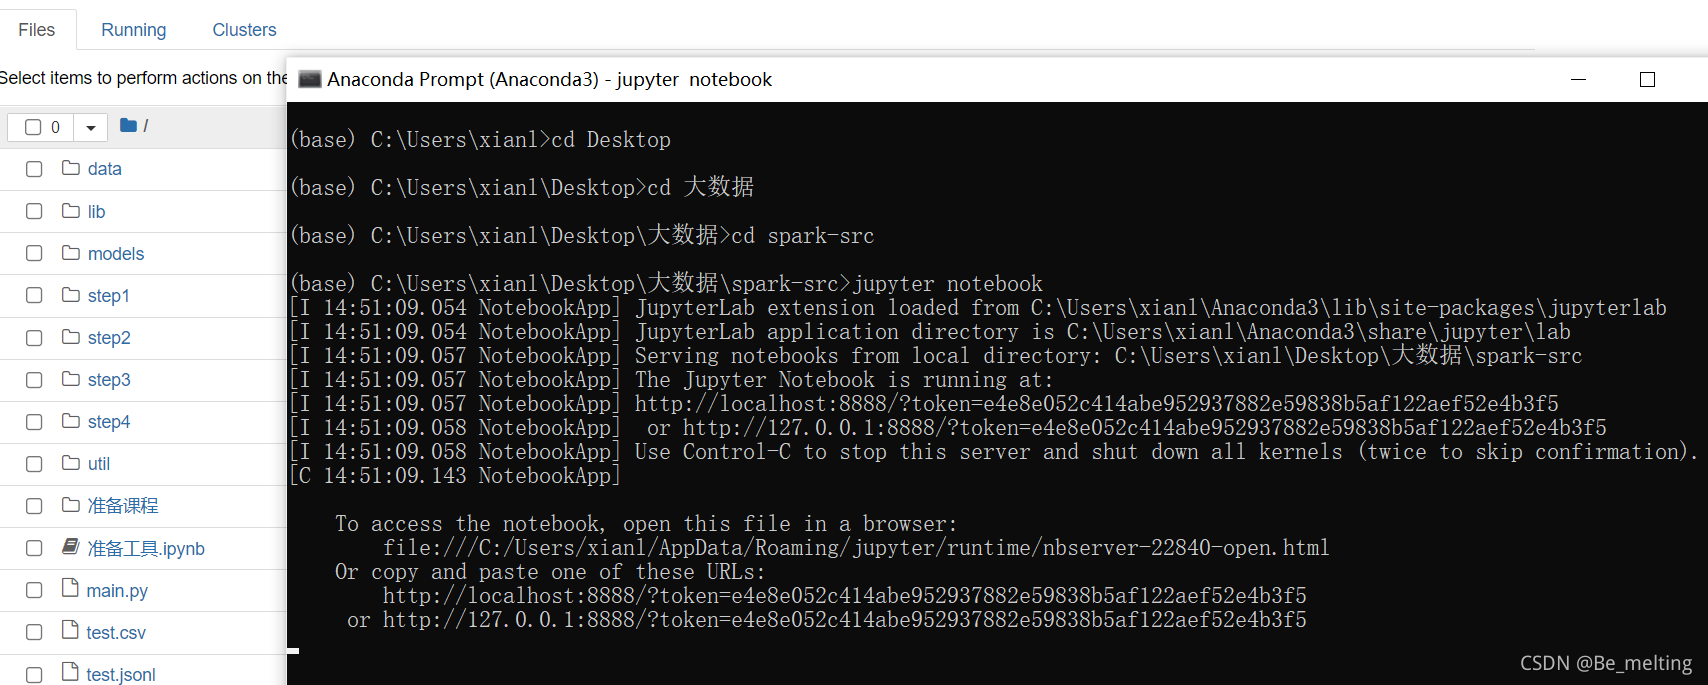
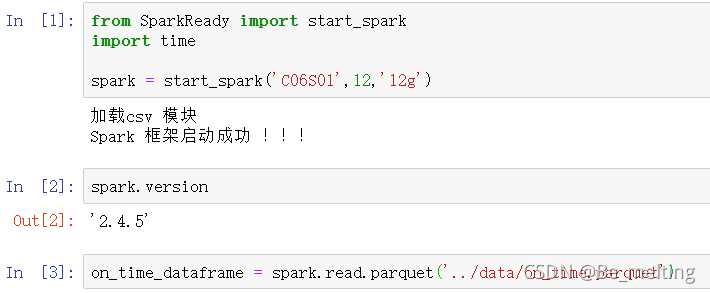
9.1.1 环境配置与数据读入
新建一个step4文件夹,在改文件加下创建一个新的example01.ipynb文件,配置Spark环境读取要分析的数据文件,代码及操作结果如下。
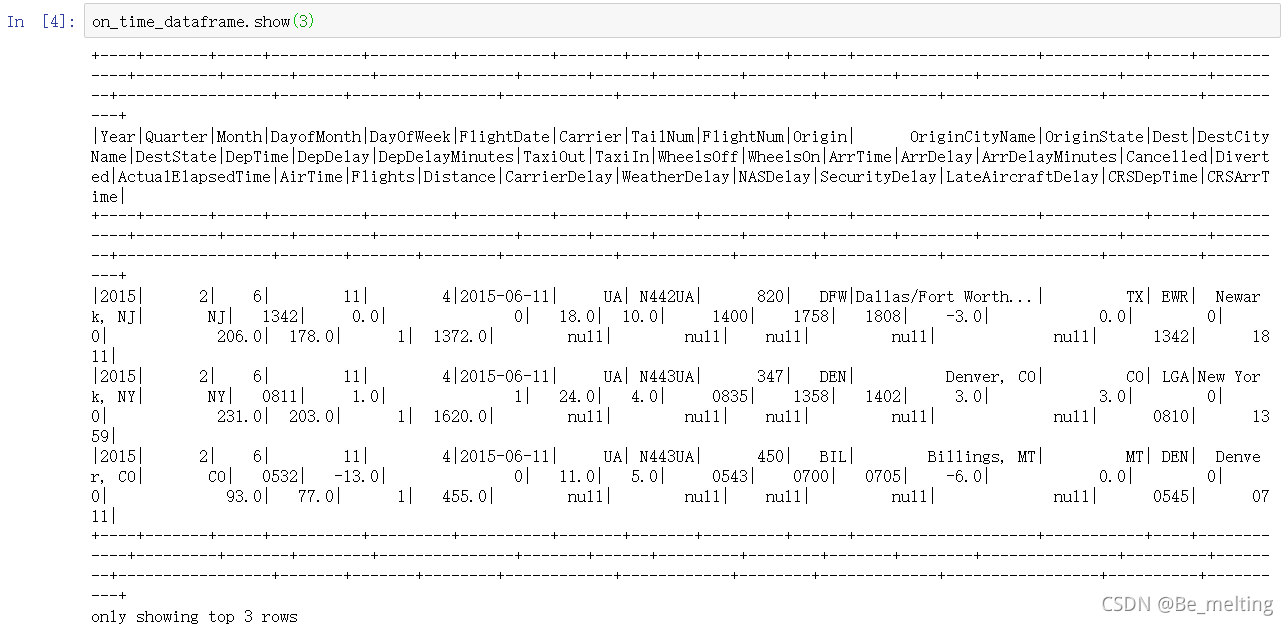
可以直接使用show()方法进行查看数据,这种方式输出结果在pycahrm中比较和谐,但是在jupyter botebook中却不怎么友好,比如查看前3条数据,输出结果如下。
此外进一步将数据注册为表,方便进行查询和计算操作,比如获取数据量,可以有两种方式,一种是使用SQL语句进行查询,另一种是直接使用封装好的函数count()调用,输出结果如下。
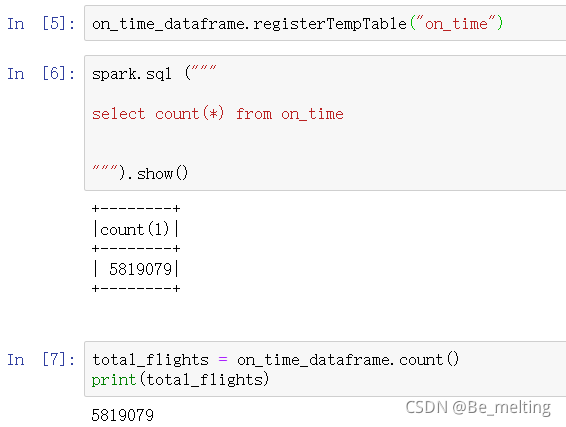
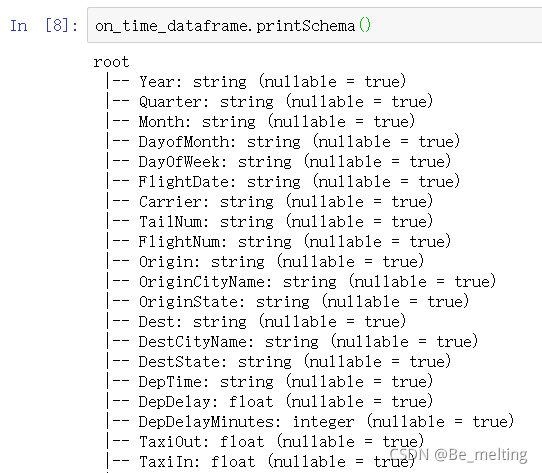
printSchema()方法在之前的讲解中已经有涉及,可以输出表中所有的字段和其构成的数据类型,方便后续分析选择字段和对比数据类型,输出结果如下。(只进行部分字段信息的截图)
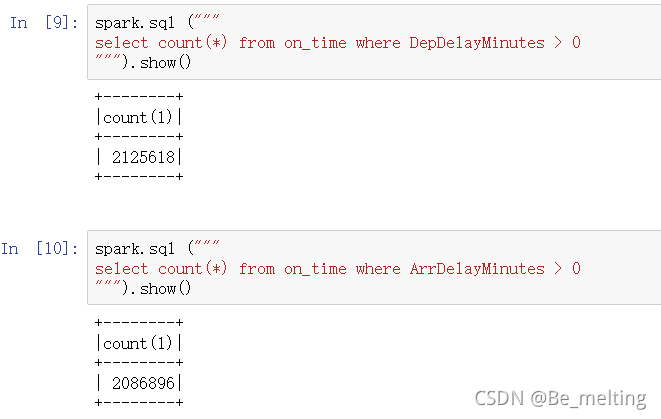
9.1.2 探究延误航班有多少数据量
航班延误包含了起飞延误和到达延误,可以分别使用SQL语句和自带的filter方法进行数据查询。
(1)利用SQL语句进行查询的代码及结果如下。
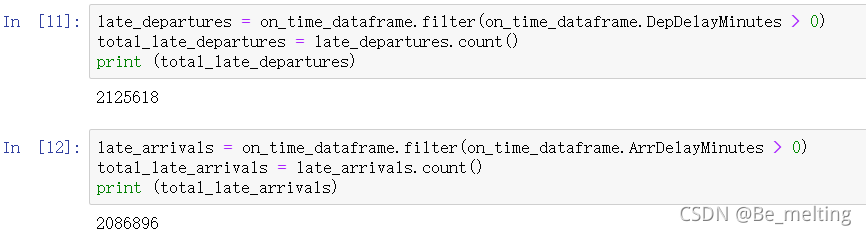
(2)利用filter方法查询的代码及结果如下。(这种方式有点类似于pandas中对于数据提取的操作)
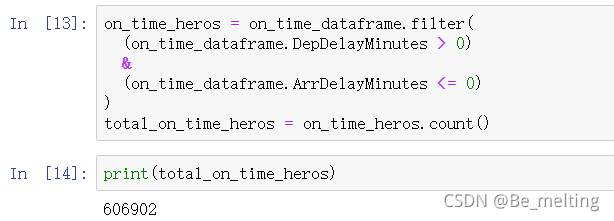
9.1.3 探究出发延期到达提前的数据量
从人们的接受层面上讲如果飞机最终可以按时到达是不算晚点的,即使出发延期,这里探究出发延期到达的情况。利用filter方法进行数据处理,理解上更为简单,也可以尝试使用SQL进行,代码及结果输出如下。
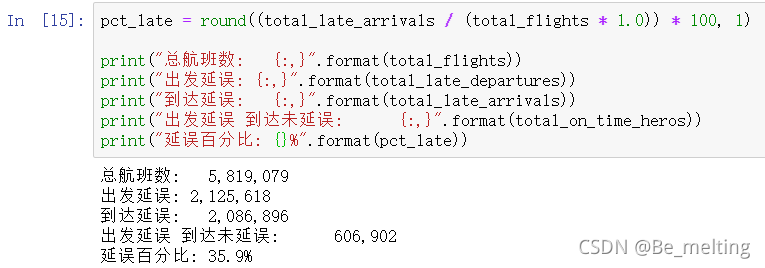
结合前面的分析,我们可以对延误的基本情况进行划分和统计,得到航班总数、出发延误数量、到达延误数量、延误百分比等。最终输出结果如下。
[En]
Combined with the previous analysis, we can divide and statistics the basic situation of delay, and get the total number of flights, the number of departure delays, the number of arrival delays, the percentage of delays and so on. The final output results are as follows.
9.1.4 探究延误的平均时间
与延误百分比一起显示,三分之一的航班有延误风险。可以计算总延迟时间或平均延迟时间。编码和输出结果如下。(平均出发延误9.4,抵达延误4.4)
[En]
With the percentage of delay, it shows that 1/3 of the flights are at risk of delay. The total or average delay time can be calculated. The code and output results are as follows. (the average departure delay is 9.4 and the arrival delay is 4.4)

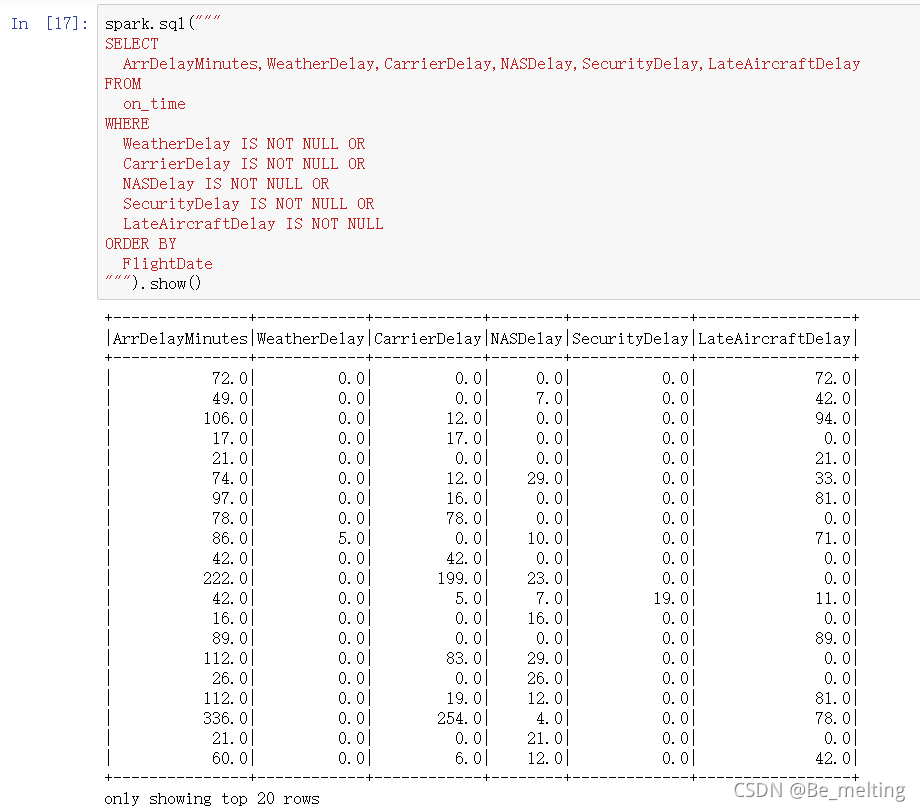
9.1.5 探究延误的原因
根据输出的字段,表中已经将延误的原因分为了五种,具体为:WeatherDelay, CarrierDelay, ASDelay, SecurityDelay, LateAircraftDelay。可以统计五类原因的延误时间并汇总,代码及输出结果如下。(第一列是延误的总时间,剩下五列就是延误的明细)
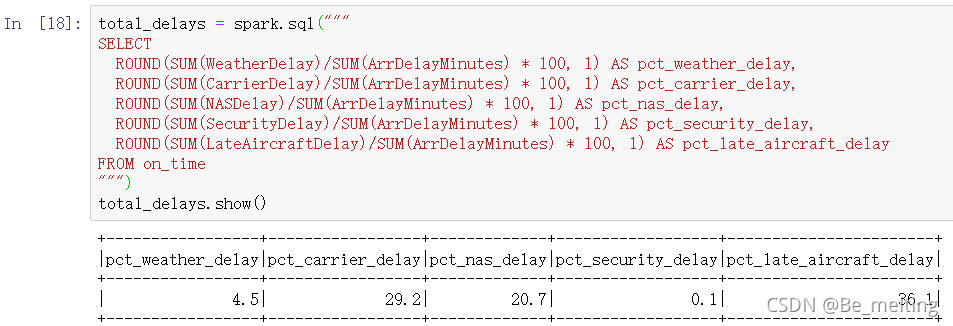
进一步可以探究每一类延误原因的占比多少,代码及输出结果如下。(占比最多的就是LateAircraftDelay)
9.2 特征工程
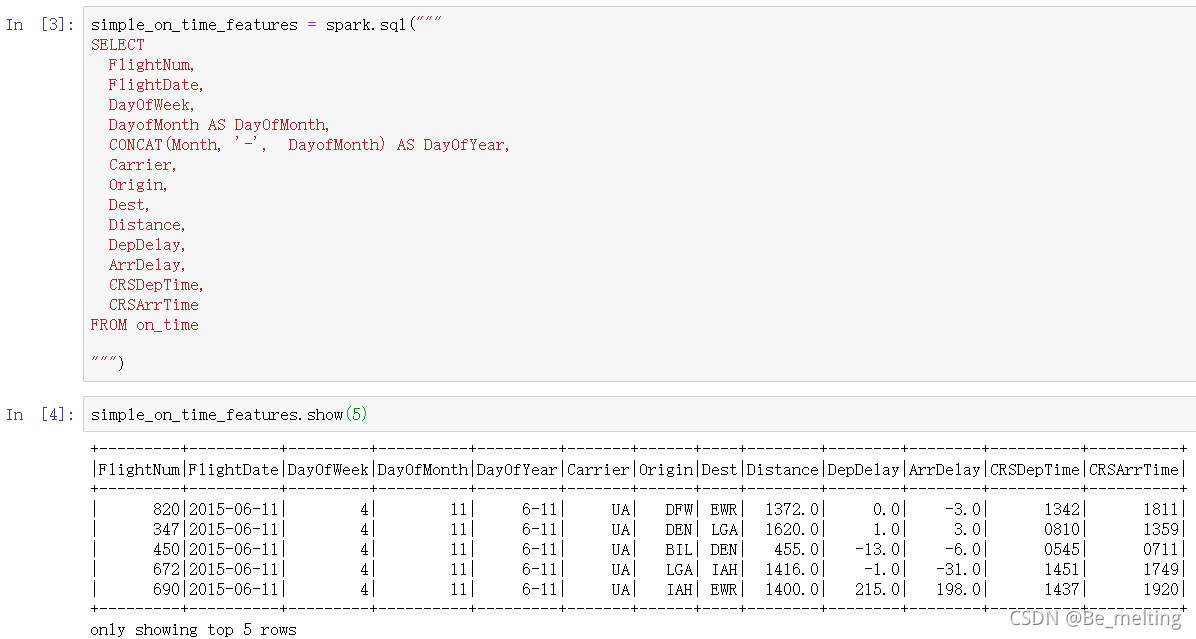
创建一个新文件example02.py,部署Spark环境和数据加载,步骤和前面的意志,就不需要赘述,直接从表中进行需求数据的获取,代码如下。
9.2.1 去除空值
前面探究延误的数据,发现存在着空值的数据,在进行特征工程时需要首先去除空值,代码及输出结果如下。(缺失值大概有10w条)
filled_on_time_features = simple_on_time_features.filter( simple_on_time_features.ArrDelay.isNotNull() & simple_on_time_features.DepDelay.isNotNull())
9.2.2 时间数据处理
根据输出选取指定字段输出的结果中,CRSDepTime和CRSArrTime字段中的数据实际上是时间数据,但是这里确实字符串数据类型,比如第一行数据应该为13:42出发,18:11到达,故需要将时间是数据进行处理。
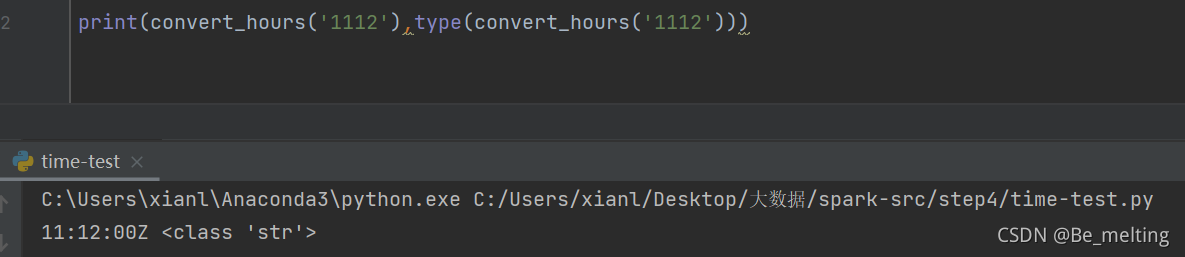
(1)首先第一个处理函数,针对就是CRSDepTime和CRSArrTime字段中的数据进行时间数据的转化。
import iso8601import datetimedef convert_hours(hours_minutes): hours = hours_minutes[:-2] minutes = hours_minutes[-2:] if hours == '24': hours = '23' minutes = '59' time_string = "{}:{}:00Z".format(hours, minutes) return
调用函数的测试示例和输出如下所示。(返回的结果仍然是字符串数据,但已经变成了时间格式的字符串,用于后续操作。)
[En]
The test example and the output of the calling function are as follows. (the returned result is still string data, but it has become a time-formatted string for subsequent operations.)
(2)第二个时间处理函数,组合日期和时间两个字段的数据,构成一个数据。
def compose_datetime(iso_date, time_string): return "{} {}".format(iso_date, time_string)
调用函数的测试示例和输出如下所示。(功能是构建完整的时间样式字符串数据)
[En]
The test example and the output of the calling function are as follows. (the function is to construct a complete time-style string data)

(3)第三个函数,就是对前两个函数的组合,直接利用日期和CRSDepTime和CRSArrTime字段数据创建一个完整的时间字符串数据。
def create_iso_string(iso_date, hours_minutes): time_string = convert_hours(hours_minutes) full_datetime = compose_datetime(iso_date, time_string) return
调用函数的测试示例和输出如下所示。(此函数是前两个函数的前提)
[En]
The test example and the output of the calling function are as follows. (this function is the premise of the previous two functions)

(4)第四个函数,对日期字符串进行转化为datetime数据类型。
def create_datetime(iso_string): return iso8601.parse_date(iso_string)
调用函数的测试示例和输出如下所示。
[En]
The test example and the output of the calling function are as follows.

(5)第五个函数,将日期和时分字符串数据组合后转化为datetime数据类型
def convert_datetime(iso_date, hours_minutes): iso_string = create_iso_string(iso_date, hours_minutes) dt = create_datetime(iso_string) return
调用函数的测试示例和输出如下所示。
[En]
The test example and the output of the calling function are as follows.

(6)第六个函数,获取当前时间数据所在的一年中的某一天
def day_of_year(iso_date_string): dt = iso8601.parse_date(iso_date_string) doy = dt.timetuple().tm_yday return
调用函数的测试示例和输出如下所示。
[En]
The test example and the output of the calling function are as follows.

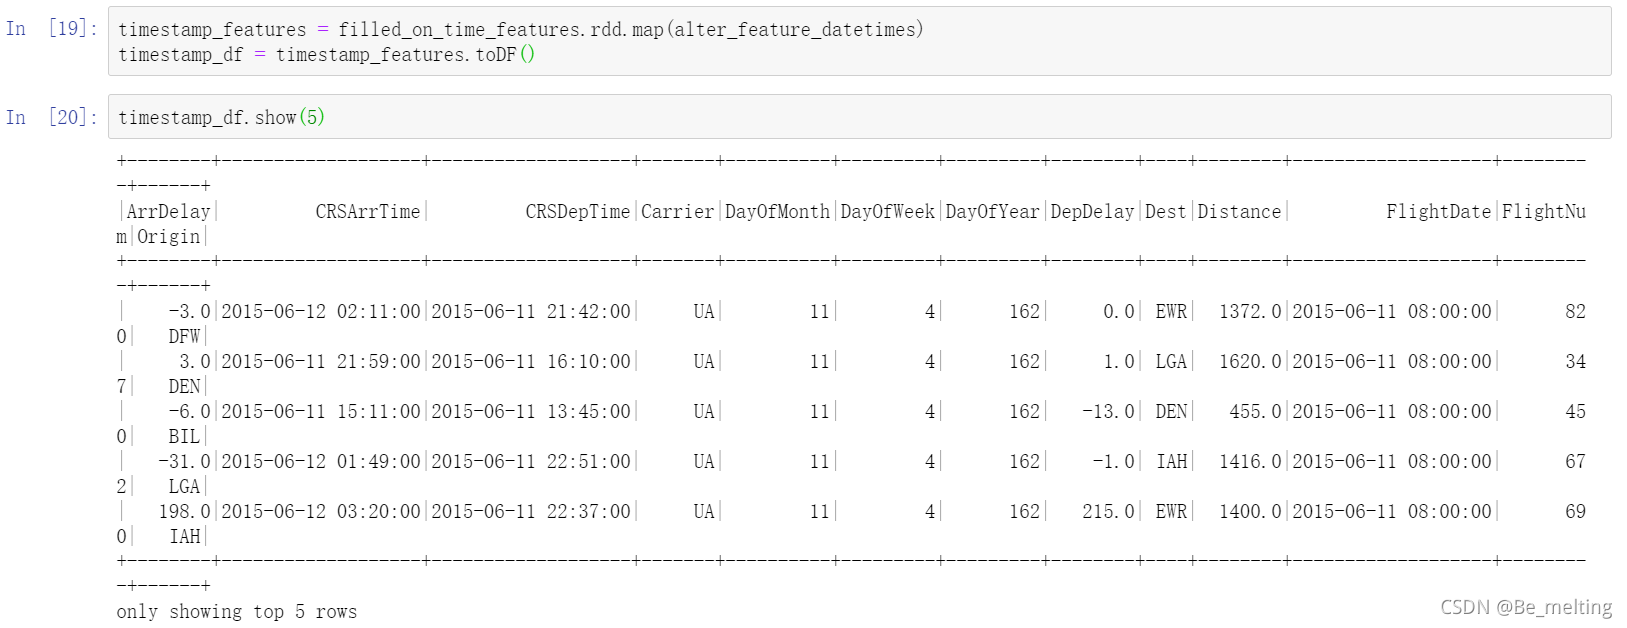
(7)第七个函数,就是整合前面的所有函数对数据进行清洗,从而得到完整的时间数据。
def alter_feature_datetimes(row): flight_date = iso8601.parse_date(row['FlightDate']) scheduled_dep_time = convert_datetime(row['FlightDate'], row['CRSDepTime']) scheduled_arr_time = convert_datetime(row['FlightDate'], row['CRSArrTime']) # Handle overnight flights if scheduled_arr_time < scheduled_dep_time: scheduled_arr_time += datetime.timedelta(days=1) doy = day_of_year(row['FlightDate']) return { 'FlightNum': row['FlightNum'], 'FlightDate': flight_date, 'DayOfWeek': int(row['DayOfWeek']), 'DayOfMonth': int(row['DayOfMonth']), 'DayOfYear': doy, 'Carrier': row['Carrier'], 'Origin': row['Origin'], 'Dest': row['Dest'], 'Distance': row['Distance'], 'DepDelay': row['DepDelay'], 'ArrDelay': row['ArrDelay'], 'CRSDepTime': scheduled_dep_time, 'CRSArrTime': scheduled_arr_time, }
最后,使用第七个函数进行数据处理,输出结果如下。
[En]
Finally, the seventh function is used for data processing, and the output result is as follows.
然后对数据进行排序,排序规则如下,确认数据正确,将数据保存到本地,代码和操作结果如下。
[En]
Then sort the data, the sorting rules are as follows, confirm that the data is correct, save the data locally, the code and operation results are as follows.
import datetimesorted_features = timestamp_df.sort( timestamp_df.DayOfYear, timestamp_df.Carrier, timestamp_df.Origin, timestamp_df.Dest, timestamp_df.FlightNum, timestamp_df.CRSDepTime, timestamp_df.CRSArrTime,)sorted_features.show()sorted_features.repartition(1).write.mode("overwrite").json("../data/simple_flight_delay_features.json")
9.3 模型创建,评估与保存
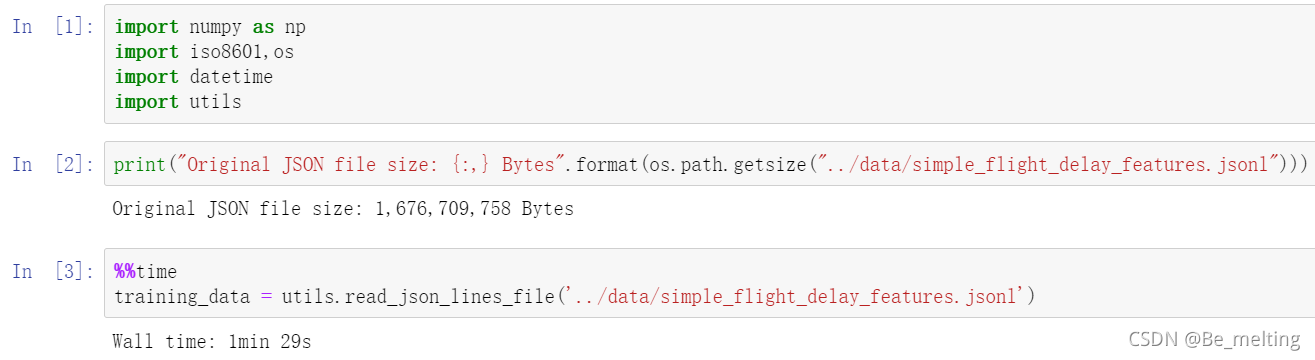
9.3.1 模块导入与数据加载
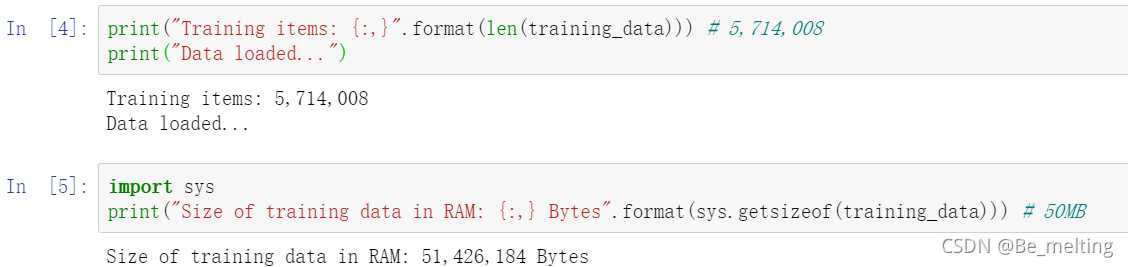
新建一个文件example03.ipynb,导入要使用的模块和加载延误数据,顺便可以通过程序查看一下文件的大小。(文件大小1.6G,直接用python进行读取大概用了1min29s,对比前面使用Spark处理有明显的时间差别)
计算读入数据并检查运行时占用的内存量。
[En]
Count the read-in data and check the amount of running memory consumed.
9.3.2 数据随机采样与标签数据处理
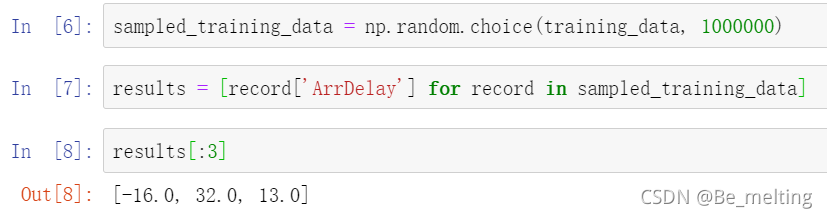
根据电脑性能的不同对于数据量可以进行随机采样,以防止计算机在训练数据时候导致崩溃。假定随机采样量为1000000(100w数据量),然后获取里面的数据标签,这里选用到达延误时间字段作为标签字段。
您可以随机获取任意一条数据,并查看数据的基本结构。例如,选择此处索引为2的数据,即可查看相应的数据信息。
[En]
You can get any piece of data at random and view the basic structure of the data. For example, select the data with index 2 here to view the corresponding data information.
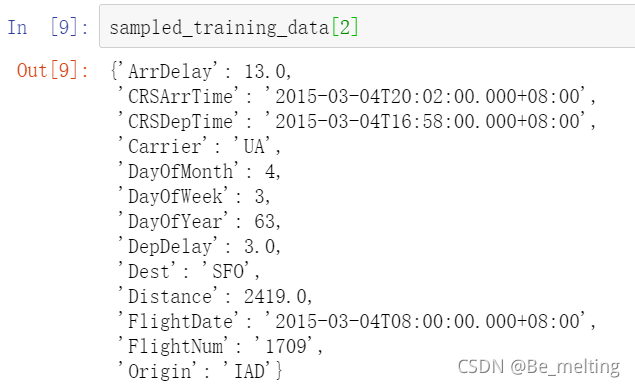
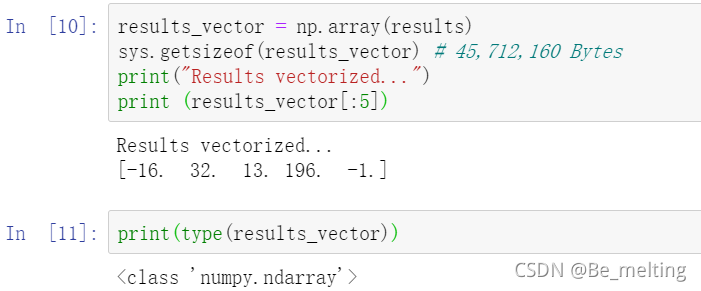
通过结果可以看出字段数据中还包含了一些字符串的信息,比如Carrier,Dest,Origin,以及时间相关的字段都是属于字符串数据类型。后续传入模型之前都需要进行处理。先处理标签数据,为了提高后续模型的运算速度,将列表数据转变为Ndarray数据。
9.3.3 数据集中字段处理
有些字段没有意义和标签字段数据需要进行删除,比如飞行日期FlightDate,ArrDelay,此类字段是不需要加入到数据集。此外还有时间字段是字符串数据,需要转化为数值数据,最后可以查看任意一条数据核实是否处理正确。
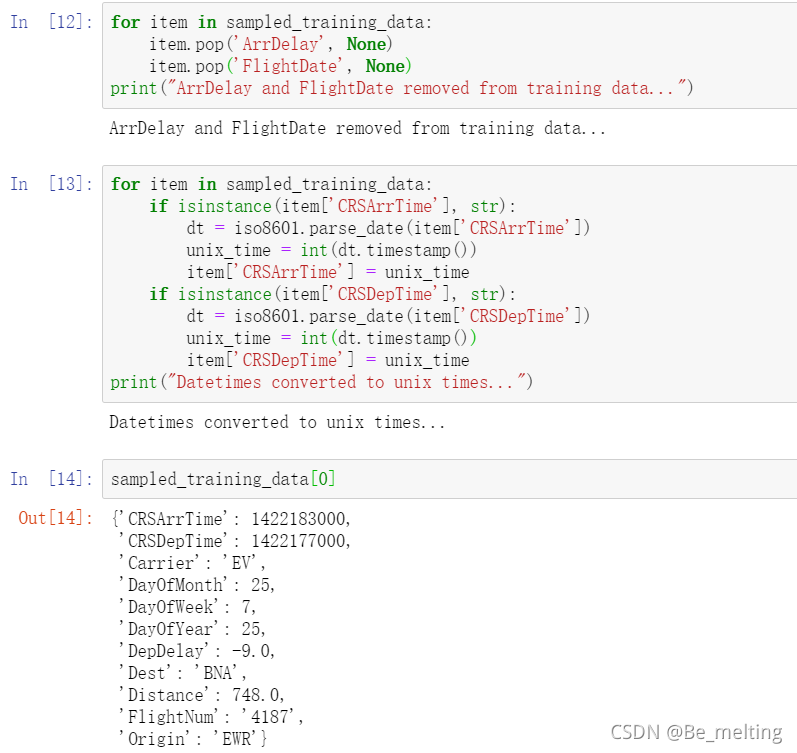
处理完时间字段,最后就是对于剩下字符串数据字段进行编码,直接采用文本向量化处理的方式,代码及处理结果如下。(最终处理完数据的维度为1000000*7436,即是100w条数据,共有7436个字段)

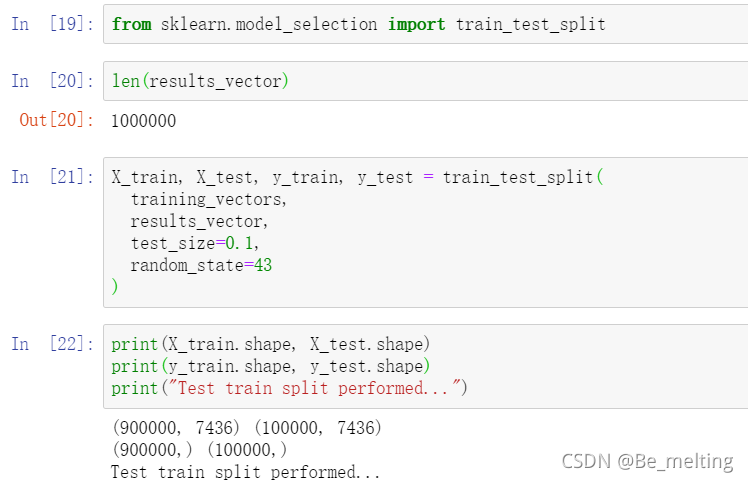
9.3.4 数据集划分
由于数据集中的数据到达100w条,即便是9:1,测试集的数据量也达到了10w条,已经是一个很大的数据量,故不一定都要进行0.75:0.25的训练集和测试集的比例划分,还需要考虑数据集的数量以及计算机的性能。
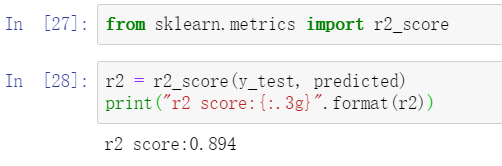
9.3.5 模型创建与评估
首先,创建线性回顾模型,分为四个步骤,依次为:导入要使用的模型、模型初始化、模型拟合、模型预测。
[En]
First of all, the linear review model is created, there are four steps, in turn: import the model to be used, model initialization, model fitting, model prediction.

模型创建完毕后要考虑模型是否可用,接着就是进行模型评估,采用R2进行评判,两步即可完成。
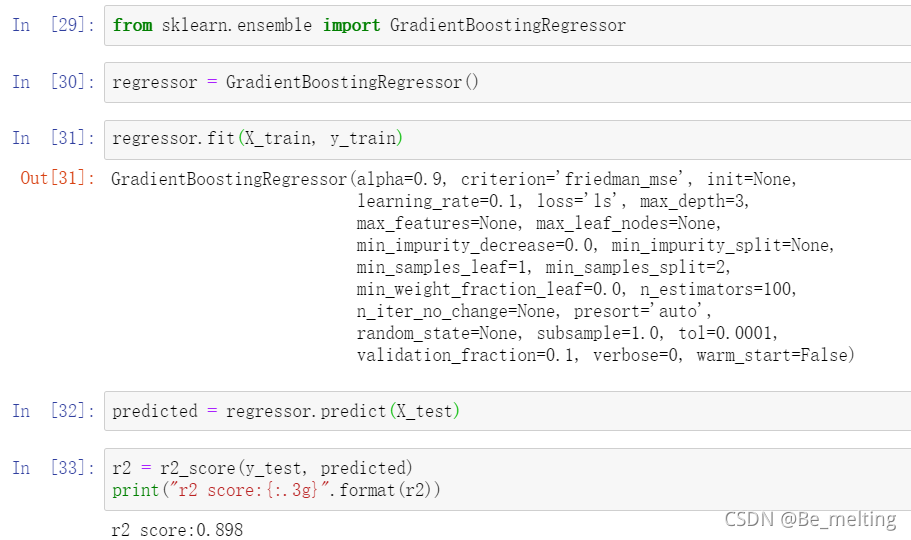
单一模型的评价分数只能粗略地判断数据的拟合程度,需要将评价分数与不同的模型分数进行比较,才能得出有意义的评价分数。然后,使用梯队推进模型进行建模(当数据量会影响程序的运行速度时),并使用相同的评估标准进行模型评估。编码和输出结果如下。
[En]
The evaluation score of a single model can only roughly judge the fitting of the data, and the evaluation score needs to be compared with different model scores before the evaluation score will be meaningful. Then, the echelon promotion model is used for modeling (when the amount of data will affect the running speed of the program), and the same evaluation criteria are used for model evaluation. The code and output results are as follows.
9.3.6 模型保存
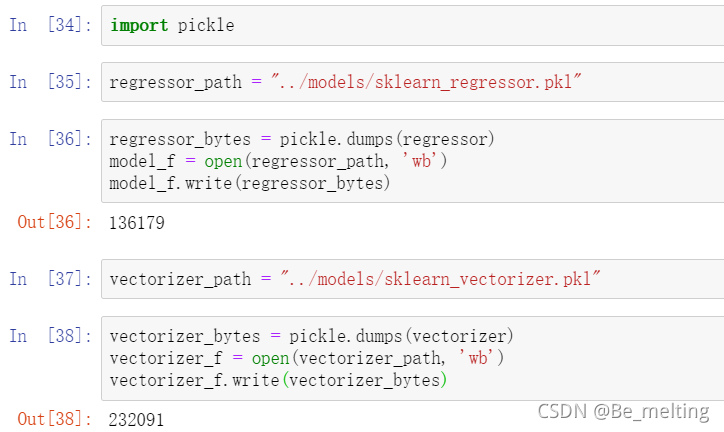
对比两个不同的模型评估的得分后,可以选择分数较高的模型进行保存,也可以顺带着把处理完毕的数据集进行保存,需要使用到pickle模块,具体的代码操作可以参考如下代码。
9.4 模型部署
许多预测模型系统在创建它们的实验室中夭折,很大程度上是因为人们不知道模型是否部署在网上。部署预测系统将是我们下一步的重要任务,也是数据科学家成长为老兵的关键技能。
[En]
Many predictive model systems die in the lab where they were created, largely because people don’t know if a model is deployed online. Deploying a prediction system will be an important task for us next, and it is also a key skill for data scientists to grow into veterans.
9.4.1 单条数据预测
以一对一测试数据为例,部署步骤分解如下:
[En]
Taking the one-on-one test data as an example, the deployment steps are broken down as follows:
(1)导入训练好的模型和数据集的pkl文件
import joblibvectorizer = joblib.load("../models/sklearn_vectorizer.pkl")regressor = joblib.load("../models/sklearn_regressor.pkl")
(2)设定特征字段数据
prediction_features = {}prediction_features['DepDelay'] = 5prediction_features['Origin'] = 'SFO'prediction_features['Dest'] = 'ATL'prediction_features['FlightNum'] = 1519prediction_features['Carrier'] = 'AA'print(prediction_features)
(3)字段数据处理
feature_vectors = vectorizer.transform(prediction_features)
(4)模型预测
result = regressor.predict(feature_vectors)[0]print ("延迟时间是:" + str(round(result,0)))
最终输出结果如下。

9.4.2 网页中加载模型进行预测
直接将step3中的文件全部复制到step4文件夹中,然后创建12.0版本的on_time12.py,在最后面添加如下代码。
import joblibvectorizer = joblib.load("../../models/sklearn_vectorizer.pkl")regressor = joblib.load("../../models/sklearn_regressor.pkl")@app.route("/flights/delays/predict/regress", methods=['POST'])def regress_flight_delays(): api_field_type_map = \ { "DepDelay": int, "Carrier": str, "FlightDate": str, "Dest": str, "FlightNum": str, "Origin": str } api_form_values = {} for api_field_name, api_field_type in api_field_type_map.items(): api_form_values[api_field_name] = request.form.get(api_field_name, type=api_field_type) prediction_features = {} prediction_features['DepDelay'] = api_form_values['DepDelay'] prediction_features['Origin'] = api_form_values['Origin'] prediction_features['Dest'] = api_form_values['Dest'] prediction_features['FlightNum'] = api_form_values['FlightNum'] prediction_features['Carrier'] = api_form_values['Carrier'] date_features_dict = predict_utils.get_regression_date_args(api_form_values['FlightDate']) for api_field_name, api_field_value in date_features_dict.items(): prediction_features[api_field_name] = api_field_value feature_vectors = vectorizer.transform([prediction_features]) result = regressor.predict(feature_vectors)[0] result_obj = {"Delay": round(result,0)} return json.dumps(result_obj)
在上面的代码中使用到了一个predict_utils文件,里面具体包含了一些处理数据的函数,如下。
import sys, os, reimport pymongoimport datetime, iso8601def process_search(results): """Process elasticsearch hits and return flights records""" records = [] total = 0 if results['hits'] and results['hits']['hits']: total = results['hits']['total'] hits = results['hits']['hits'] for hit in hits: record = hit['_source'] records.append(record) return records, totaldef get_navigation_offsets(offset1, offset2, increment): """Calculate offsets for fetching lists of flights from MongoDB""" offsets = {} offsets['Next'] = {'top_offset': offset2 + increment, 'bottom_offset': offset1 + increment} offsets['Previous'] = {'top_offset': max(offset2 - increment, 0), 'bottom_offset': max(offset1 - increment, 0)} # Don't go < 0 return offsetsdef strip_place(url): """Strip the existing start and end parameters from the query string""" try: p = re.match('(.+)\?start=.+&end=.+', url).group(1) except AttributeError as e: return url return pdef get_flight_distance(client, origin, dest): """Get the distance between a pair of airport codes""" query = { "Origin": origin, "Dest": dest, } record = client.example.origin_dest_distances.find_one(query) return record["Distance"]def get_regression_date_args(iso_date): """Given an ISO Date, return the day of year, day of month, day of week as the API expects them.""" print(iso_date) dt = iso8601.parse_date(iso_date) print(dt) day_of_year = dt.timetuple().tm_yday print(day_of_year) day_of_month = dt.day day_of_week = dt.weekday() print(day_of_week) return { "DayOfYear": day_of_year, "DayOfMonth": day_of_month, "DayOfWeek": day_of_week, }def get_current_timestamp(): iso_now = datetime.datetime.now().isoformat() return
最后就是设置一个可视化窗体,让用户输入相应的内容,在on_time12.py的最后面添加如下代码。
@app.route("/flights/delays/predict")def flight_delays_page(): form_config = [ {'field': 'DepDelay', 'label': 'Departure Delay','colname':'出发延迟时间'}, {'field': 'Carrier','colname':'航空公司'}, {'field': 'FlightDate', 'label': 'Date','colname':'航班时间'}, {'field': 'Origin','colname':'出发地'}, {'field': 'Dest', 'label': 'Destination','colname':'目的地'}, {'field': 'FlightNum', 'label': 'Flight Number','colname':'航班编号'}, ] return render_template('flight_delays_predict.html', form_config=form_config)
此时的flight_delays_predict.html文件中就是对于渲染网页布局的设定,代码如下。
{% extends "index.html" %}
{% block body2 %}

  / <a href="/flights/delays/predict">预测航班延迟a>
  <p class="lead" style="margin: 10px; margin-left: 0px;">

    预测航班延迟
  p>

  <form id="flight_delay_regression" action="/flights/delays/predict/regress" method="post">
    {% for item in form_config %}
      {% if 'label' in item %}
        <label for="{{item['field']}}">{{item['colname']}}label>
      {% else %}
        <label for="{{item['field']}}">{{item['colname']}}label>
      {% endif %}
        <input name="{{item['field']}}" style="width: 36px; margin-right: 10px;" value="">input>
    {% endfor %}
    <button type="submit" class="btn btn-xs btn-default" style="height:">提交查询button>
  form>
  <div style="margin-top: 10px;">
      <p>预计航班延迟时间: <span id="result" style="display: inline-block;">span> 分钟p>
  div>
  <script>// Attach a submit handler to the form
    $( "#flight_delay_regression" ).submit(function( event ) {
      // Stop form from submitting normally
      event.preventDefault();
      // Get some values from elements on the page:
      var $form = $( this ),
        term = $form.find( "input[name='s']" ).val(),
        url = $form.attr( "action" );
      // Send the data using post
      var posting = $.post( url, $( "#flight_delay_regression" ).serialize() );
      // Put the results in a div
      posting.done(function( data ) {
        result = JSON.parse(data);
        $( "#result" ).empty().append( result.Delay );
      });
    });script>
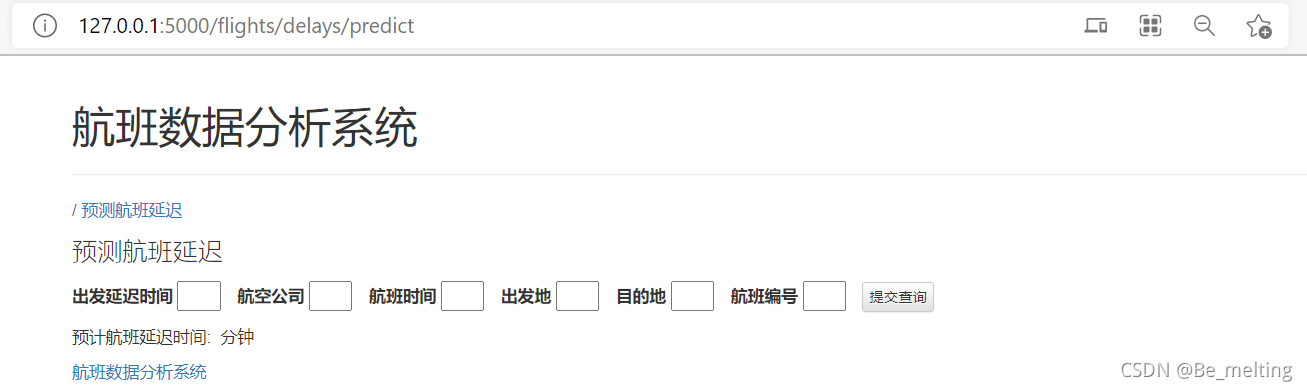
全部设置完毕后,运行on_time12.py文件,然后再浏览器网址栏输入:http://127.0.0.1:5000/flights/delays/predict,回车后就进入到下面内容。
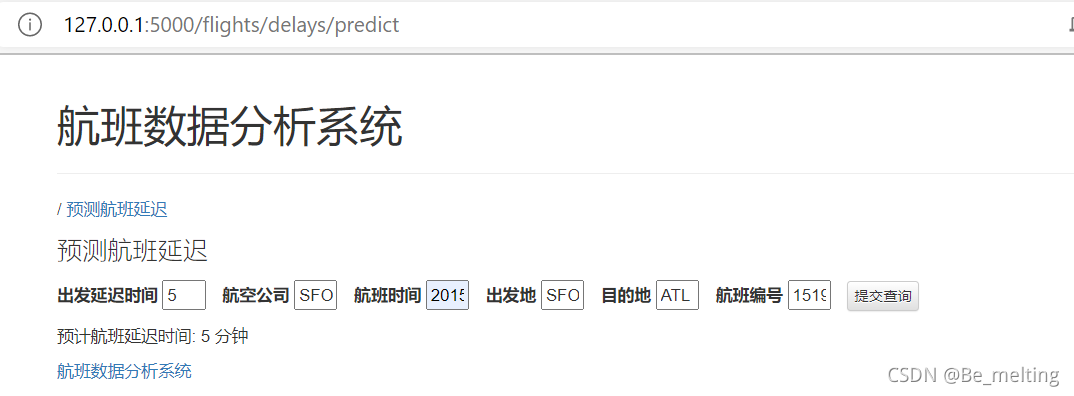
然后,您可以输入内容,例如输入单个测试数据,并通过提交查询按钮获得最终预测结果。(最终输出与单次测试结果一致)
[En]
You can then enter the content, such as entering a single piece of test data, and get the final prediction result through the submit query button. (the final output is consistent with the results of a single test)
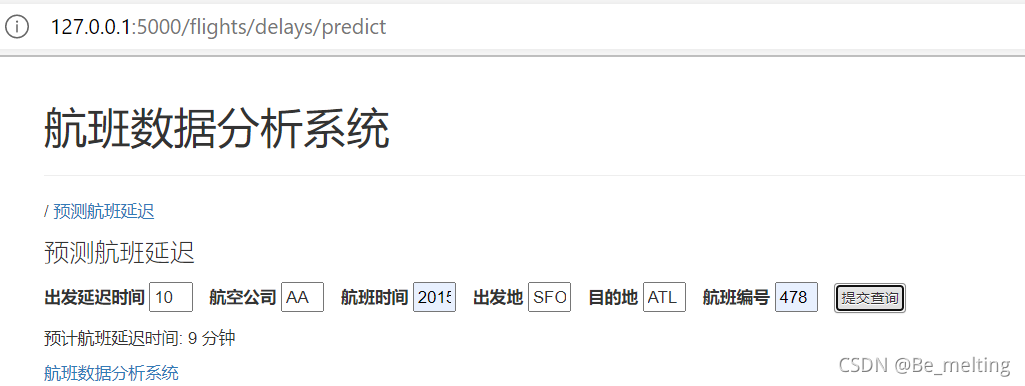
您可以更改输入数据并再次测试它。输入和输出结果如下。
[En]
You can change the input data and test it again. The input and output results are as follows.
Original: https://blog.51cto.com/u_15713987/5462732
Author: 百木从森
Title: 【大数据实战项目八】使用机器学习算法进行预测分析并进行网上部署
原创文章受到原创版权保护。转载请注明出处:https://www.johngo689.com/508301/
转载文章受原作者版权保护。转载请注明原作者出处!