

Python OpenCv 实现实时人脸识别及 面部测距
准备
在进行人脸 面部测距开发前,先在你的Python中分别安装4个库,分别为cvzone库,mediapipe库,tensorflow库,tensorflow-gpu库,其中安装cvzone库和mediapipe库都较快,直接使用下面语句即可快速安装好
pip install cvzone
pip install mediapipe
安装tensorflow库和tensorflow-gpu库时因为库文件较大,常规方法安装经常中途下载失败,这里推荐使用下面的命令,本人亲测过可以快速安装。
pip install -i https://pypi.tuna.tsinghua.edu.cn/simple tensorflow
pip install -i https://pypi.tuna.tsinghua.edu.cn/simple tensorflow-gpu
确保以上4个库都安装成功后就可以开始编写代码了。
原理
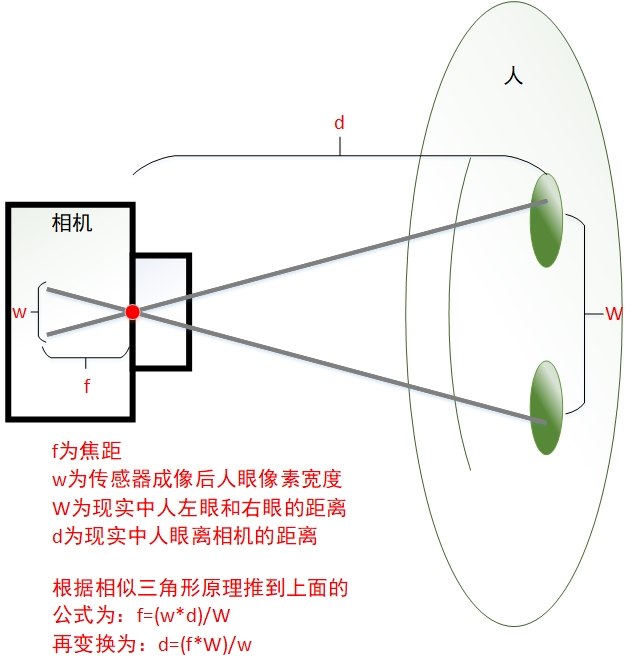
OpenCv实现人脸测距主要利用了相似三角形原理,见下图

参数说明:
(1)其中相机的焦距f是固定不变的;
(2)w为照相机成像后人眼的像素值距离,可以通过findFaceMesh( )将人脸网格识别后再测算成像人眼的像素距离w;
(3)W为现实中人左眼和右眼的距离,男人平均瞳距为64mm,女人的平均瞳距为62mm,本项目开发取中间值63mm;
(4)d为想要获得的实际人到相机的距离,通过相似三角形原理,变换公式后就可以计算出人到相机的距离公式:d=(f*W)/w
注:
不同的相机,焦距是不一样的,如果知道相机本身的参数是最好的,可以直接代入即可精准计算。如果不知道相机参数的条件下,就需要自己手动的多次校正确定焦距f。手动校正需要多测几数据,然后求均值,以确保焦距f的准确,从而提升测距精确度。手动校正时,先固定一个眼睛到相机的距离,比如50cm,用皮尺精确的测量,多测几次求出焦距f。具体测焦距f的代码见下:
import cv2
import cvzone
from cvzone.FaceMeshModule import FaceMeshDetector

cap = cv2.VideoCapture(0)
detector = FaceMeshDetector(maxFaces = 1)

while True:
    success,img = cap.read()
    img,faces = detector.findFaceMesh(img,draw = False)

    if faces:

        face = faces[0]
        pointLeft = face[145]
        pointRight = face[374]

        w,_ = detector.findDistance(pointLeft,pointRight)
        W = 6.3
        d = 50
        f = (w * d) / W
        print(f)

    cv2.imshow("Iamge",img)
    cv2.waitKey(1)
通过上面代码多次测量焦距f求均值,本人使用的摄像头焦距为300,所以后面我的代码中f = 300,这里根据自己的实际焦距代入测量。下面将焦距f代入测量公式d = (f*W) / w,具体代码见下:
import cv2
import cvzone
from cvzone.FaceMeshModule import FaceMeshDetector

cap = cv2.VideoCapture(0)
detector = FaceMeshDetector(maxFaces = 1)

while True:
    success,img = cap.read()
    img,faces = detector.findFaceMesh(img,draw = False)

    if faces:

        face = faces[0]
        pointLeft = face[145]
        pointRight = face[374]

        w, _ = detector.findDistance(pointLeft, pointRight)
        W = 6.3

        f = 300
        d = (W * f) / w
        print(d)

        cvzone.putTextRect(img,f'Depth:{int(d)}cm',(face[10][0]-95,face[10][1]-5),scale = 1.8)

    cv2.imshow("Iamge",img)
    cv2.waitKey(1)
最终的测试 结果见下:

多人测距代码见下,本人还没有优化,多人同时测距会漂浮不稳。
[En]
Multi-person ranging code see below, I have not been optimized, multiple people ranging at the same time will float unstable.
import cv2
import cvzone
from cvzone.FaceMeshModule import FaceMeshDetector

cap = cv2.VideoCapture(0)
detector = FaceMeshDetector(maxFaces=3)

while True:
    sucess,img = cap.read()
    img,faces1 = detector.findFaceMesh(img)
    img,faces2 = detector.findFaceMesh(img)
    img,faces3 = detector.findFaceMesh(img)
    W = 6.3

    if faces1:
        face1 = faces1[0]
        pointLeft1 = face1[145]
        pointRight1 = face1[374]

        w1, _ = detector.findDistance(pointLeft1, pointRight1)

        f = 300
        d1 = (W * f) / w1

        cvzone.putTextRect(img, f'Depth:{int(d1)}cm', (face1[10][0] - 95, face1[10][1] - 5), scale = 1.8)

        if faces2:
            face2 = faces2[0]
            pointLeft2 = face2[145]
            pointRight2 = face2[374]

            w2,_ = detector.findDistance(pointLeft2,pointRight2)

            f = 300
            d2 = (W * f) / w2

            cvzone.putTextRect(img, f'Depth:{int(d2)}cm', (face2[10][0] - 95, face2[10][1] - 5), scale=1.8)

            if faces3:
                face3 = faces3[0]
                pointLeft3 = face3[145]
                pointRight3 = face3[374]

                w3, _ = detector.findDistance(pointLeft3, pointRight3)

                f = 300
                d3 = (W * f) / w2

                cvzone.putTextRect(img, f'Depth:{int(d3)}cm', (face3[10][0] - 95, face3[10][1] - 5), scale=1.8)

    cv2.imshow("img",img)
    cv2.waitKey(1)
以上就是通过Python OpenCv实现人脸识别及面部测距的过程,祝各位科研人多发文章,少掉头发!
Original: https://blog.csdn.net/qq_40280673/article/details/122828350
Author: 佐咖
Title: Python OpenCv 实现实时人脸识别及面部距离测量
原创文章受到原创版权保护。转载请注明出处:https://www.johngo689.com/497009/
转载文章受原作者版权保护。转载请注明原作者出处!