

目录
一、tensorflow库安装
(1)TensorFlow的历史版本与对应Python版本
TensorFlow的历史版本与Python对应版本 TensorFlow版本Python发布时间tensorflow-2.4.03.6-3.82020年12月tensorflow-2.3.03.5-3.82020年7月tensorflow-2.2.03.5-3.82020年5月tensorflow-2.1.03.5-3.72020年1月tensorflow-2.0.03.5-3.72019年10月tensorflow-1.15.03.5-3.72019年10月tensorflow-1.14.03.5-3.72019年6月tensorflow-1.13.03.5-3.72019年2月tensorflow-1.12.03.5-3.62018年11月tensorflow-1.11.03.5-3.62018年9月tensorflow-1.10.03.5-3.62018年8月tensorflow-1.9.03.5-3.62018年7月tensorflow-1.8.03.5-3.62018年4月tensorflow-1.7.03.5-3.62018年3月tensorflow-1.6.03.5-3.62018年3月tensorflow-1.5.03.5-3.62018年1月tensorflow-1.4.03.5-3.62017年11月tensorflow-1.3.03.5-3.62017年8月tensorflow-1.2.03.5-3.62017年6月tensorflow-1.1.03.52017年4月tensorflow-1.0.03.52017年2月
(2)Python版本查询
在配置了python环境变量的情况下可以使用以下方法:
win+R或者在搜索框搜索cmd打开Windows的终端,在终端输入python –version
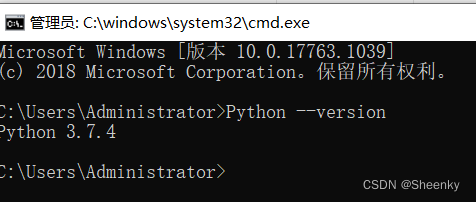

未配置python环境的情况下,使用anaconda prompt终端查询版本号以及后面的操作。
(3)找到上面的版本框进行对应的TensorFlow下载
当时安装时并没有想到版本问题会影响TensorFlow后续的使用,就随便选了一个版本,当然你想选择一样的版本也行,后续做法跟我的做法会是一样的。
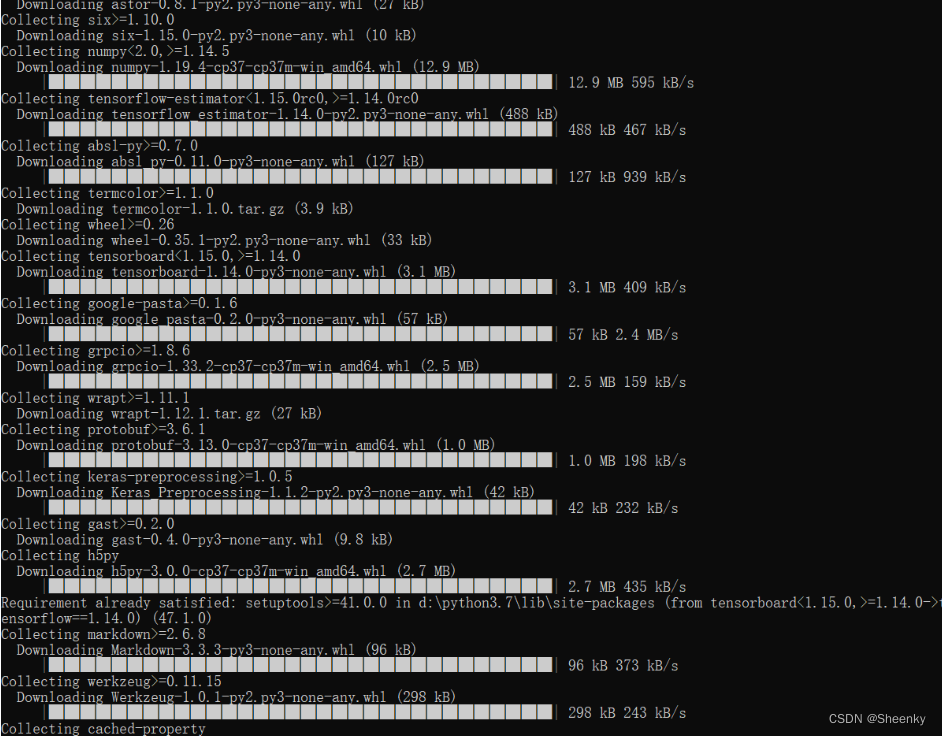
这里我们从清华园下载TensorFlow的镜像文件,后面是版本号
pip install -i https://pypi.tuna.tsinghua.edu.cn/simple tensorflow==1.14

注意:
①这里的命令运行时在Windows的终端下直接运行,前提是有Python环境
②若下载遇到非环境的报错,请复制Downloading后的网址,直接去网址上下载安装文件,然后切换到,下载路径,用pip insatll 下载的文件后缀为.whl文件
(4)安装成功
安装过程中会出现以下情况:安装成功。
[En]
During installation, the following situation occurs: the installation is successful.
(5)TensorFlow成功验证
导入TensorFlow库做一个简单的计算
import tensorflow as tf
sess = tf.Session()
a = tf.constant(10)
b = tf.constant(12)
sess.run(a+b)
以下结果证明安装是成功的
[En]
The following results prove that the installation is successful

注:
在验证阶段可能会出现以下错误
[En]
The following errors may occur during the validation phase
第一个是jupyter的报错,第二个是anaconda的报错信息


这是因为有得机器protobuf版本等级与TensorFlow不相符,只需要根据后面的protobuf>=的版本号进行重装即可
命令如下:
pip install protobuf==3.19.0
二、项目简介
(1)项目说明
图像识别技术是人工智能计算机视觉的重要基础,利用机器学习/深度学习算法可以高效准确地识别图片的主要特征,从而对不同图片内容的图片进行分类识别。
[En]
Image recognition technology is an important basis of artificial intelligence computer vision, the use of machine learning / deep learning algorithm can efficiently and accurately identify the main features of pictures, so as to classify and identify pictures with different picture content.
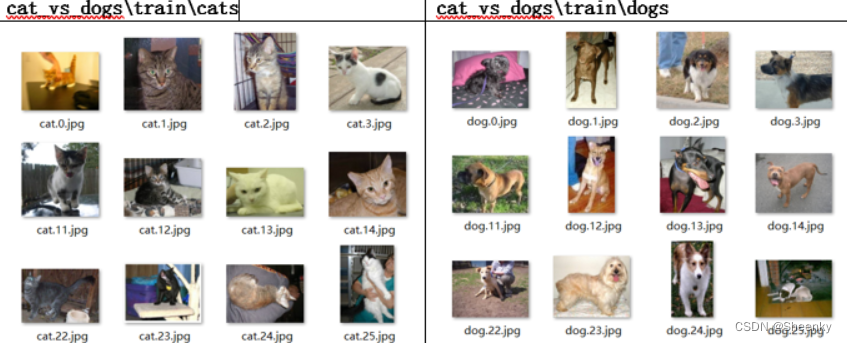
在图像识别研究领域有一个经典的数据集:Cat_vs_Dogs(猫狗识别数据集),很多计算机视觉的算法研究使用这个数据集来验证其效果。附件中采集了1500张猫的照片和1500张狗的照片,分别放入下面的目录结构中:
cats_vs_dogs:
train:
cats: [cat.0.jpg, cat.1.jpg, cat.2.jpg ….]
dogs: [dog.0.jpg, dog.1.jpg, dog.2.jpg …]
validation:
cats: [cat.2000.jpg, cat.2001.jpg, cat.2002.jpg ….]
dogs: [dog.2000.jpg, dog.2001.jpg, dog.2002.jpg …]
注:其中train作为训练集,有猫狗各1000张照片;validation作为验证集,有猫狗各500张照片。图片示例如下:
(2)项目目的
本项目的主要目的是建立猫狗模式识别模型,然后通过验证集验证模式识别模型的准确性。本文主要描述了项目建模的过程,并将在后续文章中给出模型设计、参数整定和模型结果分析。
[En]
The main purpose of the project is to establish the model of cat and dog pattern recognition, and then verify the accuracy of the pattern recognition model through the verification set. This article mainly describes the process of project modeling, and the model design, parameter tuning and model result analysis will be given in subsequent articles.
三、实现过程
(1)库导入
from tensorflow.keras.preprocessing.image import ImageDataGenerator, load_img, img_to_array, array_to_img
from tensorflow.keras.models import Sequential
from tensorflow.keras.layers import Conv2D, MaxPooling2D
from tensorflow.keras.layers import Activation, Dropout, Flatten, Dense
from tensorflow.keras import backend as K
from tensorflow.keras.callbacks import TensorBoard
from tensorflow.keras.applications import VGG16,InceptionV3,ResNet50,MobileNet
import numpy as np
import matplotlib.pyplot as plt
import glob, os, random
os模块作用
可以处理文件和目录,这是我们每天需要手动完成的。如果您希望程序独立于平台,此模块尤其重要。
[En]
Can handle files and directories, which we need to do manually on a daily basis. This module is especially important if you want your program to be platform-independent.
glob模块作用
它主要用于查找符合特定规则的目录和文件,并将搜索结果返回到列表。
[En]
It is mainly used to find directories and files that meet specific rules, and return the search results to a list.
(2)匹配图形
path = 'data'
os.path.join(path, '*/*/*.*')
使用 glob 模块批量匹配图像, * 代表匹配所有东西
img_list = glob.glob(os.path.join(path, '*/*/*.*'))
print('>>>图像数量:', len(img_list))
print(img_list[:5])

for i, img_path in enumerate(img_list[:6]):
    img_plot = load_img(img_path)  # 加载图像
    arr = img_to_array(img_plot)  # 将图像转换成数组
    print(arr.shape)  # 图像形状
    plt.subplot(2, 3, i + 1)
    plt.imshow(img_plot)
os.path.join(path,name):连接目录与文件名或目录。
glob.glob():返回符合匹配条件的所有文件的路径。
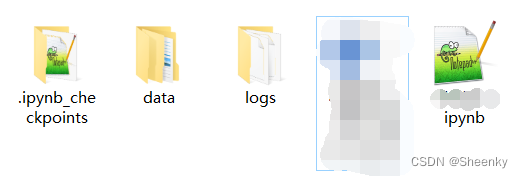
注:此处需要,ipynb文件和data文件同在一个目录下,如下图所示
(3)定义图像以及测试集与验证集路径确认
统一定义图像像素的宽度和高度<details><summary>*<font color='gray'>[En]</font>*</summary>*<font color='gray'>Uniformly define the width and height of image pixels</font>*</details>
img_width, img_height = 100, 100
定义训练集和验证集的图形路径(文件夹路径即可)<details><summary>*<font color='gray'>[En]</font>*</summary>*<font color='gray'>Define the graphic path of the training set and verification set (folder path is fine)</font>*</details>
train_data_dir = 'data/train/'
validation_data_dir = 'data/validation/'
注:这里可以统一定义图像像素的宽度和高度,无需查看后续分析文章即可调试数据。这里没有太多的解释。
[En]
Note: the width and height of image pixels can be defined uniformly here, and the data can be debugged without looking at the subsequent analysis articles. There is not too much explanation here.
(4)模型训练参数设置
模型训练的参数设置
nb_train_samples = 30
nb_validation_samples = 10
epochs = 20  # 迭代次数
batch_size = 32  # 每个批量观测数
注:模型训练参数的设置影响模型训练的结果,其中迭代次数与每个批量观测数影响着模型的结果,前两个参数是后面models.fit_generator()的参数,它一般是一个生成器函数,主要作用是利用生成器,分批次向模型送入数据的方式,可以有效节省单次内存的消耗。
(5)维度定义与图像生成器
图像输入维度设置
if K.image_data_format() == 'channels_first':
    input_shape = (3, img_width, img_height)
else:
    input_shape = (img_width, img_height, 3)

定义图像生成器
train_datagen = ImageDataGenerator(rescale=1. / 255,  # 重缩放因子
                                   shear_range=0.2,  # 剪切强度(以弧度逆时针方向剪切角度)
                                   zoom_range=0.2,  # 随机缩放范围
                                   horizontal_flip=True,  # 随机水平翻转
                                   rotation_range=360  # 360度范围内随机旋转
                                   )

使用图像生成器,从train_data_dir目录中读取图片,生成训练集(X_train图片数据, y_train图片所在的目录名称)
train_generator = train_datagen.flow_from_directory(train_data_dir,  # 训练数据的文件夹路径
                                                    target_size=(img_width, img_height),  # 统一像素大小
                                                    batch_size=batch_size,  # 每一批次的观测数
                                                    class_mode='categorical'  # 指定分类模式,指定二分类
                                                    )

test_datagen = ImageDataGenerator(rescale=1. / 255,
                                  shear_range=0.2,  # 剪切强度(以弧度逆时针方向剪切角度)
                                  zoom_range=0.2,  # 随机缩放范围
                                  horizontal_flip=True)  # 随机水平翻转

validation_generator = test_datagen.flow_from_directory(validation_data_dir,  # 验证集文件夹路径
                                                        target_size=(img_width, img_height),
                                                        batch_size=batch_size,
                                                        class_mode='categorical'  # 二分类
                                                        )
注:图像维度设置中k.image_data_format(),返回图像维度顺序(”channels_first”或”channels_last”),彩色图像的性质一般包括:width、height、channels。
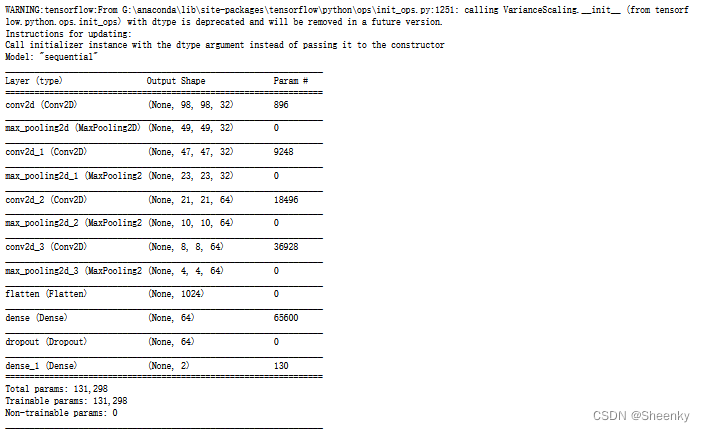
(6)卷积神经网络各层次设置
model = Sequential()

-----------------------------------------------------
输入层:第一层
添加第一个卷积层/最大池化层(必选)
model.add(Conv2D(filters=32,  # 32 个过滤器
                 kernel_size=(3, 3),  # 卷积核大小 3 x 3
                 input_shape=input_shape,  # 图像输入维度
                 activation='relu'))  # 'relu' 激活函数
model.add(MaxPooling2D(pool_size=(2, 2)))  # 池化核大小 2 x 2

----------------------------------------------------
隐藏层:在第一层和最后一层之间<details><summary>*<font color='gray'>[En]</font>*</summary>*<font color='gray'>Hidden layer: between the first and last layers</font>*</details>
添加第二个卷积层/最大池化层(可选)
model.add(Conv2D(filters=32, kernel_size=(3, 3), activation='relu'))
model.add(MaxPooling2D(pool_size=(2, 2)))

添加第三个卷积层/最大池化层(可选)
model.add(Conv2D(filters=64, kernel_size=(3, 3), activation='relu'))
model.add(MaxPooling2D(pool_size=(2, 2)))

添加第三个卷积层/最大池化层(可选)
model.add(Conv2D(filters=64, kernel_size=(3, 3), activation='relu'))
model.add(MaxPooling2D(pool_size=(2, 2)))

由于卷积层是 2D 空间,训练时需要将数据展平为 1D 空间
model.add(Flatten())  # 添加展平层(必选)
model.add(Dense(units=64, activation='relu'))  # 添加全连接层(必选) 64 个神经元
model.add(Dropout(0.5))  # 添加丢弃层,防止过拟合

---------------------------------------------------
输出层:在最后一层,神经元控制输出的维度,并指定分类激活函数。<details><summary>*<font color='gray'>[En]</font>*</summary>*<font color='gray'>Output layer: in the last layer, the neuron controls the dimension of the output and specifies the classification activation function.</font>*</details>
model.add(Dense(units=2, activation='sigmoid'))  # 指定分类激活函数

model.summary()

model.compile(loss='binary_crossentropy',  # 指定损失函数类型
              optimizer='rmsprop',  # 优化器
              metrics=['accuracy'])  # 评价指标
操作完成后,将显示以下流程图:
[En]
The following flow chart appears when the operation is completed:
(7)函数回调结果注入训练
tensorboard回调函数
logs = os.path.join("logs")
if not os.path.exists(logs):
os.mkdir(logs)
train_callbacks = [
TensorBoard(
log_dir=r'./logs',
histogram_freq=1,
)
]
tensorboard_dir = os.path.join(r'.\logs\plugins\profile')
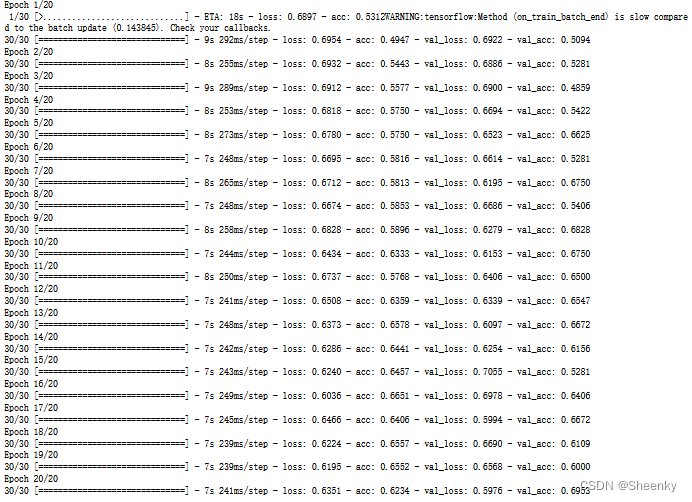
history = model.fit_generator(train_generator,
steps_per_epoch=nb_train_samples,
epochs=epochs,
validation_data=validation_generator,
validation_steps=nb_validation_samples,
callbacks=train_callbacks
)
models.fit_generator()的参数,它一般是一个生成器函数,主要作用是利用生成器,分批次向模型送入数据的方式,可以有效节省单次内存的消耗。
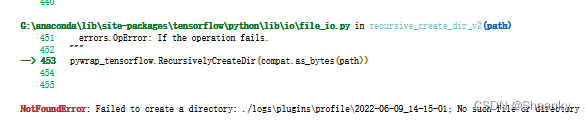
注:其中logs\plugins\profile这个文件内容需要自己手动建立,本实验代码没有写代码创建模块,当创建logs后需要自己在logs文件夹下创建plugins文件夹,在文件夹plugins下创建profile文件夹。否则会报以下错误:
运行后会出现如下过程图
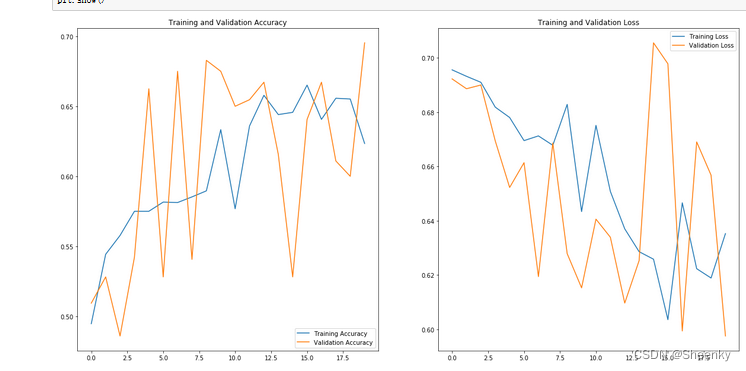
(8)训练结果可视化
#现在将训练后的结果可视化。
acc = history.history['acc']
val_acc = history.history['val_acc']

loss = history.history['loss']
val_loss = history.history['val_loss']

epochs_range = range(epochs)

plt.figure(figsize=(20, 10))
plt.subplot(1, 2, 1)
plt.plot(epochs_range, acc, label='Training Accuracy')
plt.plot(epochs_range, val_acc, label='Validation Accuracy')
plt.legend(loc='lower right')
plt.title('Training and Validation Accuracy')

plt.subplot(1, 2, 2)
plt.plot(epochs_range, loss, label='Training Loss')
plt.plot(epochs_range, val_loss, label='Validation Loss')
plt.legend(loc='upper right')
plt.title('Training and Validation Loss')
plt.show()
可视化训练后的结果图:
Original: https://blog.csdn.net/Sheenky/article/details/125199619
Author: Sheenky
Title: 猫狗图像识别(卷积神经网络算法,TensorFlow安装)
原创文章受到原创版权保护。转载请注明出处:https://www.johngo689.com/496624/
转载文章受原作者版权保护。转载请注明原作者出处!