

文章开始书写时间:2022-03/19-14:30
0x00:引子
最近云哥 @吃货本货 问小宋(笔者)如何在Apple的M1芯片进行深度学习开发,恰逢最近M1开发生态都趋于稳定,就把安装步骤梳理下分享出来。

0x01:分析
在开始正式安装之前,请梳理步骤以便于后续安装。
[En]
Before starting the formal installation, comb the steps to facilitate subsequent installation.
简单分析下:
目的是在M1平台开发深度学习,需要以下几个必备因素:
- 编辑器:VSCode,跨平台最佳编程工具,不接受反驳。你要反对,就算你对。(再透露一个小秘密:其实好多大厂也是用VSCode开发哦:)
- 开发语言:不二之选-Python,这里版本采用Python3.8,最新深度学习框架依赖。
- 深度学习框架:TensorFlow与PyTorch,这里安装两个最流行的框架,读者们按照自己需求安装就好。
配置环境实际上有点像玩游戏,需要不断升级。
[En]
Configuring the environment is actually a bit like playing games, which requires constant upgrades.
以下是需要逐一细分的因素:
[En]
Here are the factors that need to be broken down one by one:
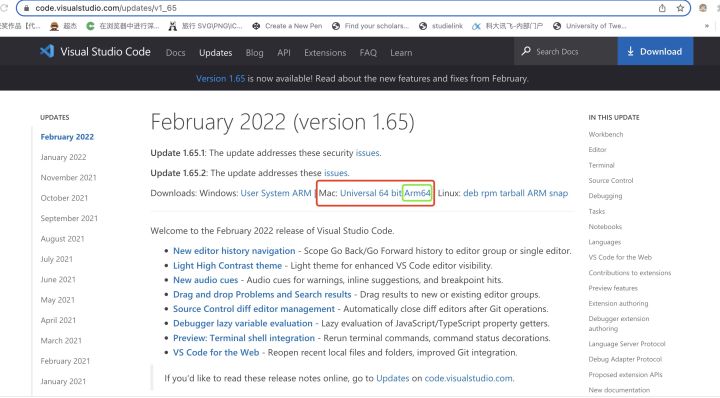
- VSCode:目前正式版本已支持M1,网址在这:Visual Studio Code February 2022
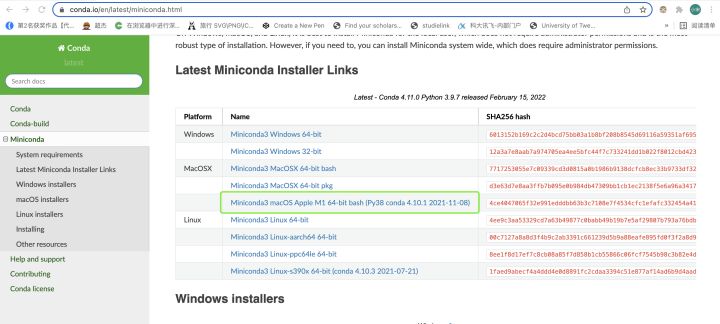
- Python3.8:笔者习惯用conda安装和管理Python,尤其爱用Miniconda(精简版Anaconda),需要用到什么包自己安装就好。目前Miniconda也支持M1芯片了,可以在这里下载:Miniconda — Conda documentation
- TensorFlow与PyTorch:好巧不巧的,这两个框架正式版也都支持了M1芯片。TensorFlow步骤:Tensorflow Plugin – Metal – Apple Developer,PyTorch步骤:Previous PyTorch Versions | PyTorch
0x02:实操
如果你是一个有经验的开发人员,你可以在这里结束,并根据上面的分析开始安装(如果出现问题,请参见下面的分析)。以下教程是为新手用户编写的。
[En]
If you are an experienced developer, you can end it here and start the installation according to the above analysis (if something goes wrong, see the one below). The following tutorials are written for novice users.
1、VSCode安装
首先打开网址:Visual Studio Code February 2022,如果打不开,那可能需要科学上网,如果还不会,那就放弃吧,真的做开发需要一点天赋和努力的,对了还有一点英语阅读技能。
打开以后,点击红色框内(Mac,救命,这里指的是苹果MacOS,可不是口红,手动狗头:)的绿色链接网址下载(表示Arm版MacOS的软件)。
解压完成后,双击打开,如果遇到需要确认的信息,点击确定。
[En]
After the completion of the decompression, double-click to open it, if you encounter the information that needs to be confirmed, click OK.

此时VSCode就完成了,是不是很简单,下面要开始一些有难度的了。还是一样的规劝,实在搞不定就放弃的,别在这个领域卷了,如果没有选择就好好努力吧。
2、Python安装
这里采用的Miniconda(精简版Anaconda)下载地址:Miniconda — Conda documentation
打开后,找到绿色位置,然后点击链接下载。
[En]
After opening it, find the green location and click the link to download.
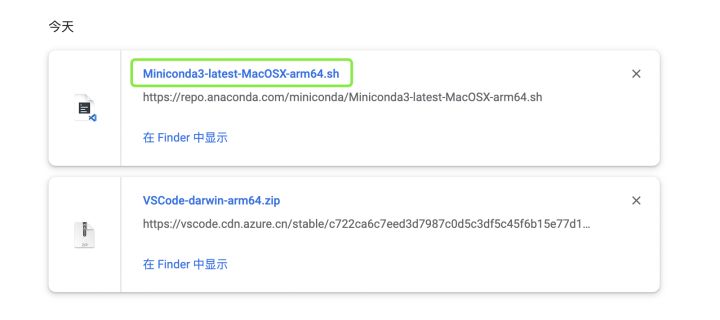
要注意下,这次下载的是.sh文件,不是安装包,不可直接点击傻瓜式安装。
需要借助”终端”工具执行安装
在启动台搜索”终端”,点击打开”终端”:
下面就开始执行Miniconda安装脚本,首先你要搞清楚刚刚下载的.sh文件保存到了那里,一般默认放在Downloads文件夹下(如果不是的话,需要找一下实际位置),执行以下脚本即可开始安装:
bash Downloads/Miniconda3-latest-MacOSX-arm64.sh
随后执行遇到需要确认的地方回车和输入”yes”确认,即可完成安装Miniconda。
完成,打开一个新的”终端”,在里面输入
conda -V
如果输出正常,那么Miniconda就安装成功了,如果显示”command not found”,那么你可能需要配置一下路径。

Python环境的安装就不如VSCode那么简单轻松了,不过恭喜你走到了这一步。
行百里者,半九十也。我们也迎来了最后一步安装TensorFlow与PyTorch,打完这两个boss,今天的游戏就通关啦。
3、TensorFlow与PyTorch安装
参考TensorFlow步骤:Tensorflow Plugin – Metal – Apple Developer,PyTorch步骤:Previous PyTorch Versions | PyTorch
首先我们先使用新建一个Python3.8环境,”终端”输入:
conda create -n py38 python=3.8
这句翻译为文字就是,使用conda新建(conda create)名为(-n)py38(py38)的环境,指定python版本为3.8(python=3.8)。对了执行的时候保持网络连接,因为需要下载东西到本地。
在新项目完成后,您可以进入此环境:
[En]
After the new project is completed, you can enter this environment:
conda activate py38
接下来,我们将正式安装深度学习环境。
[En]
Next, we will officially install the deep learning environment.
先安装TensorFlow,参考TensorFlow步骤:Tensorflow Plugin – Metal – Apple Developer:
依次执行:
conda install -c apple tensorflow-deps # Step 1: Environment setup Install the TensorFlow dependencies:
pip install tensorflow-macos # Step 2: Install base TensorFlow
pip install tensorflow-metal # Step 3: Install tensorflow-metal plugin
运行完,TensorFlow就安装完成了,下面测试一下TensorFlow:
song@192 ~ % conda activate py38
(py38) song@192 ~ % python
Python 3.8.11 (default, Aug 16 2021, 12:04:33)
[Clang 12.0.0 ] :: Anaconda, Inc. on darwin
Type "help", "copyright", "credits" or "license" for more information.

>>> import tensorflow as tf
>>> print("tf version",tf.__version__)
tf version 2.8.0
>>> print("tf gpu",tf.test.is_gpu_available())
WARNING:tensorflow:From :1: is_gpu_available (from tensorflow.python.framework.test_util) is deprecated and will be removed in a future version.

Instructions for updating:
Use tf.config.list_physical_devices('GPU') instead.

Metal device set to: Apple M1

systemMemory: 8.00 GB
maxCacheSize: 2.67 GB

2022-03-19 17:03:20.293520: I tensorflow/core/common_runtime/pluggable_device/pluggable_device_factory.cc:305] Could not identify NUMA node of platform GPU ID 0, defaulting to 0. Your kernel may not have been built with NUMA support.

2022-03-19 17:03:20.294430: I tensorflow/core/common_runtime/pluggable_device/pluggable_device_factory.cc:271] Created TensorFlow device (/device:GPU:0 with 0 MB memory) -> physical PluggableDevice (device: 0, name: METAL, pci bus id: )
tf gpu True
>>>
然后安装PyTorch,参照:Previous PyTorch Versions | PyTorch,在”终端”执行
pip install torch==1.9.0 torchvision==0.10.0 torchaudio==0.9.0
安装完成后,执行相同的测试:
[En]
After the installation is complete, do the same test:
(py38) song@192 ~ % python
Python 3.8.11 (default, Aug 16 2021, 12:04:33)
[Clang 12.0.0 ] :: Anaconda, Inc. on darwin
Type "help", "copyright", "credits" or "license" for more information.

>>> import torch
>>> print("torch version",torch.__version__)
torch version 1.9.0
>>> torch.ones(1)+torch.ones(1)
tensor([2.])
>>>
最后安装一些DL常用的库:
pip install pandas matplotlib glob2 tqdm opencv-python scipy scikit-learn
完成上述步骤,我们就完成了使用M1芯片的MacOS电脑环境的配置,本次游戏通关欢迎下次再见,拜拜。
如果对你有帮助,请不要吝啬你的点赞和鼓励。我会越来越努力地去。
[En]
If it helps you, please don’t be stingy with your likes and encouragement. I will try harder and harder to .
0x03:参考
Original: https://blog.csdn.net/xiaosongshine/article/details/123614352
Author: 小宋是呢
Title: 『开发技巧』MacbookM1芯片深度学习环境配置最全教程:简明安装开发TensorFlow与PyTorch
原创文章受到原创版权保护。转载请注明出处:https://www.johngo689.com/496344/
转载文章受原作者版权保护。转载请注明原作者出处!