

这几天想用深度学习做一下点云的分割试验,网上搜了一下相关标题的blog有很多,但大部分只是简单的介绍文章内容,说明具体操作流程的干货并不多。在缺乏相关资料和帮助的情况下,本人大致搞清楚了pointnet进行sem_seg的流程。可能步骤存在问题甚至是错的,因为也没有人交流,但从试验结果看来还行。欢迎大家批评指正。点云的标注用cloudcompare(下面简称cc)就可以,后面obj文件的可视化由于cc对其支持不太好,改用meshlab。
欢迎阅读我的其他文章:
windows下运行pointnet(全)
pointnet C++推理部署(一)
pointnet C++推理部署(二)
训练
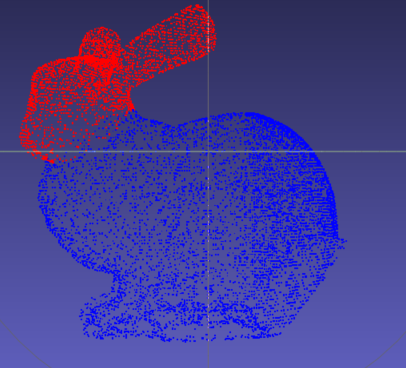
首先准备自己的数据集。txt格式的点云文件就行,我随便找了个斯坦福兔子点云文件,里面是xyz三维点的坐标。把兔子用cc软件分割成头(head)和身子(body),并分别保存成两个txt文件。
因为我比较懒所以只标注了这一个兔子,将其随机平移和旋转变换得到100个兔子的头和身子的txt,将其分别保存在编号为i(i=0,1,2,…,99)的文件夹下分别命名为head_i.txt和body_i.txt(i=0,1,2,…,99)。
修改sem_seg\meta\class_name.txt内容为head和body。
修改sem_seg\meta\anno_path.txt内容为训练标注的路径。
修改indoor3d_util.py中的g_class2color如下
g_class2color = {'head':    [255,0,0],
                 'body':    [0,0,255]}
修改collect_point_label函数里面的内容,给点云数据增加rgb信息:
   for f in glob.glob(os.path.join(anno_path, '*.txt')):
       print(f)
       cls = os.path.basename(f).split('_')[0]

       if cls not in g_classes:
            cls = 'clutter'
       points = np.loadtxt(f)
       labels = np.ones((points.shape[0], 1)) * g_class2label[cls]
       color = np.zeros((points.shape[0], 3))
       color[:, 0:3] = 255
       points_list.append(np.concatenate([points, color, labels], 1))
然后可以运行collect_indoor3d_data.py生成npy文件。再通过运行gen_indoor3d_h5.py生成h5文件,注意要修改sem_seg\meta\all_data_label.txt内容为上面生成的npy文件的路径。
得到h5文件后就可以进行训练了。train.py文件有几个地方要修改:NUM_CLASSES、train_idxs、test_idxs;还需要修改model.py文件中网络最后一个卷积层的通道数为要分类的数目。另外,输入参数num_point、max_epoch、batch_size可以根据自己情况修改。我的数据量较少,几分钟就能训练完毕。
预测
运行batch_inference.py程序即可。同理,需要修改NUM_CLASSES,以及修改sem_seg\meta\data_label.txt中的待预测模型的路径。运行需要提供的参数可以参考我的上一篇文章:windows下运行pointnet(全)。
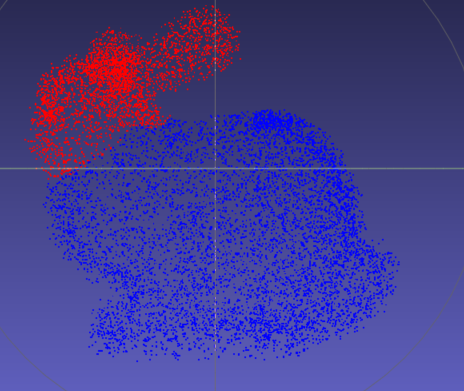
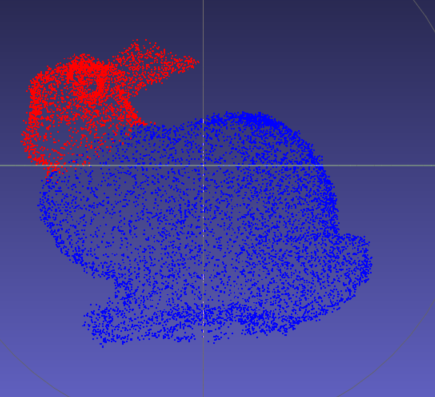
随便做了一些npy文件用于测试,制作过程和训练部分相似。用于预测的数据集包括随机平移旋转的模型,添加噪声的模型,裁剪的模型以及混合前三种的模型。红色为预测出的兔子头部,蓝色为预测出的兔子身体,黑色为未识别出的部分。因为我自始至终只是用了一个原始模型进行不同变换进行的测试,所以正确率都在99%以上。
随机平移和旋转的模型预测结果:
[En]
The model prediction results of random translation and rotation:


添加噪声的模型的预测结果:
[En]
The prediction result of the model adding noise:
整个工程文件打包:链接: https://pan.baidu.com/s/1yZG_OigNQqbeC852N6SMXw?pwd=zjn1 提取码: zjn1 复制这段内容后打开百度网盘手机App,操作更方便哦
–来自百度网盘超级会员v4的分享
本文参考的文章如下:
PointNet学习+训练自己的模型并实际使用测试成功
附预处理程序(Python实现和C++实现):
随机位姿变换
import numpy as np
import random

old_file=r"rabbit.txt"
new_file=r"rabbit_change.txt"

x_offset=random.uniform(-10, 10)
y_offset=random.uniform(-10, 10)
z_offset=random.uniform(-10, 10)

scale=1.0

roate_x=random.uniform(-np.pi/10, np.pi/10)
roate_y=random.uniform(-np.pi/10, np.pi/10)
roate_z=random.uniform(-np.pi/10, np.pi/10)

roate_x_matrix=np.array([
                    [1,0,0,0],
                    [0,np.cos(roate_x),-np.sin(roate_x),0],
                    [0,np.sin(roate_x),np.cos(roate_x),0],
                    [0,0,0,1]
                    ])
roate_y_matrix=np.array([
                    [np.cos(roate_y),0,np.sin(roate_y),0],
                    [0,1,0,0],
                    [-np.sin(roate_y),0,np.cos(roate_y),0],
                    [0,0,0,1]
                    ])
roate_z_matrix=np.array([
                    [np.cos(roate_z),-np.sin(roate_z),0,0],
                    [np.sin(roate_z),np.cos(roate_z),0,0],
                    [0,0,1,0],
                    [0,0,0,1]
                    ])

transformation_matrix=np.array([
                            [scale,0,0,x_offset],
                            [0,scale,0,y_offset],
                            [0,0,scale,z_offset],
                            [0,0,0,1]
                            ]).dot(roate_z_matrix).dot(roate_y_matrix).dot(roate_x_matrix)

old_array=np.loadtxt(old_file)
old_xyz=old_array[:,:3]

ones_data=np.ones(old_xyz.shape[0])
old_xyz=np.insert(old_xyz,3,values=ones_data,axis=1)

new_xyz = np.dot(transformation_matrix,old_xyz.T)
new_array=np.concatenate((new_xyz.T[:,:3],old_array[:,3:]),axis=1)
np.savetxt(new_file,new_array,fmt='%.06f')
Eigen::Matrix4f random_transformation()
{

    float yaw = rand() * 2 /10.0 * M_PI / RAND_MAX - M_PI / 10.0;
    float pitching = rand() * M_PI / 10.0 / RAND_MAX - M_PI / 20.0;
    float droll = rand() * 2 * M_PI / 10.0 / RAND_MAX - M_PI / 10.0;

    Eigen::Vector3f ea0(yaw, pitching, droll);
    Eigen::Matrix3f R;
    R = Eigen::AngleAxisf(ea0[0], Eigen::Vector3f::UnitZ())*
        Eigen::AngleAxisf(ea0[1], Eigen::Vector3f::UnitY()) *
        Eigen::AngleAxisf(ea0[2], Eigen::Vector3f::UnitX());

    float x = rand() * 20.0 / RAND_MAX - 10.0;
    float y = rand() * 20.0 / RAND_MAX - 10.0;
    float z = rand() * 20.0 / RAND_MAX - 10.0;

    Eigen::Vector3f T(x, y, z);
    Eigen::Matrix4f H;
    H << R, T, 0, 0, 0, 1;
    return H;
}
添加高斯噪声
import numpy as np

old_file=r"rabbit.txt"
new_file=r"rabbit_change.txt"

def add_noise(point, sigma=0.1, clip=0.1):
    point = point.reshape(-1,3)
    Row, Col = point.shape
    noisy_point = np.clip(sigma * np.random.randn(Row, Col), -1*clip, clip)
    noisy_point += point
    return noisy_point

old_array=np.loadtxt(old_file)
old_xyz=old_array[:,:3]

new_xyz=add_noise(old_xyz)
new_array=np.concatenate((new_xyz,old_array[:,3:]),axis=1)
np.savetxt(new_file,new_array,fmt='%.06f')
#include
#include
#include
#include
#include

int main(int argc, char** argv)
{
    boost::mt19937 rng;
    rng.seed(static_cast<unsigned int>(time(0)));
    boost::normal_distribution<> nd(0, 0.01);
    boost::variate_generator<boost::mt19937&, boost::normal_distribution<>> var_nor(rng, nd);

    std::ifstream infile;
    std::fstream outfile;
    pcl::PointCloud<pcl::PointXYZ>::Ptr cloud(new pcl::PointCloud<pcl::PointXYZ>);
    pcl::PointCloud<pcl::PointXYZ>::Ptr cloudfiltered(new pcl::PointCloud<pcl::PointXYZ>());
    float x, y, z;

    infile.open("17/head_17.txt");
    outfile.open("19/head_19.txt", 'w');
    while (infile >> x >> y >> z)
    {
        x += static_cast<float> (var_nor());
        y += static_cast<float> (var_nor());
        z += static_cast<float> (var_nor());
        outfile << x << " " << y << " " << z << std::endl;
    }
    infile.close();
    outfile.close();

    infile.open("17/body_17.txt");
    outfile.open("19/body_19.txt", 'w');
    while (infile >> x >> y >> z)
    {
        x += static_cast<float> (var_nor());
        y += static_cast<float> (var_nor());
        z += static_cast<float> (var_nor());
        outfile << x << " " << y << " " << z << std::endl;
    }
    infile.close();
    outfile.close();

    return EXIT_SUCCESS;
}
常见报错更新
- File “h5py_objects.pyx”, line 54, in h5py._objects.with_phil.wrapper
File “h5py_objects.pyx”, line 55, in h5py._objects.with_phil.wrapper
File “h5py\h5f.pyx”, line 106, in h5py.h5f.open
FileNotFoundError: [Errno 2] Unable to open file (unable to open file: name = ‘E:\ruanjianchengxuwenjian\py\pointnet-rabbit\sem_seg/data\ply_data_all_0.h5’, errno = 2, error message = ‘No such file or directory’, flags = 0, o_flags = 0)
报错原因:h5py包的版本过高
解决方法:降低h5py包的版本,例如pip install h5py==2.10 - Exception has occurred: ValueError
need at least one array to concatenate
位于gen_indoor3d_h5.py的return np.concatenate(block_data_list, 0), np.concatenate(block_label_list, 0)
错误原因:网格分割比例太小,导致网格中的中点数为0。[En]
Error reason: the grid division scale is too small, so that the number of midpoints in a grid is 0.
解决方法:将
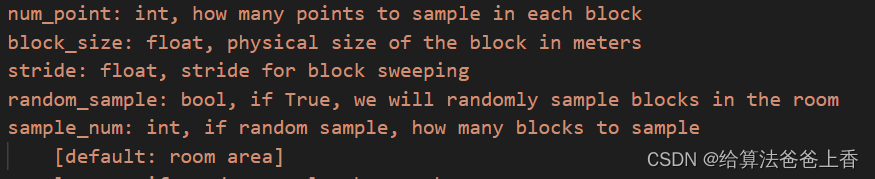
data, label = indoor3d_util.room2blocks_wrapper_normalized(data_label_filename, NUM_POINT, block_size=1, stride=0.5, random_sample=False, sample_num=None)中的block_size和stride根据自己数据尺度进行调整,参数的含义见下图(从indoor3d_util.py中摘选)。
Original: https://blog.csdn.net/taifyang/article/details/115441212
Author: 给算法爸爸上香
Title: pointnet语义分割_训练并预测自己的数据
原创文章受到原创版权保护。转载请注明出处:https://www.johngo689.com/496198/
转载文章受原作者版权保护。转载请注明原作者出处!